

Businesses often find themselves managing multiple Salesforce orgs to cater to diverse needs or establish partnerships with other Salesforce-utilizing enterprises. The necessity arises to seamlessly collaborate and share records across these various orgs. This is where a Salesforce-to-Salesforce connection becomes invaluable, allowing organizations to establish a direct link between two orgs and facilitate the sharing of records.
While not every Salesforce customer may require a Salesforce-to-Salesforce connection, it proves crucial for those managing several Salesforce orgs under one company seeking to exchange records with collaborative business partners.
In this blog post, we’ll guide you through the process of integrating one Salesforce org with another using REST API.
Essentials To Integrate One Salesforce Org to Another Salesforce Org:
REST API (Representational State Transfer Application Programming Interface) is an internet standard for building web services. It allows different software systems to communicate and exchange data using HTTP requests like GET, POST, PUT, and DELETE. Data is often in formats like JSON or XML.
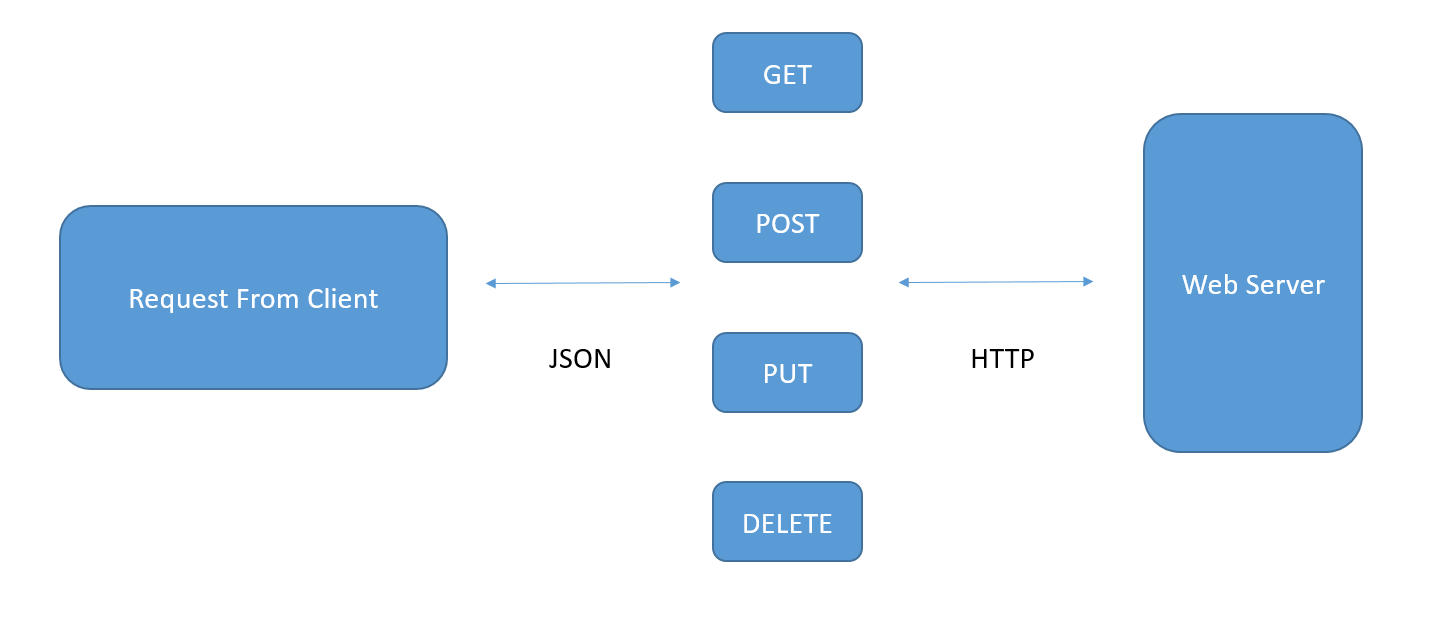
To embark on this journey, ensure you have the following prerequisites in place:
- Target Org(Salesforce Org)
- Source Org(Salesforce Org)
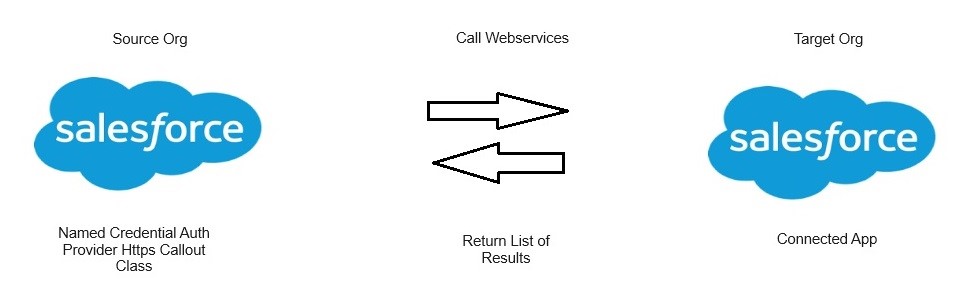
Steps to integrate Salesforce org to another Salesforce Org
Org A (Source Org)
Step 1: Create AuthProvider in source Org
Step 2: Create named Credential in source Org
Step 3: Create Remote Site Setting in source Org
Step 4: Write apex in source Org to fetch data from destination Org.
Org B (Target Org)
Step 1: Create a connected App in Target org
Step 2: Create Web Services for Target Org
>>>>>>>>>>>>>>>>>>>>>>>>>>>>>>>>>>>>>>>>>>>>>>>>>>>>>>>>>>>>>>>>>>>>>>>>>>>>>>>>
> Org A (Source Org)
Login to Org A:
Step 1: Create AuthProvider in source Org
- Go to Source Org.
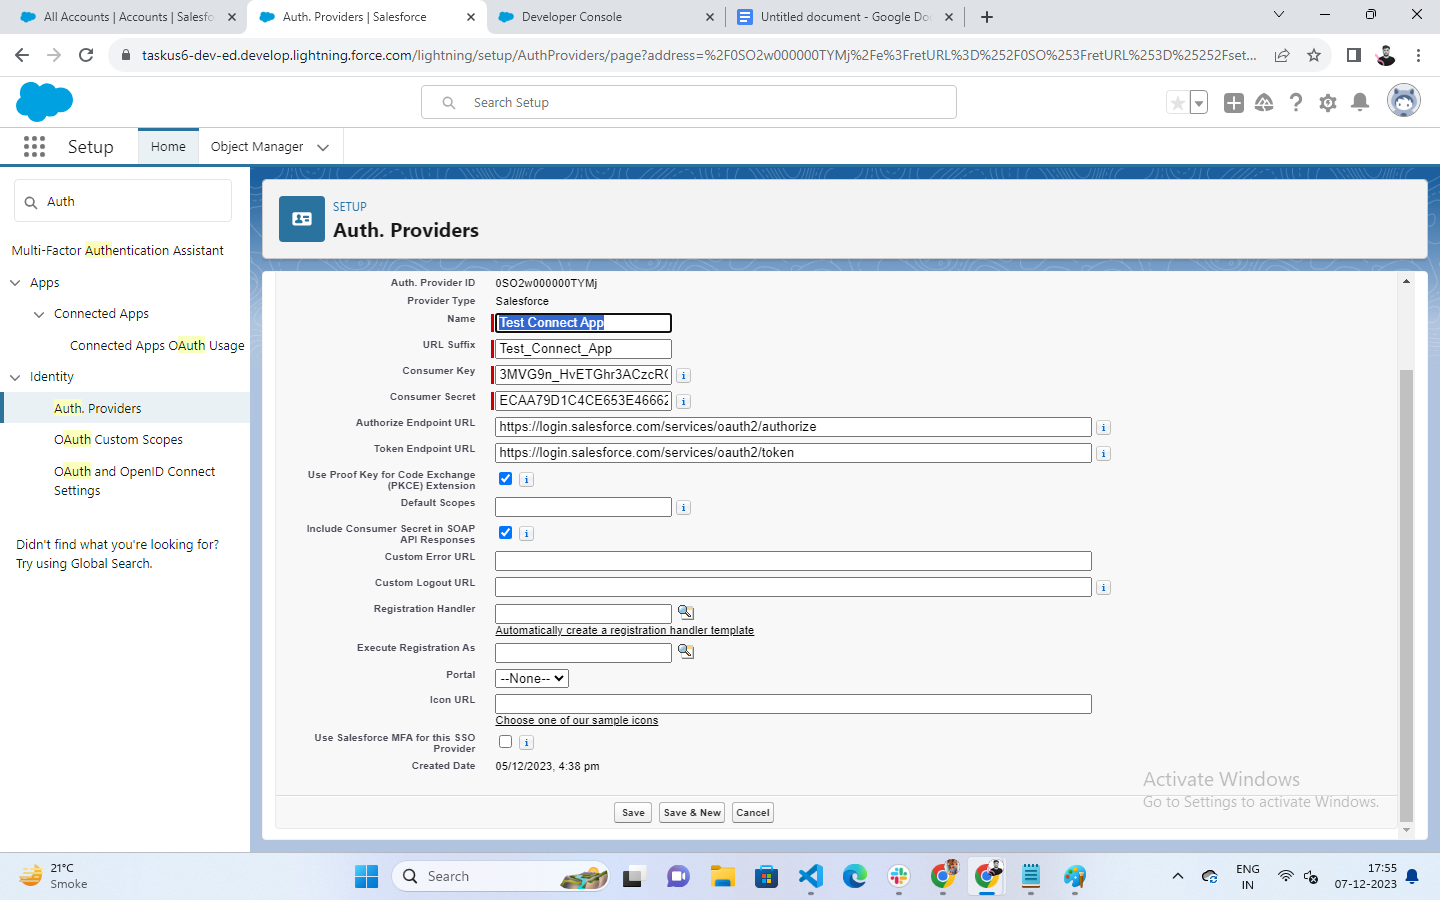
- Navigate to “Setup | Administer | Security Controls | Auth. Providers | Create New”.
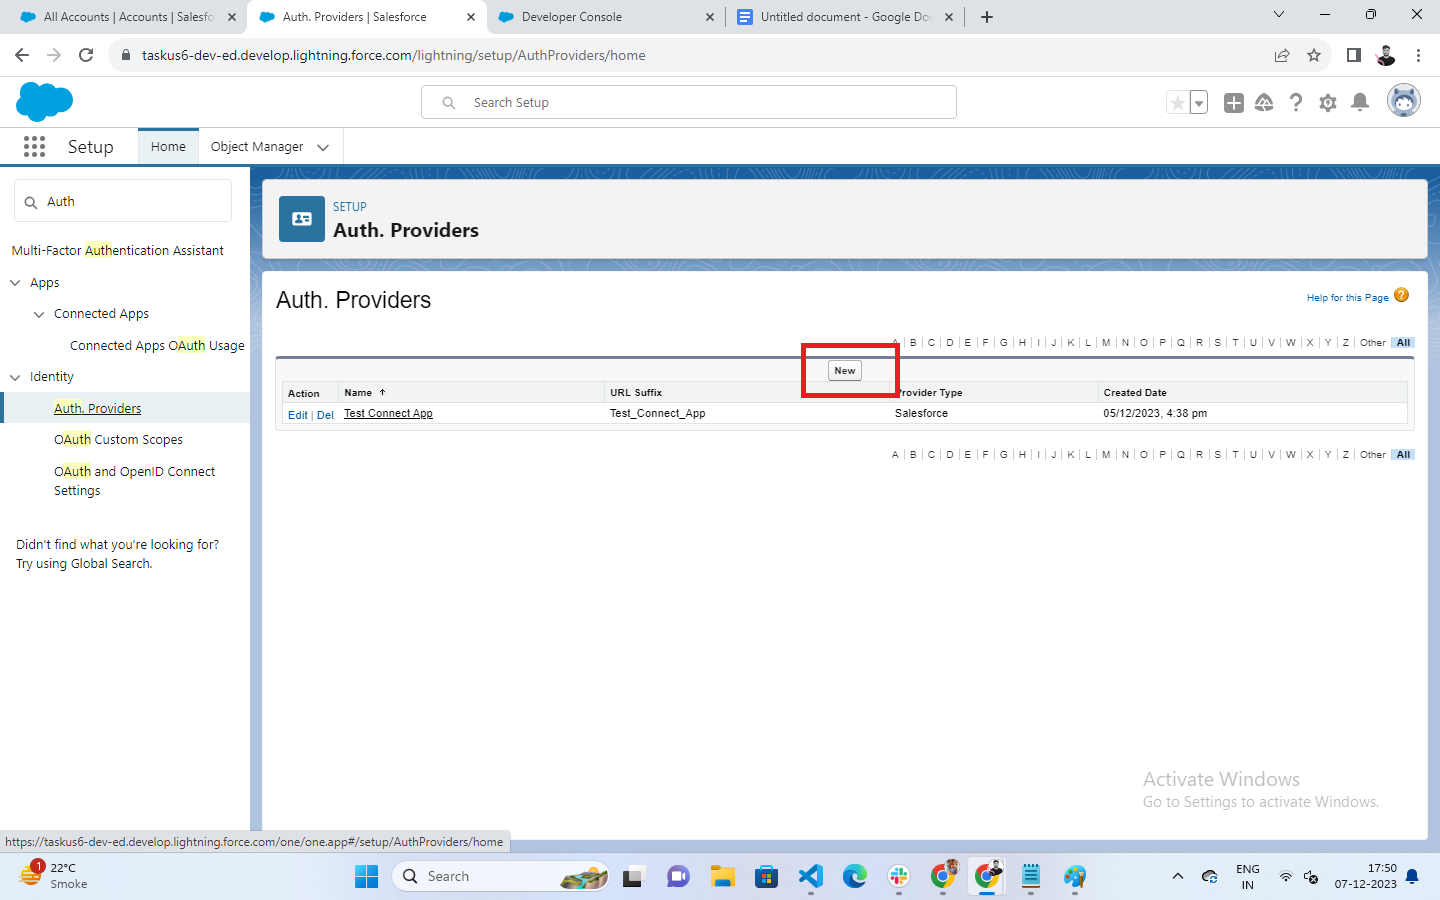
- Select “Salesforce” as Provider Type
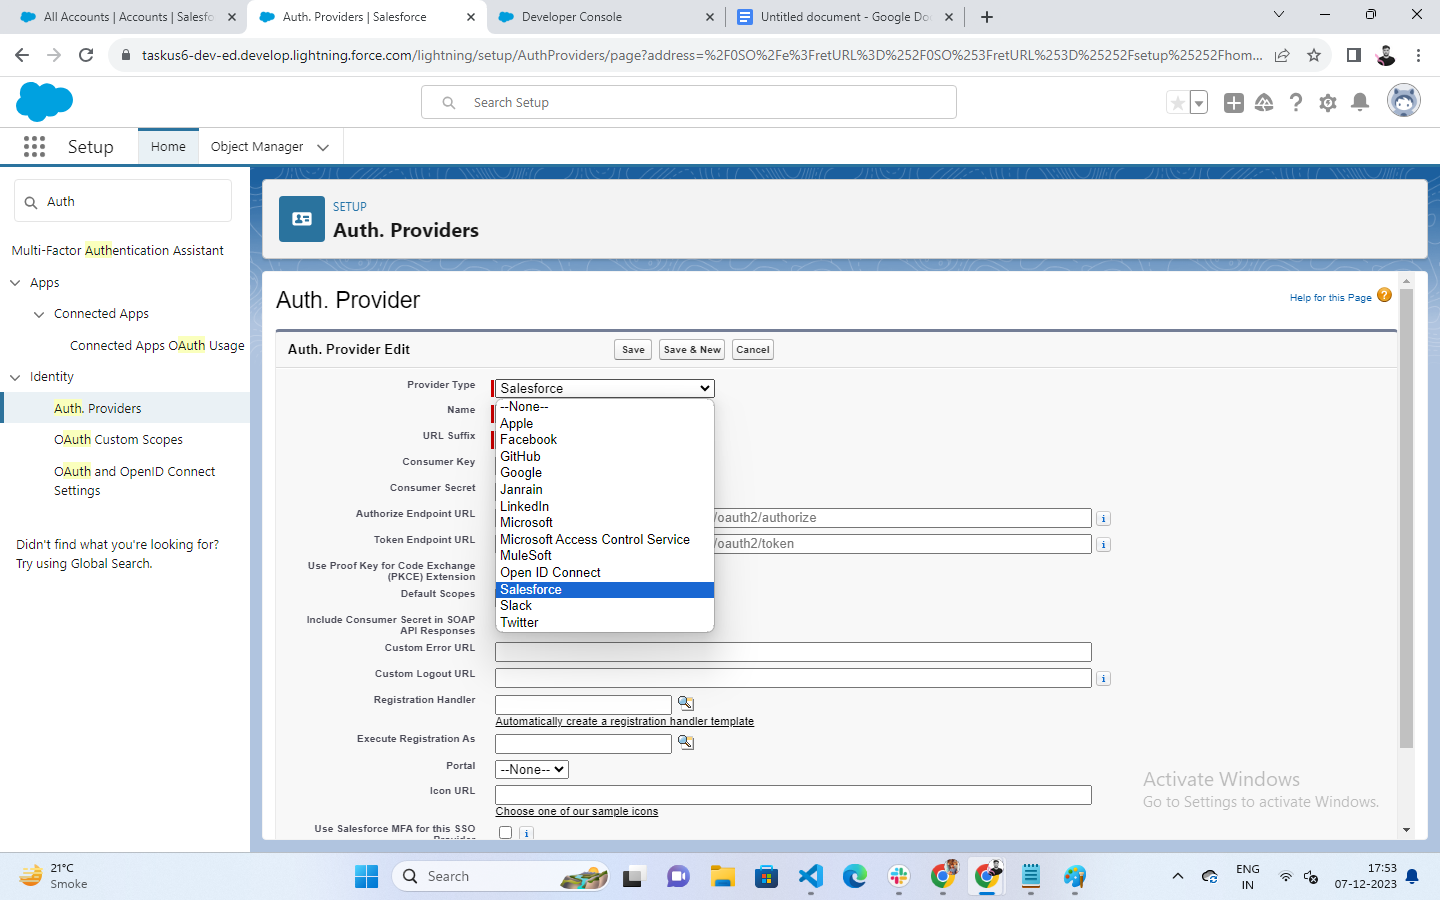
- Provide “Consumer Key” and “Consumer Secret” from the previous step
- In “Default Scope” enter the value as “api” and “refresh_token, offline_access” should be separated by space
- Finally, Save
Once you save, you will have a new Callback URL generated at the bottom of the page in the ‘Salesforce Configuration’ section. Copy this Callback URL and update your Callback URL value in the Connected App you created in the above step.
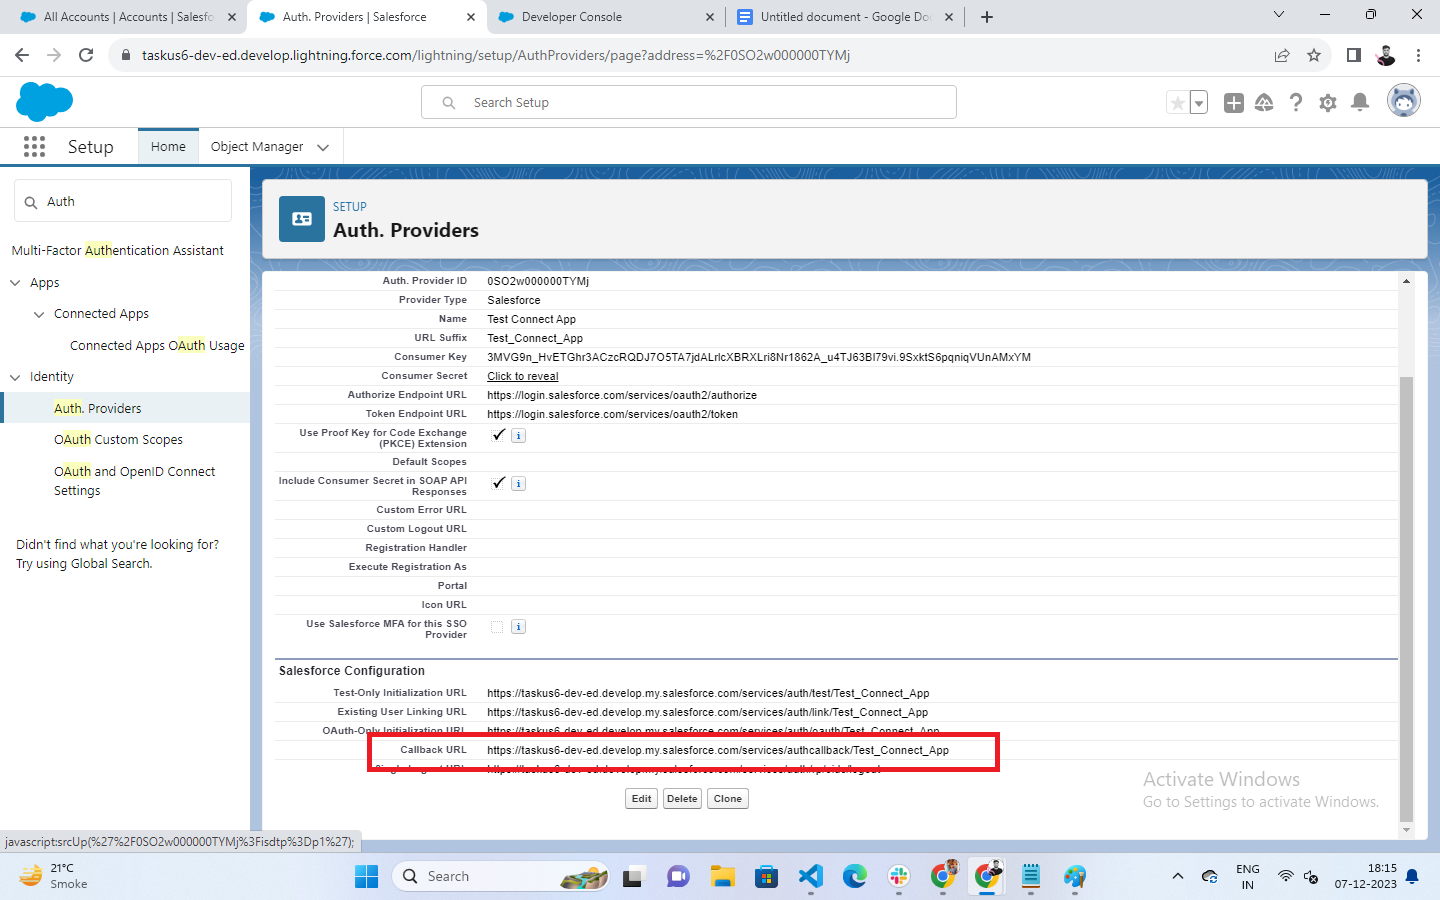
Once you save, you will have a new Callback URL generated at the bottom of the page in the ‘Salesforce Configuration’ section. Copy this Callback URL and update your Callback URL value in the Connected App you created in the above step.
Step 2: Create named Credential in source Org
- Navigate to “Setup | Administer | Security Controls | Named Credentials | New Named Credential “.
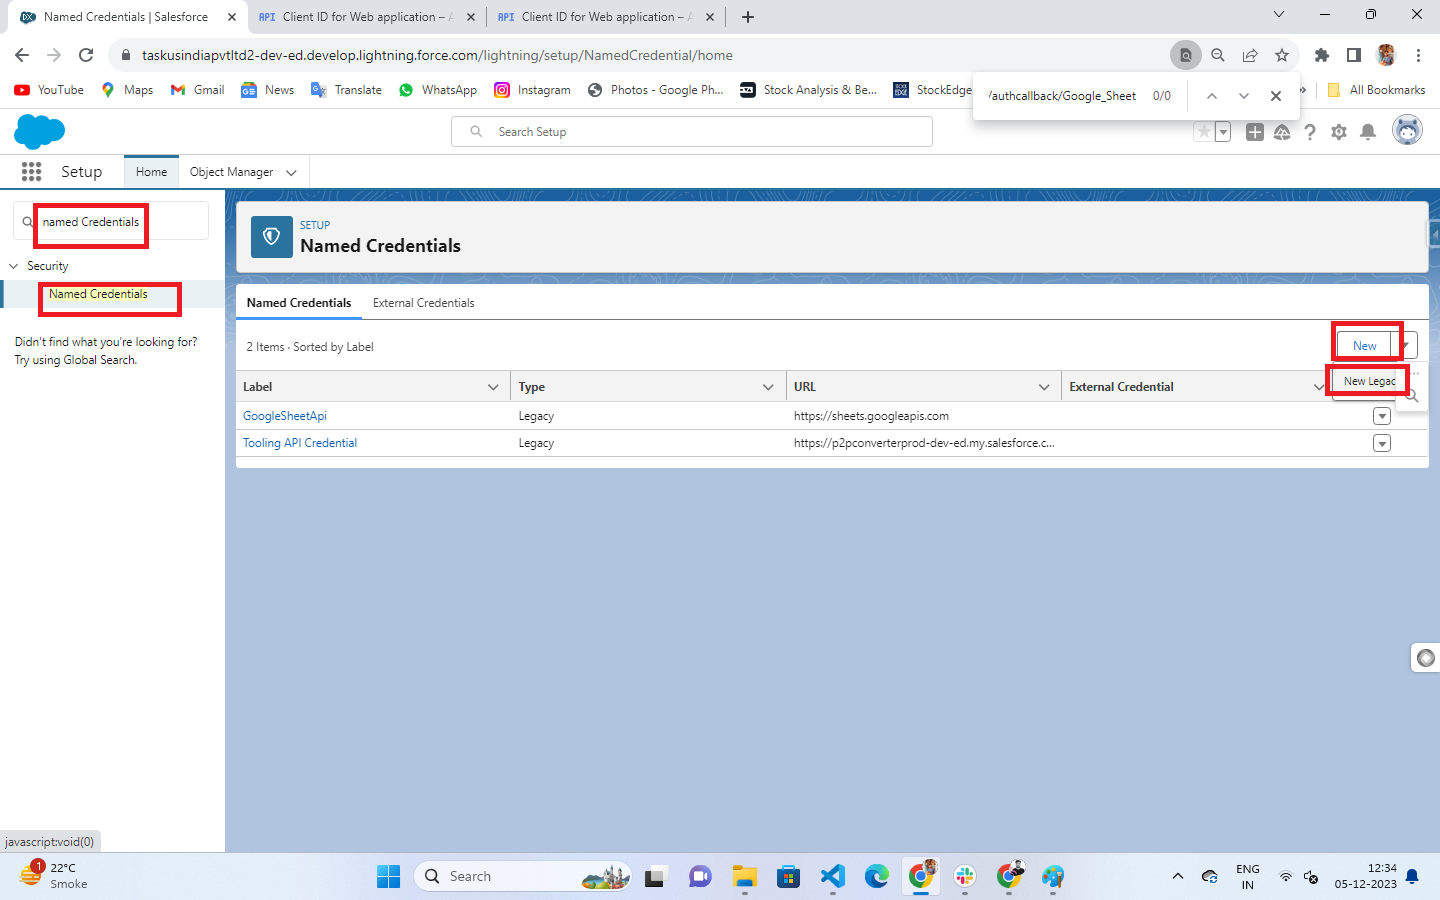
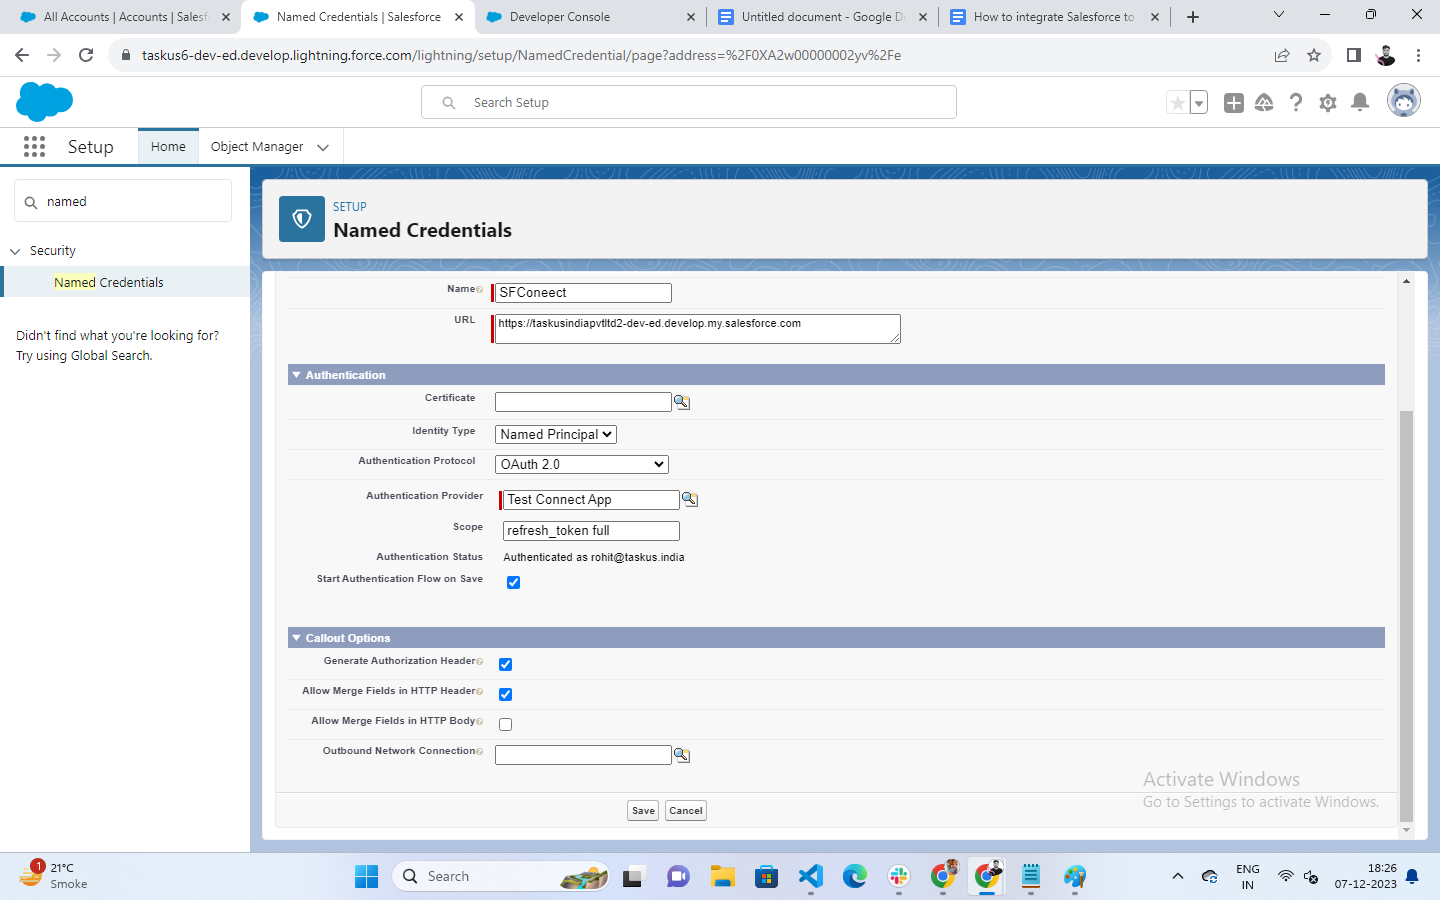
- Provide the name (label)
- In URL, provide URL of Salesforce instance where we want to Connect
- Select “Named Principal” as Identity Type
- In our example select “Authentication Protocol” as OAuth 2.0
- Select the “Auth Provider” created in the previous step
- In scope, enter the value as “api refresh_token”
- Check “Start Authentication Flow on Save” (this is important)
- Save
- As you click on the save button it will redirect you to verify your Salesforce account.
Step 3: Create Remote Site Setting in source Org
- Navigate to “Setup || Security |Remote Site Setting “.
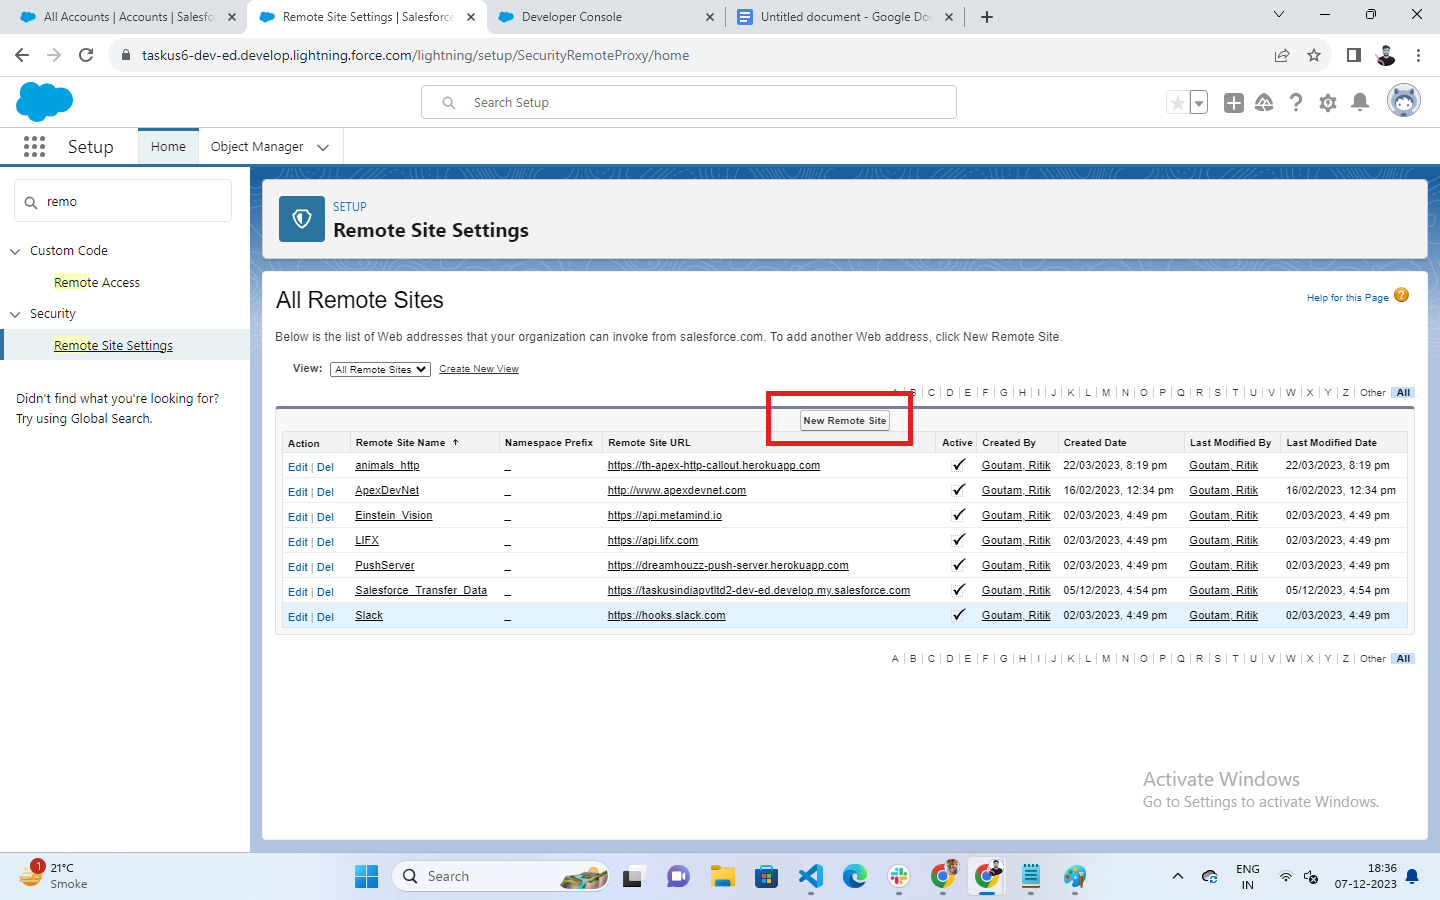
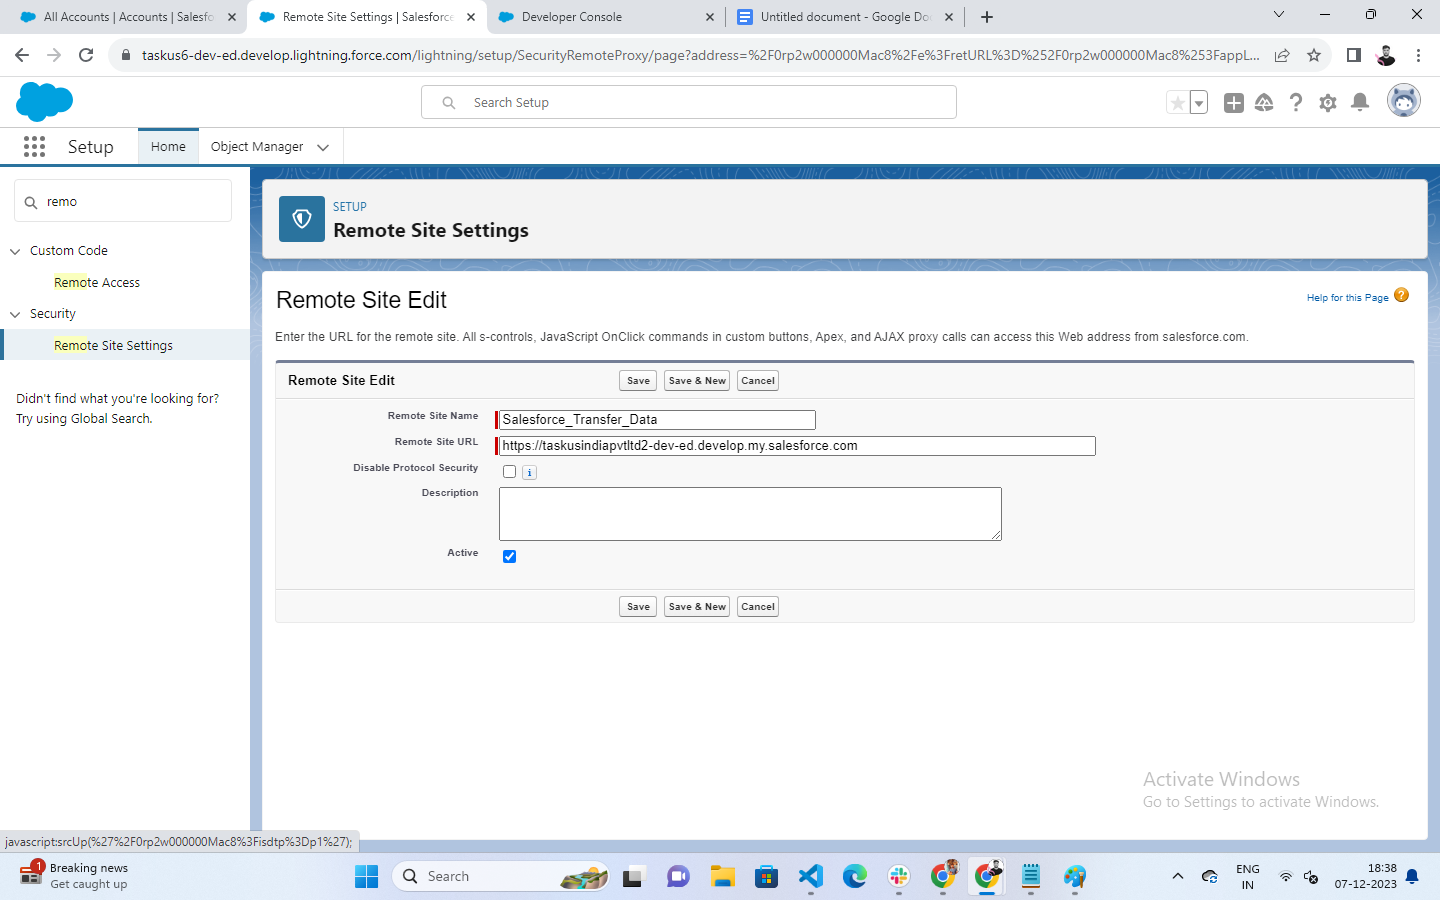
- Make you remote site active and in the url mention your target org Url and make it active.
Step 4: Create Apex HTTP callouts
The common HTTP callouts are Get, Post, Put, Delete.
Here we have created callouts following callouts using endpoint –
Apex class – SalesforcedataSend.cls
public with sharing class SalesforcedataSend {
- HTTP callout for Get Method
- HTTP callout for Post Method
- HTTP callout for Delete Method
- HTTP callout for Put Method
>>>>>>>>>>>>>>>>>>>>>>>>>>>>>>>>>>>>>>>>>>>>>>>>>>>>>>>>>>>>>>>>>>>>>>>>>>>>>>
Org B (Target Org)
Login to Org B:
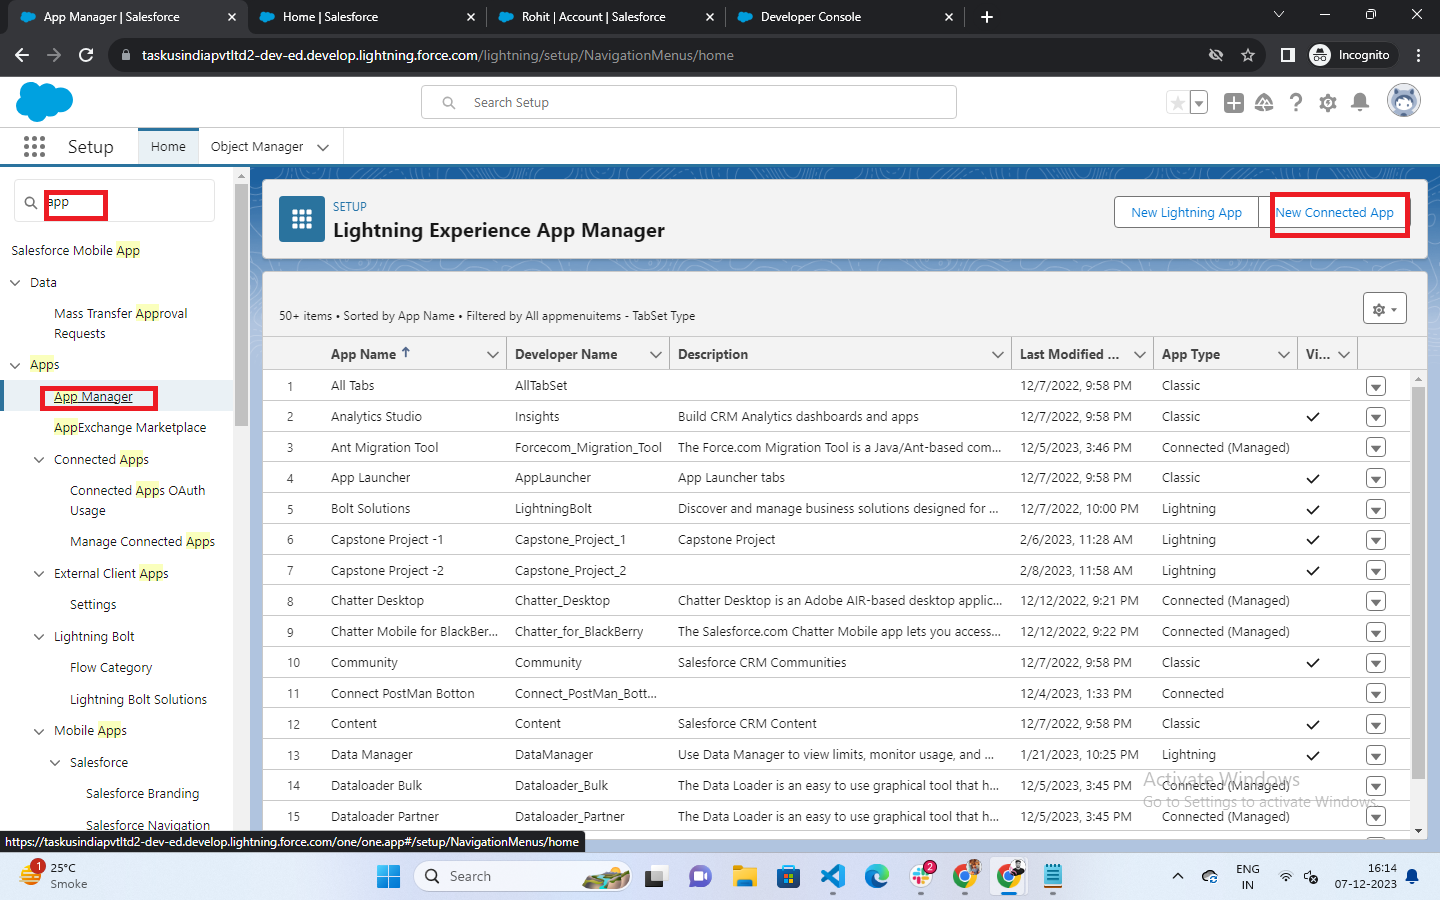
Navigate to App Manager:
Click on the “App Launcher” (grid icon in the upper-left corner).
In the search bar, type “App Manager” and select it from the dropdown.
Create a New Connected App:
In the App Manager, click the “New Connected App” button.
Fill in the Basic Information:
- Connected App Name: Enter a name for your connected app.
- API Name: The API name will be automatically generated based on the connected app name.
- Contact Email: Provide an email address for the contact person.
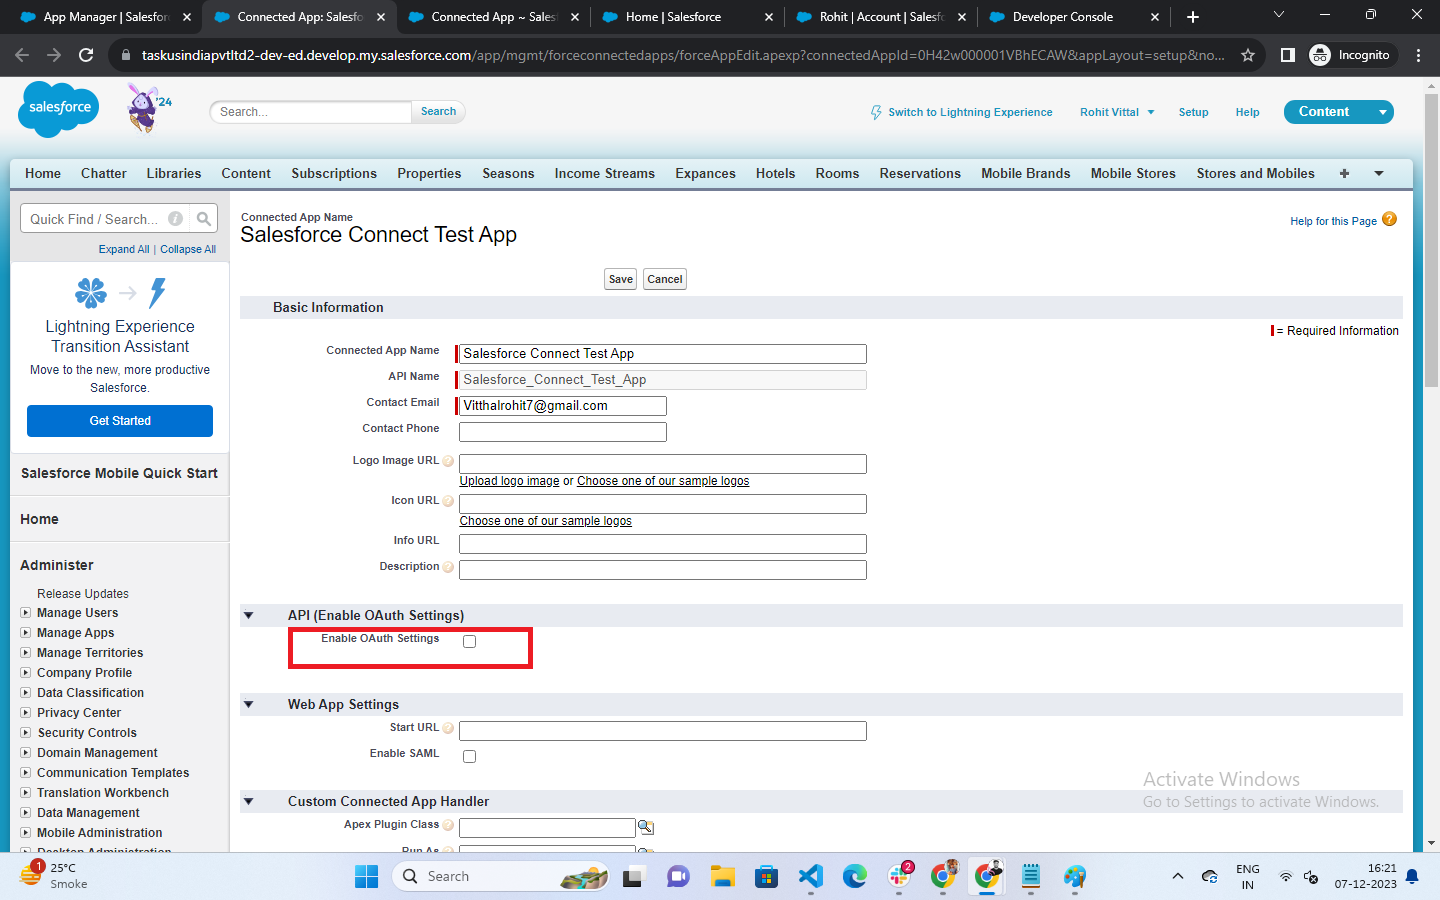
Enable OAuth Settings:
- Enable OAuth Settings: Check this box to enable OAuth.
- Callback URL: Enter a callback URL. It can be a placeholder for now.
- Selected OAuth Scopes: Choose the necessary OAuth scopes based on your requirements (e.g., full access, perform requests on your behalf).
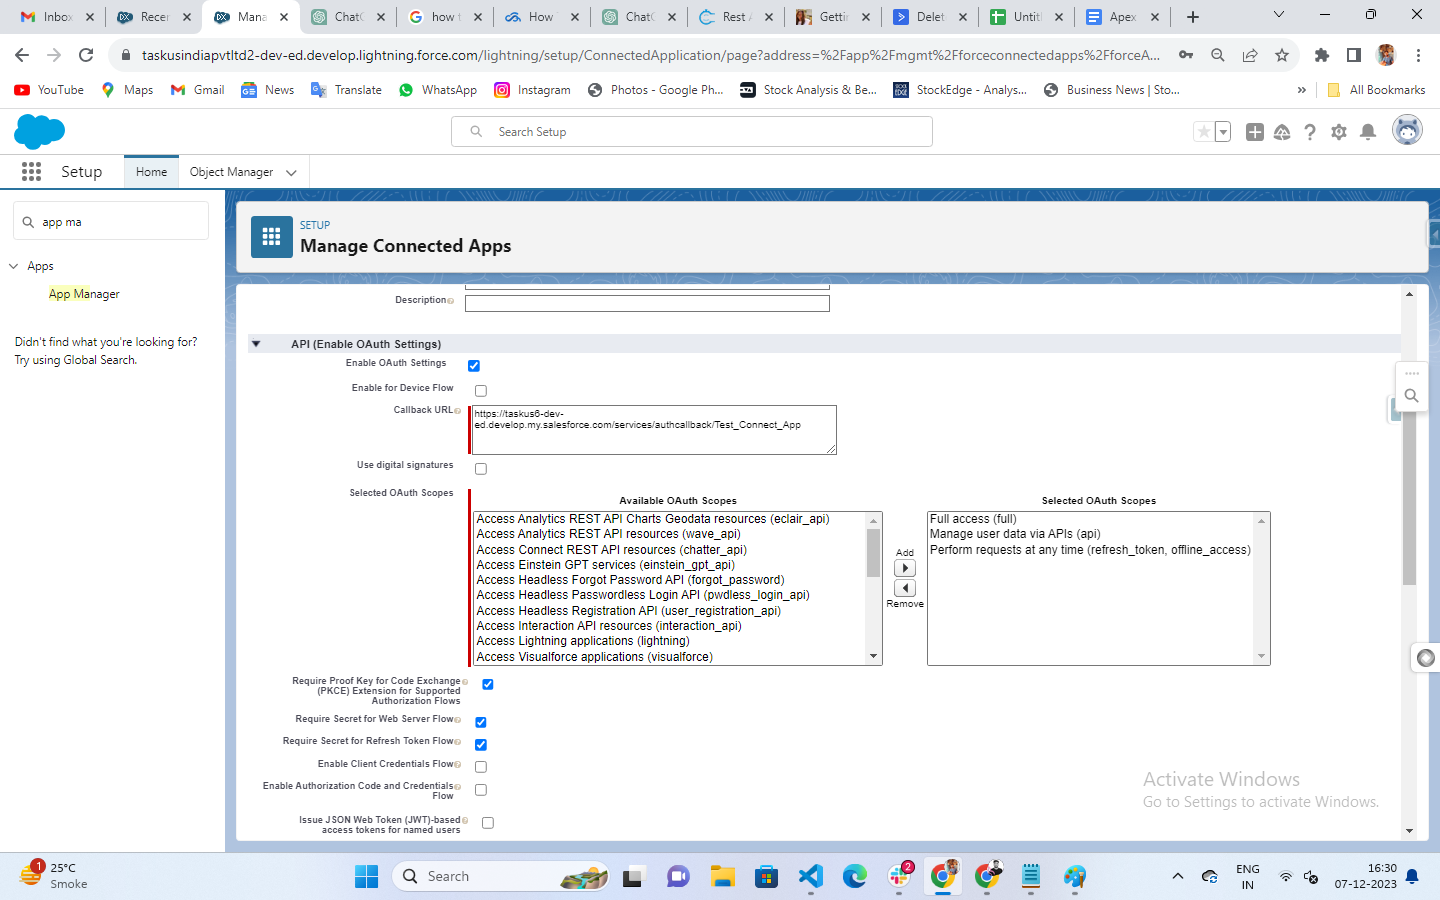
Once OAuth Scope is selected check the checkbox for the following permission and Click the “Save” button to save the connected app. Once you are back on the page click on Manage Consumer Users.
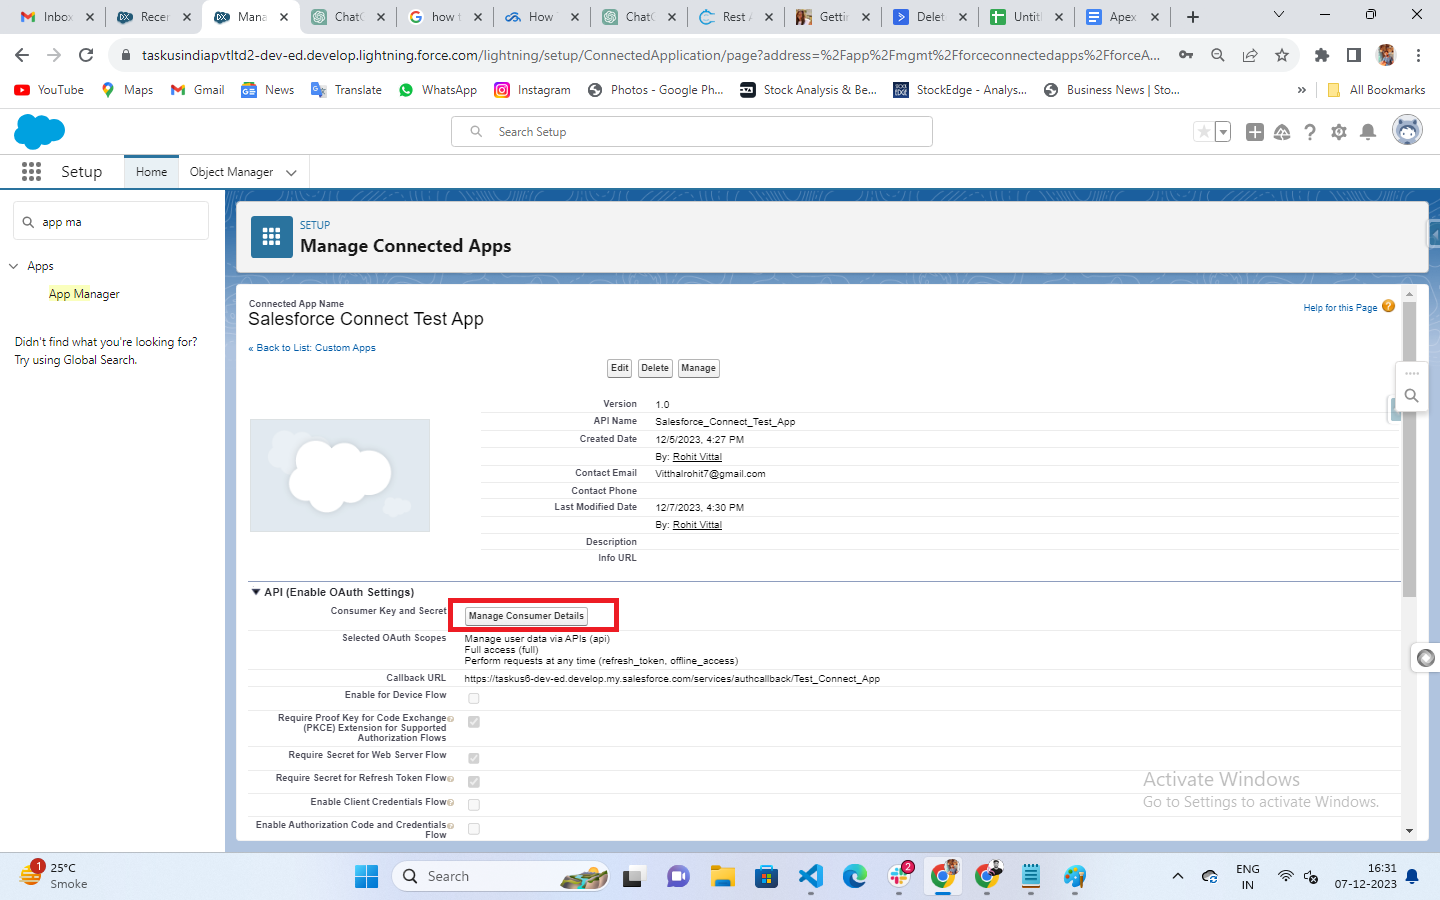
Once you click on Manage Consumer Details it will redirect you to verify the org so enter the verification code.
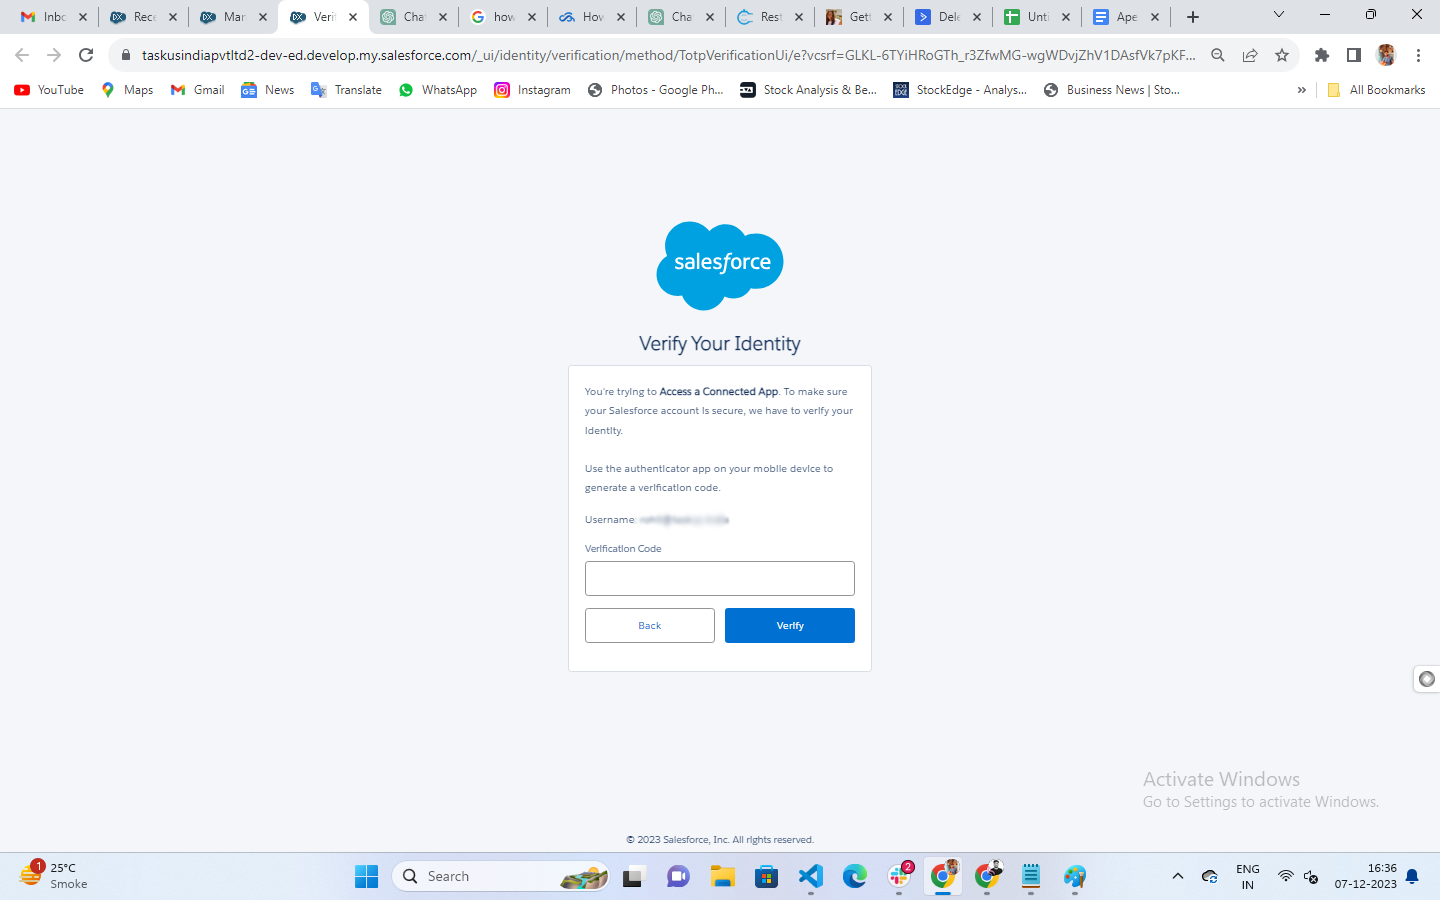
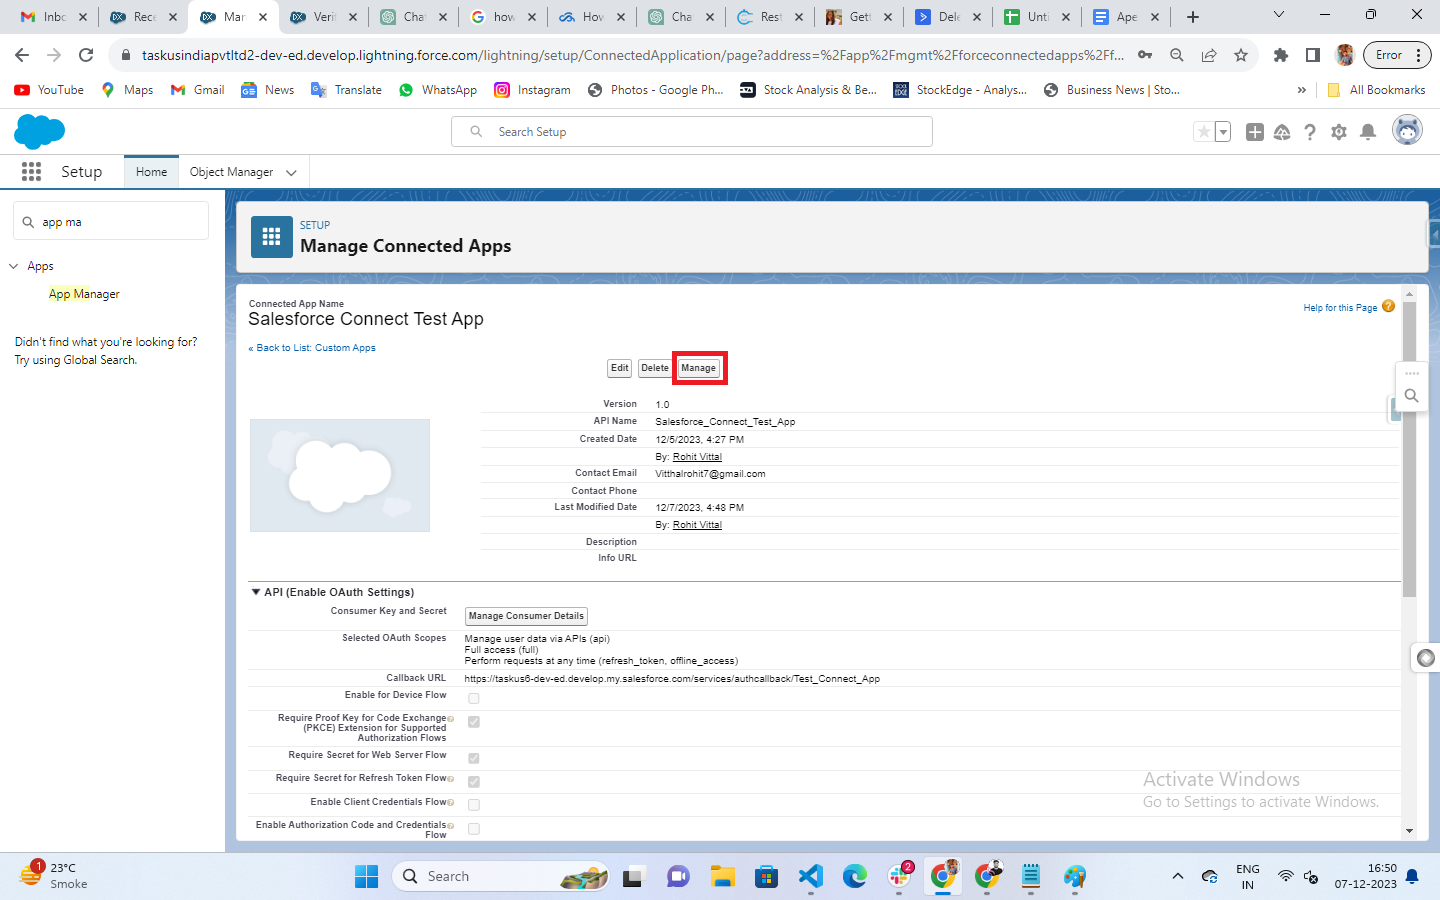
Once you verify yourself it will redirect you to the connected app page. Click on the manage button.
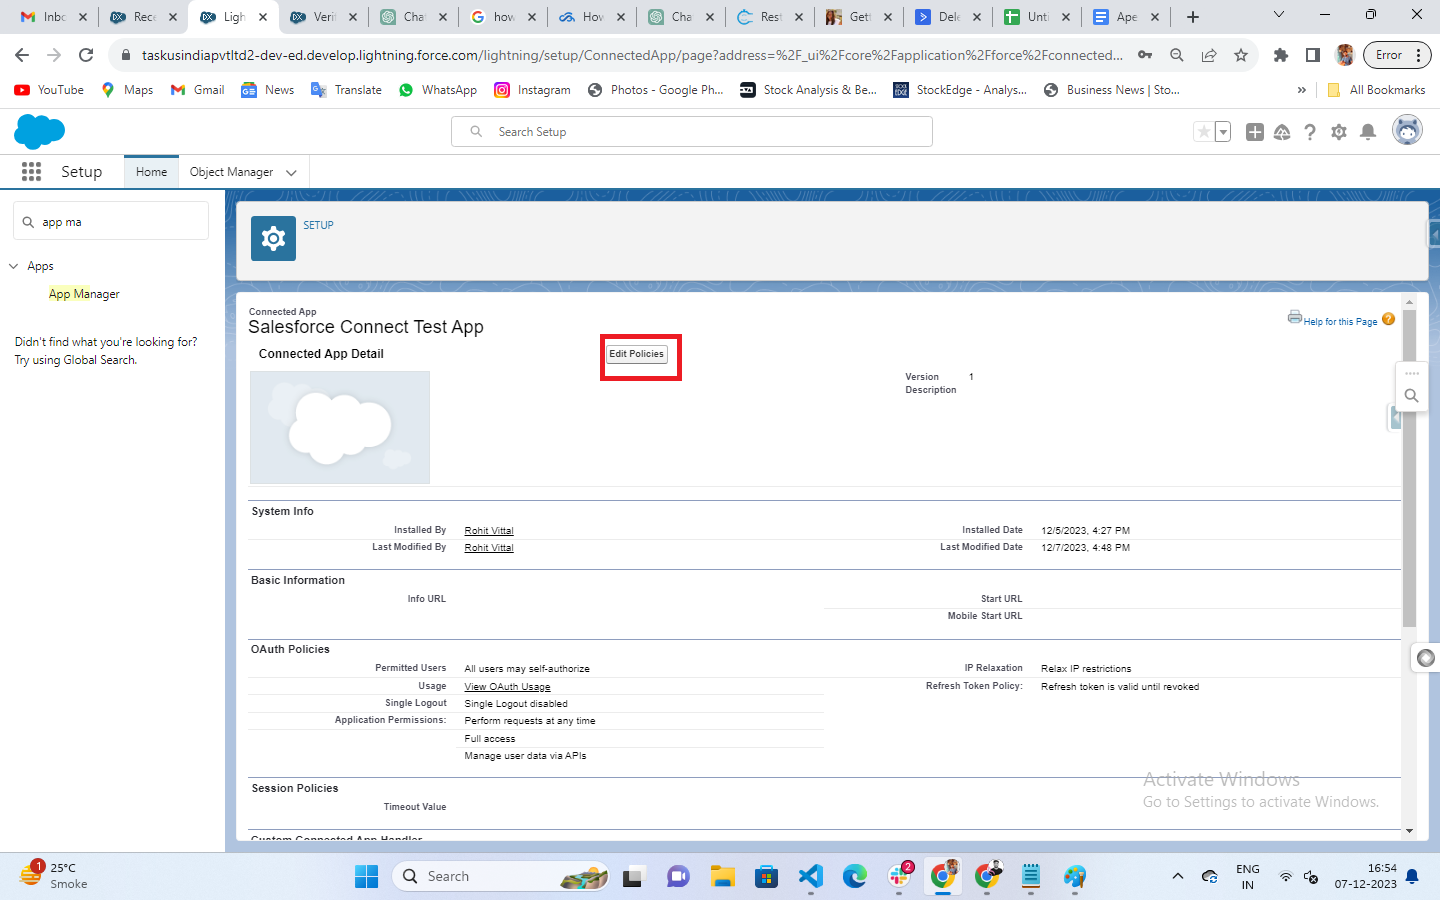
Click on Edit Policies button –
In IP Relaxation: Choose the IP relaxation settings based on your security requirements.
- Permitted Users: Choose the appropriate setting based on your needs (e.g., “All users may self-authorize”).
Configure Available OAuth Flows:
- OAuth Flows: Choose the appropriate flow for your integration (e.g., “Authorization Code”).
- Refresh Token Policy: Choose the policy based on your needs.
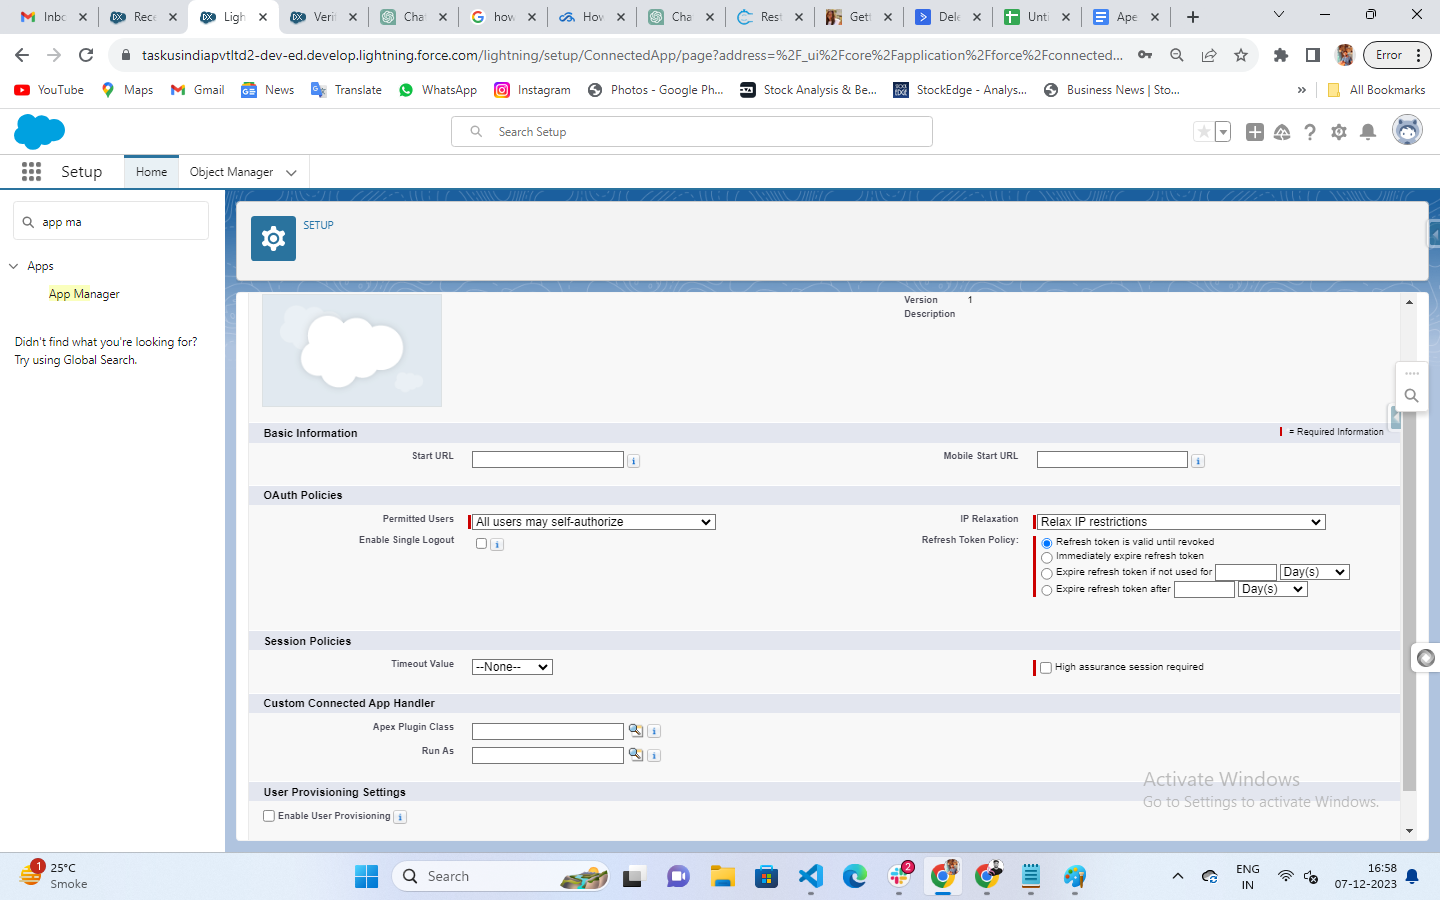
- Click the “Save” button to save the connected app.
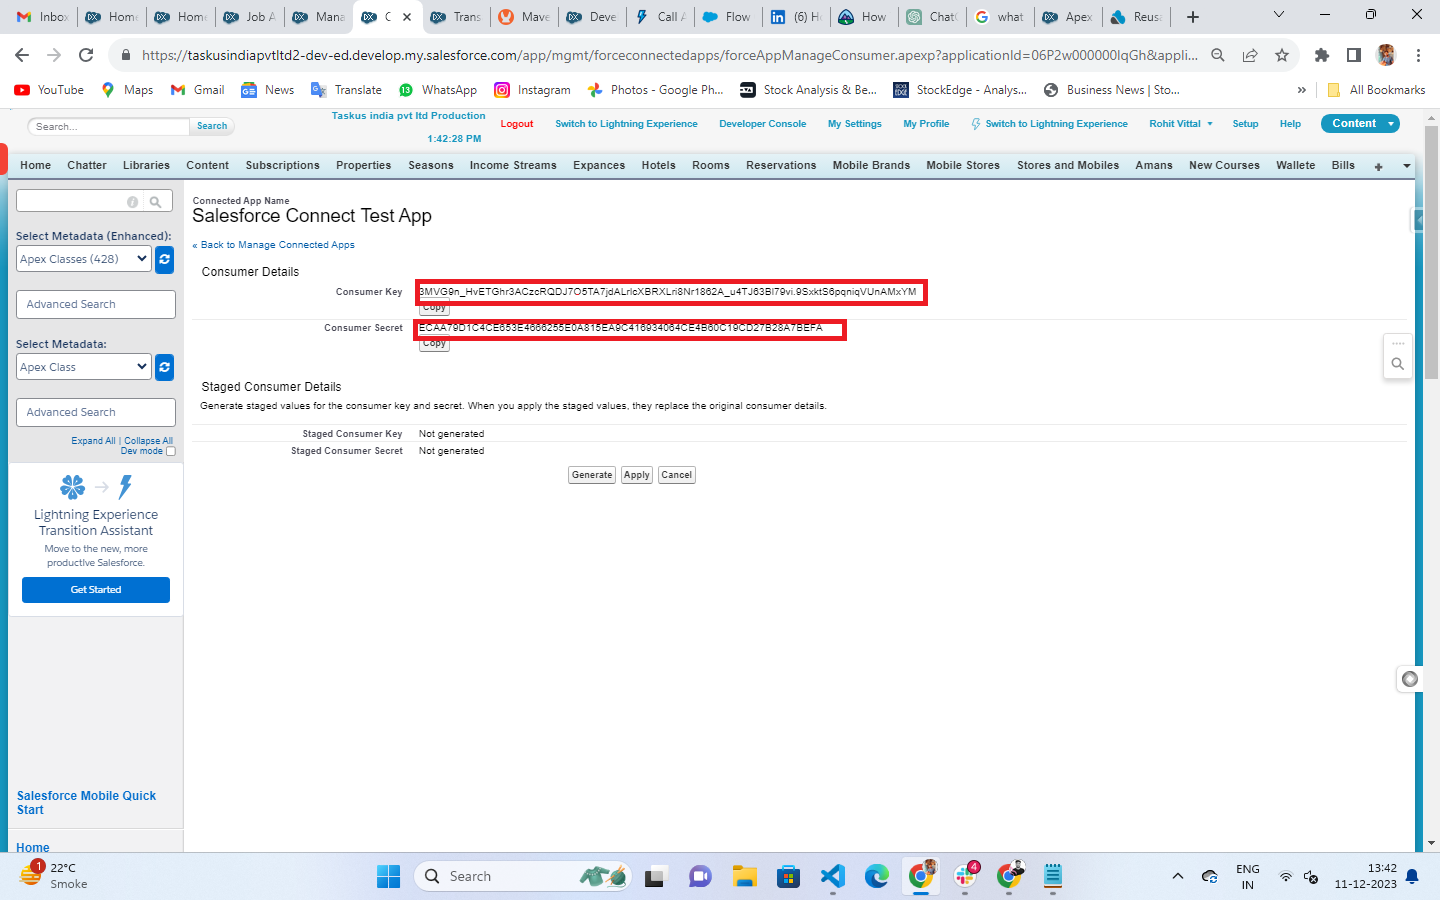
Note down the following credentials:
- Consumer Key (ClientId): This is the “Consumer Key” field.
- Consumer Secret (ClientSecret): Click on the “Click to reveal” link next to “Consumer Secret” to obtain it.
Create Web Services for Target Org –
First, you would have to create an Apex class and define it as global. You can do that by adding ‘global’ access identifier to the class definition.
Apex class – RestApiUsingConnectClass
Conclusion
So, here is our strategic guide to Integrate Salesforce org to another Salesforce Org using web services callout. Feel free to try out the solution and share your experience with us.
Catch you on the next one. Happy Learning!.





