

Loading...

Salesforce, the world’s leading CRM software, allows you to work in your language of choice with a simple language attribute on their record. Danish, German, English, Spanish, Finnish, French, Italian, Japanese, Korean, Dutch, Portuguese (Brazil), Russian, Swedish, Thai, Chinese (Simplified), and Chinese (Traditional) are some languages that Salesforce UI supports.

As you know, Salesforce supports multi-language org. Today, in this thoughtful solution, you will know how to set up your org for a multi- Language team.

What is a default Org language?

The default language is set org level, and you can check and edit it from setup > company information.

My Setting > Language & Time Zone > Select your local language from the list of enabled languages.

Things to know before enabling multi-language org:

Salesforce offers three levels of language support.

  1. Fully supported languages: This is a list of languages that will change the whole page in the selected language.
  2. End-user languages: It is the list of languages where users can set up pages in the language of their choice except setup and help translate.
  3. Platform-only languages: It helps you translate custom apps developed in Salesforce. Also, to set translation for language Salesforce doesn’t provide translation via translation workbench.

Steps to setup multi-language for your org:

Step1. Enable multi-language setting.

Step1. Enable multi-language setting.

From setup, enter ‘Language Setting’ and enable End-user language and Platform-only language. Then select your preferred language (in our case, we selected Japanese and Hindi).

From setup, enter ‘Language Setting’ and enable End-user language and Platform-only language. Then select your preferred language (in our case, we selected Japanese and Hindi).

Step2: Enable Translation setting:

Setup > Translation Setting >🡪Enable
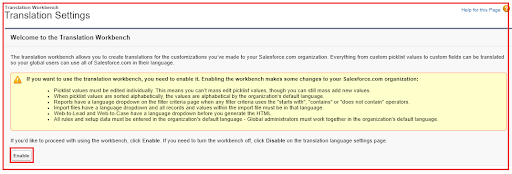
Step2: Enable Translation setting:
Setup > Translation Setting >🡪Enable

Step3: Add supported language for each user: in our case, we have selected Japanese for one of our users.
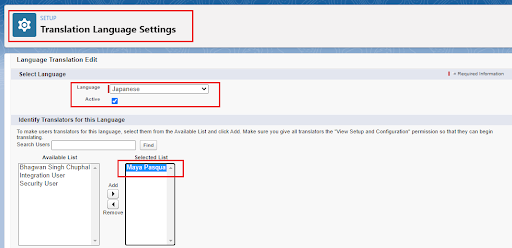
Step3: Add supported language for each user: in our case, we have selected Japanese for one of our users.

Step4: Create a custom field on account “Company Name” and make it available for all user profiles.

Step4: Create a custom field on account “Company Name” and make it available for all user profiles.

Step5: Now, set the local language of the user to Japanese

Step5: Now, set the local language of the user to Japanese

Step6: So, if we check by login with this user, you will see the custom field is still not translated.
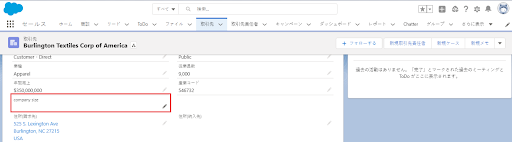
Step6: So, if we check by login with this user, you will see the custom field is still not translated.

Step7: Now, add the translated value for the field.
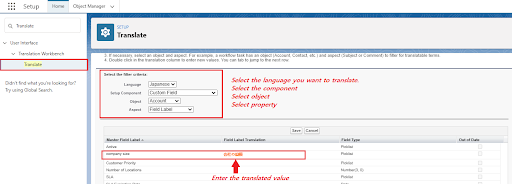
Step7: Now, add the translated value for the field.

Step8: Finally, you will see.

Step8: Finally, you will see.

Conclusion

Salesforce Translation Workbench is the perfect solution by Salesforce to help users with different languages interact with each other. We hope that you liked this informative article and got to learn how to set up multi-language for your org. Do share your experiences with us if you try out our solution. We’ll be back with another life-saving Salesforce solution soon. Till then, happy learning! 🙂


Related Articles

Sticky notes aren’t just for your desk anymore! In this tutorial, we’ll create a Lightning Web Component (LWC) in Salesforce that allows you to pin notes on your app page or record page. With a clean, interactive UI, these digital sticky notes ensure you never forget important tasks or details. What Will You Learn? By […]

Read More
How to Create Dynamic, Animated Charts in Salesforce LWC using Chart.js

Bring Salesforce data to life with dynamic charts inside Lightning pages! While Salesforce dashboards are powerful, sometimes business users want visual insights without leaving their current page. That’s where Chart.js with Lightning Web Components (LWC) becomes a game-changer. In this step-by-step guide, you’ll learn how to: Upload Chart.js as a static resource in Salesforce. Build […]

Read More
How to Encrypt and Decrypt Data in Salesforce Using Apex Crypto Class

Data security is more important than ever. Whether you’re storing customer information, sensitive business data, or private communication, ensuring that your data stays safe is critical. Salesforce provides built-in tools to help with this, and one of the most powerful yet easy-to-use approaches is encryption and decryption using the Apex Crypto class. In this blog, […]

Read More
Benefits & Step-by-Step Setup Guide for Salesforce Code Analyzer

When building on the Salesforce platform, code quality and security are non-negotiable, especially before submitting your app for a Salesforce Security Review. Catching bugs and vulnerabilities early not only saves time but also ensures compliance with Salesforce’s best practices. That’s where the Salesforce Code Analyzer comes in. This open-source tool scans your Apex classes, triggers, […]

Read More
A Step-by-Step Guide to Integrate Zoho CRM with Salesforce (Without Coding)

Managing data across multiple CRMs can be a real challenge for businesses that want a single source of truth. If your teams use Zoho CRM but want to move or sync all records seamlessly into Salesforce, you don’t need to write a single line of code. Thanks to MultiSync Made Easy, the integration process is […]

Read More
How to Integrate Salesforce with Copilot

Integrating Salesforce with Copilot is becoming an essential step for organizations aiming to streamline workflows, automate client data management, and unlock the power of AI-driven CRM. By connecting these two platforms, businesses can centralize customer information, reduce manual tasks, and accelerate growth. This guide walks you through the Salesforce–Copilot integration process with clear steps, Apex […]

Read More



