




There are many methods in Salesforce to create records, like creating them manually, using a data loader to upload many records at once, or using an apex class. But what if there was a way where a person could just email with data of records to his Salesforce org and records will be created automatically?
Well, this is possible with Salesforce Email Services!
In Salesforce, Email Service can be configured easily and then with some code, you can do basically anything in your org.
So, in this blog today, we will share how to create bulk records in Salesforce with an email.
For this, we will be creating Lead records with Email service and if any Lead is not created the user will be notified which Lead is not created and the cause of the error.
So let’s start the demo!
Step 1:
First, navigate to Setup > Email Services and you will be greeted with this screen:
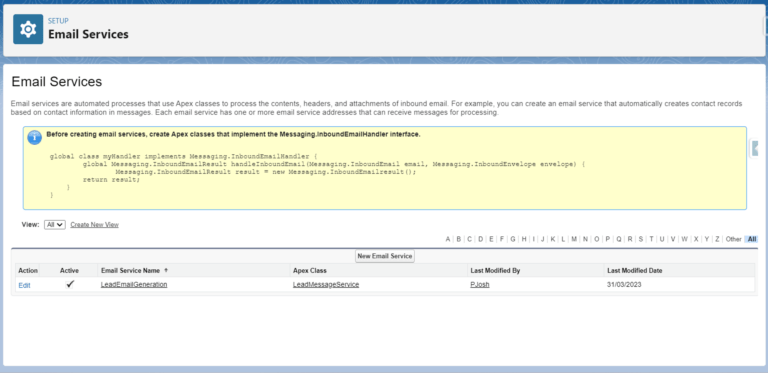
The above prompt is suggesting you create an apex class that is using this line of code
Code
And you should exactly do what it says and make an apex class with this code to start with.
Step 2:
After making that class you can now click on “New Email Service” and create a new email service(Obviously!).

Step 3:
Give a name to your Email Service, select the apex you created, and fill in other fields as per your requirement.
For this demo, we are receiving a CSV to create records so we will be selecting “All” in Accept Attachments and Convert Text Attachments to Binary Attachments.
Now we have created our email service but still want an email address to which we can send emails to create records. For that, just click on the email service that you just created and select “New Email Address” and an email will be created for you.
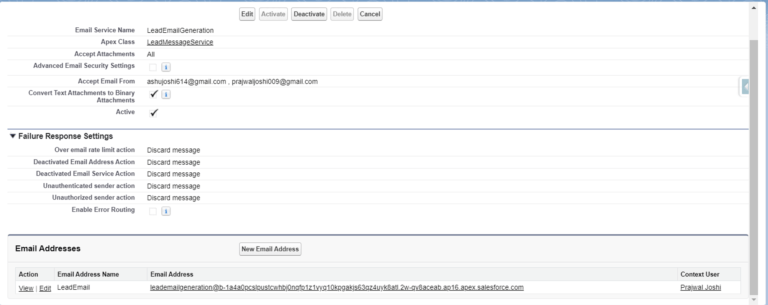
And that’s all you have to set up your Email Service.
Step 4:
All that is left to do is write the code for it. For that open the Apex class you created and make the following changes:
Apex Code:
In the above code, I am also using a CSV Reader class “SimpleCsvReader” that you can copy from here:
SimpleCsvReader:
Code
Step 5:
For testing the Email service we will be using this CSV file with Lead Records to insert them:
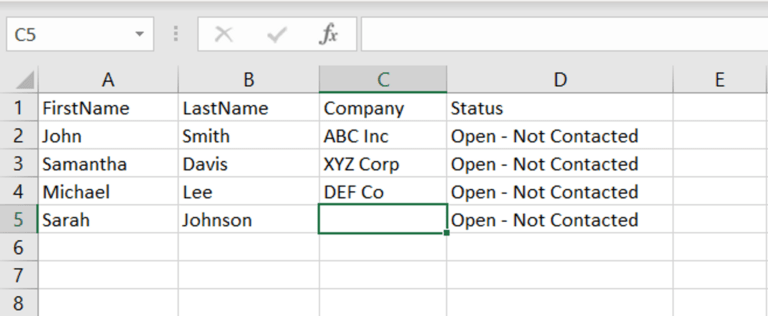
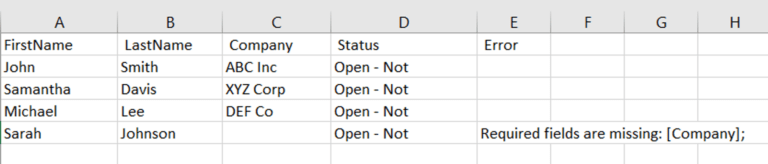
In this, we left a required field empty to get the error message in return.
When we send this CSV as an attachment in an email to the email address we got from the email service it creates those records in the Lead object.
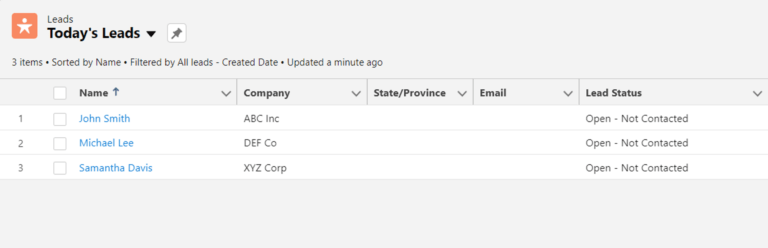
All the Leads got created except for the one without the company field and for that, we received a CSV in our email showing us the error:
User Testing:
If you want to test this implementation you can send your Lead record CSV in the fields in the above respective order to this email:
leademailgeneration@h-22bywfmax7f6x6qu97pjee6j3mt19x3rizfvq4ane0sdy1bi5p.2w-qutegeaj.ap16.apex.salesforce.com
Conclusion
In conclusion, Salesforce Email Services provide a simple and efficient way to create records in Salesforce by just sending an email with the required data. By setting up an email service and creating an apex class to handle incoming emails, we can easily create records in bulk with the data provided in the email.
Additionally, we can plan to notify the user if any records were not created and provide the cause of the error. This method can save a lot of time and effort, especially when dealing with large amounts of data.
Like the blog? Share your valuable feedback with us and stay connected for more such interesting Salesforce development services!





