
Loading...
New Awarded Winner – IT & Development | Payoneer India 2026 Check out
Featured Recognized by Salesforce; Proven by impact! Check out

Authorize.net is a prominent payment gateway used by customers to purchase products and services online by making online payments. It is the most common payment gateway used to make payment transactions from the website.

You can leverage this payment processing platform by integrating it with Salesforce and provide your employees with a centralized solution to accept all online payment from ACH, wallets, debit cards, and credit cards.

Here’s how you can easily connect the Authorize.net payment gateway to Salesforce:

STEP 1:

  • Create an authorize.net developer account Click here.
  • After entering the above link click on ‘HELLO WORLD’ and choose ‘Get Started’ and click on ‘Create Sandbox Account’.
  • Enter your details and click Submit.

To obtain the API Login ID and Transaction Key:

  • Log in to the Sandbox Account which you have just created Click here.
  • Click Account from the main toolbar.
  • Find API Credentials & Keys.
  • Click API Credentials & Keys.

Payment Page Screen :

Here we have payment screens for credit card
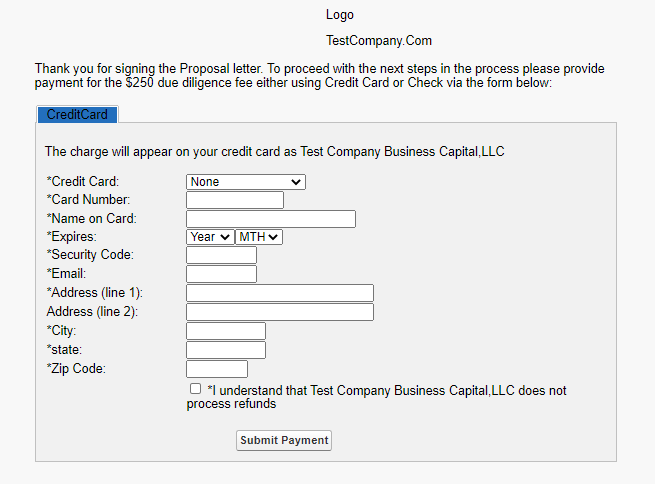
salesforce Authorize.net integration

STEP 2: For the Implementation of the above page to work fine, we have to follow the following steps:

  • Go to Setup in Salesforce and type ‘Custom Settings’.
  • Click on New and create an Object and give name – AuthorizeNet (API Name -AuthorizeNet__c) and select setting type (List).
  • Create three fields in AuthorizeNet__c Object –

  1. Api_Login_ID (Data Type – Text)
  2. Endpoint_URL (Data Type – Text)
  3. Transaction_Key (Data Type – Text)
  • Now Create a record by clicking on Manage
  • Click on New

    Now create a record of name ‘Cred’ and Paste your Api_Login_ID, and Transaction_Key and for Endpoint_URL paste this link.

STEP 3:

  • Now Go to Setup and type ‘Objects’.
  • Now Create a custom Object of the name ‘Payment_Request’.
  • Now create three custom Fields on Payment_Request Object.
  1. Status (Data Type – Text)
  2. Opportunity (Data Type – Lookup with Opportunity)
  3. Billing_Contact (Data Type – Lookup with Contact)
  1. Code Samples:

Here we have a visualforce page as well as apex classes for the same.

Visualforce Page:

Apex Class:

Wrapper Classses : Create two Wrapper classes

For Testing:

  • For testing generate any fake Credit Card from Google.
  • Create a record on Payment_Request Object.
  • Copy id of that record.
  • Launch VF Page and Paste the id of the record in the URL.
  • Now paste the Fake Generated Credit Card Details and click Submit Payment.
  • Voila! Your payment has been done and you received a mail of ‘payment completed’ on your Authorized.net registered mail id.

Conclusion:

This centralized approach of receiving payments through Authorize.net would automatically record all the transactions into your Salesforce.

Try this seamless Salesforce integration now and deliver a streamlined payment process to your customers!


Related Articles

Sticky notes aren’t just for your desk anymore! In this tutorial, we’ll create a Lightning Web Component (LWC) in Salesforce that allows you to pin notes on your app page or record page. With a clean, interactive UI, these digital sticky notes ensure you never forget important tasks or details. What Will You Learn? By […]

Read More
How to Create Dynamic, Animated Charts in Salesforce LWC using Chart.js

Bring Salesforce data to life with dynamic charts inside Lightning pages! While Salesforce dashboards are powerful, sometimes business users want visual insights without leaving their current page. That’s where Chart.js with Lightning Web Components (LWC) becomes a game-changer. In this step-by-step guide, you’ll learn how to: Upload Chart.js as a static resource in Salesforce. Build […]

Read More
How to Encrypt and Decrypt Data in Salesforce Using Apex Crypto Class

Data security is more important than ever. Whether you’re storing customer information, sensitive business data, or private communication, ensuring that your data stays safe is critical. Salesforce provides built-in tools to help with this, and one of the most powerful yet easy-to-use approaches is encryption and decryption using the Apex Crypto class. In this blog, […]

Read More
Benefits & Step-by-Step Setup Guide for Salesforce Code Analyzer

When building on the Salesforce platform, code quality and security are non-negotiable, especially before submitting your app for a Salesforce Security Review. Catching bugs and vulnerabilities early not only saves time but also ensures compliance with Salesforce’s best practices. That’s where the Salesforce Code Analyzer comes in. This open-source tool scans your Apex classes, triggers, […]

Read More
A Step-by-Step Guide to Integrate Zoho CRM with Salesforce (Without Coding)

Managing data across multiple CRMs can be a real challenge for businesses that want a single source of truth. If your teams use Zoho CRM but want to move or sync all records seamlessly into Salesforce, you don’t need to write a single line of code. Thanks to MultiSync Made Easy, the integration process is […]

Read More
How to Integrate Salesforce with Copilot

Integrating Salesforce with Copilot is becoming an essential step for organizations aiming to streamline workflows, automate client data management, and unlock the power of AI-driven CRM. By connecting these two platforms, businesses can centralize customer information, reduce manual tasks, and accelerate growth. This guide walks you through the Salesforce–Copilot integration process with clear steps, Apex […]

Read More



