

Salesforce DevOps tools offer a range of features to support your development process, including deployment assistance, data and metadata backup, test automation, and code scanning for security issues and bugs.
The DevOps Center simplifies the process of bundling and migrating changes through stages with a user-friendly interface, eliminating the need for coding.
The DevOps Center replaces Salesforce Change Sets and introduces features like:
- Work Items for tracking changes
- Automated Change Tracking for transparent monitoring
- Pipelines for defining development environments
- Source Control integration with GitHub for visibility into changes
Effortless Process of DevOps Center Set Up and Deployment Across Various Salesforce Editions
The DevOps Center, a managed package, is installable at zero extra expense in a Professional (API access necessary), Enterprise, or Unlimited Edition org.
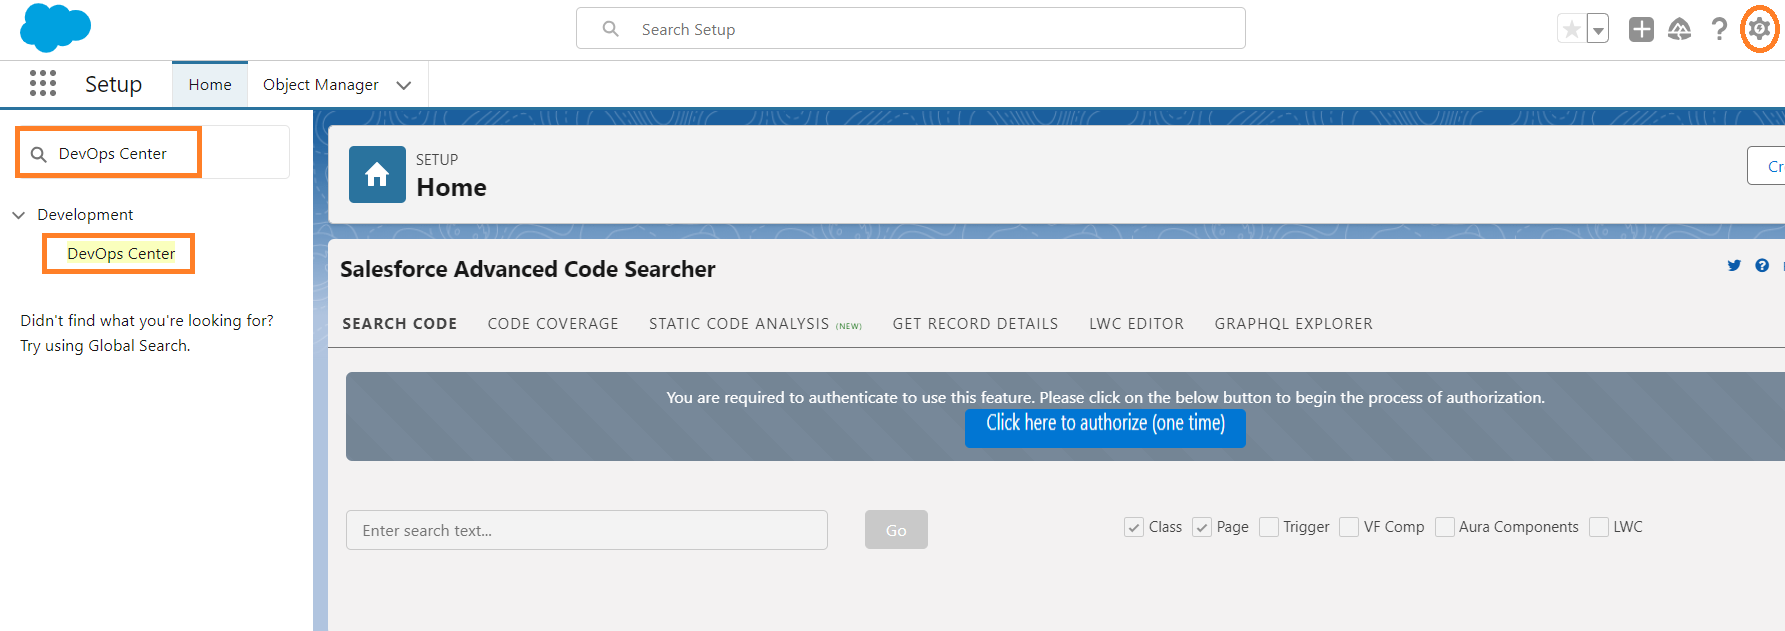
It is equally compatible with installation in a Developer Edition org, Trailhead Playground, or Scratch Org for assessment purposes. To reach the Salesforce DevOps Center, navigate to the Setup menu in Salesforce and input “DevOps Center” into the setup search bar.
Installation and configuration of DevOps in salesforce:
- From Setup, type DevOps Center in the Quick Find box, then select DevOps Center.
2. Enable DevOps Center, and then review and accept the licensee agreement, which allows you to install the package.
3. Click Install Package.
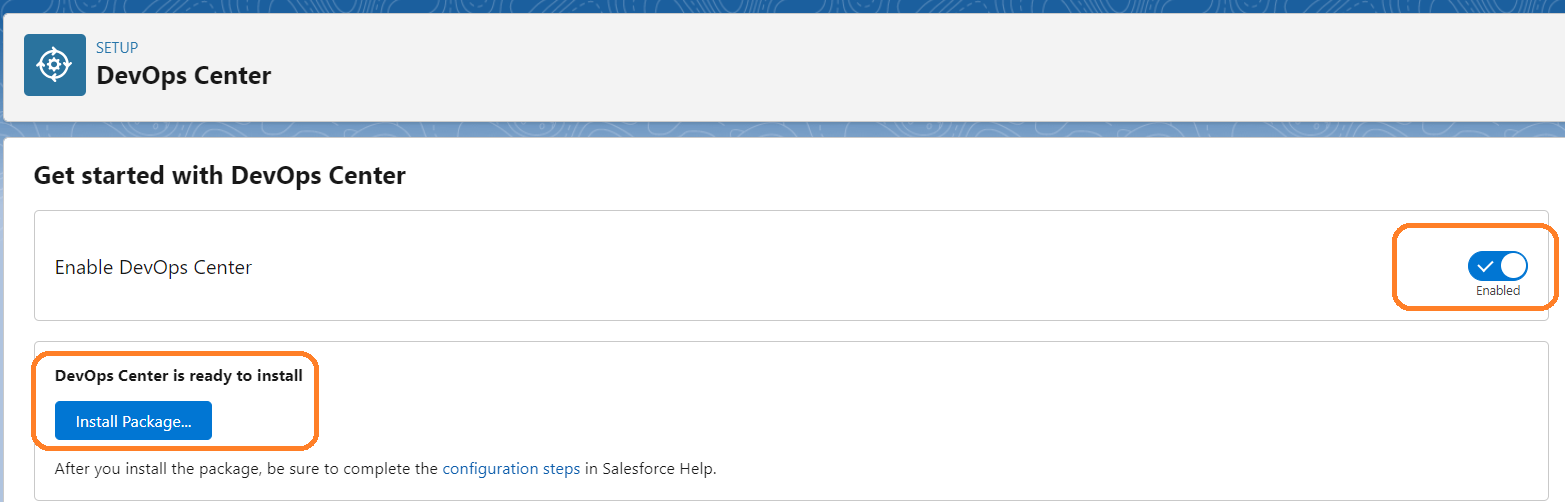
4. Choose Install for Admins Only, and then hit Install.
5. Approve third-party access.
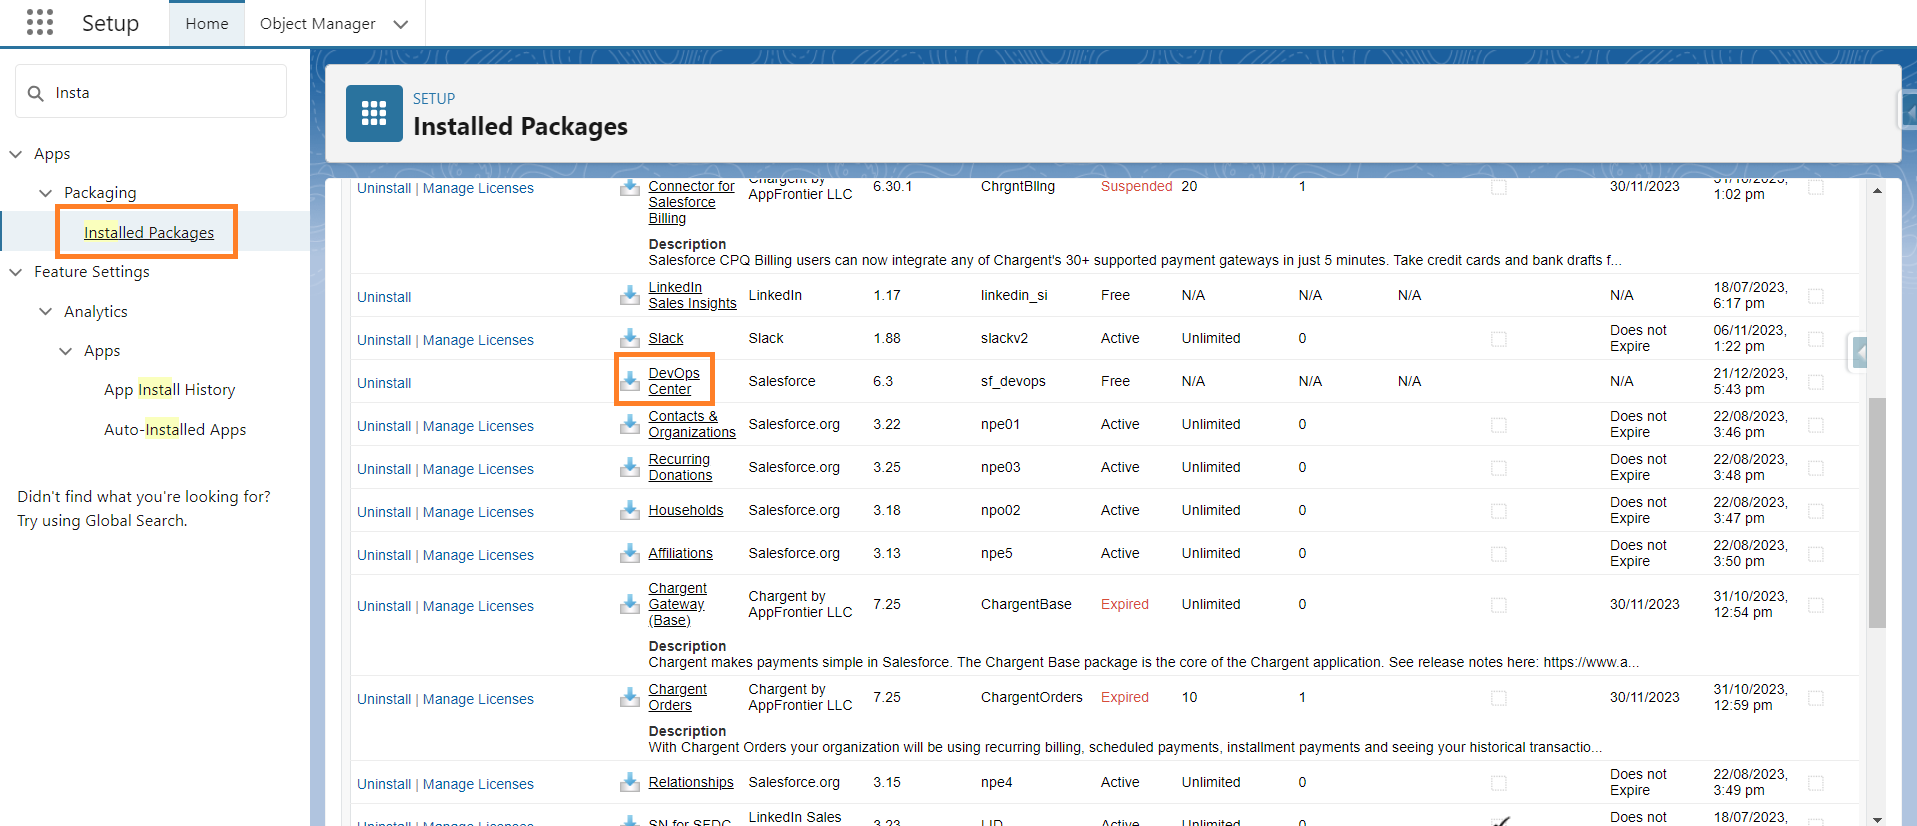
6. To confirm DevOps Center Package Installation, from Setup, enter Installed Packages in the Quick Find box, then select Installed Packages.
Create Connected App for DevOps:
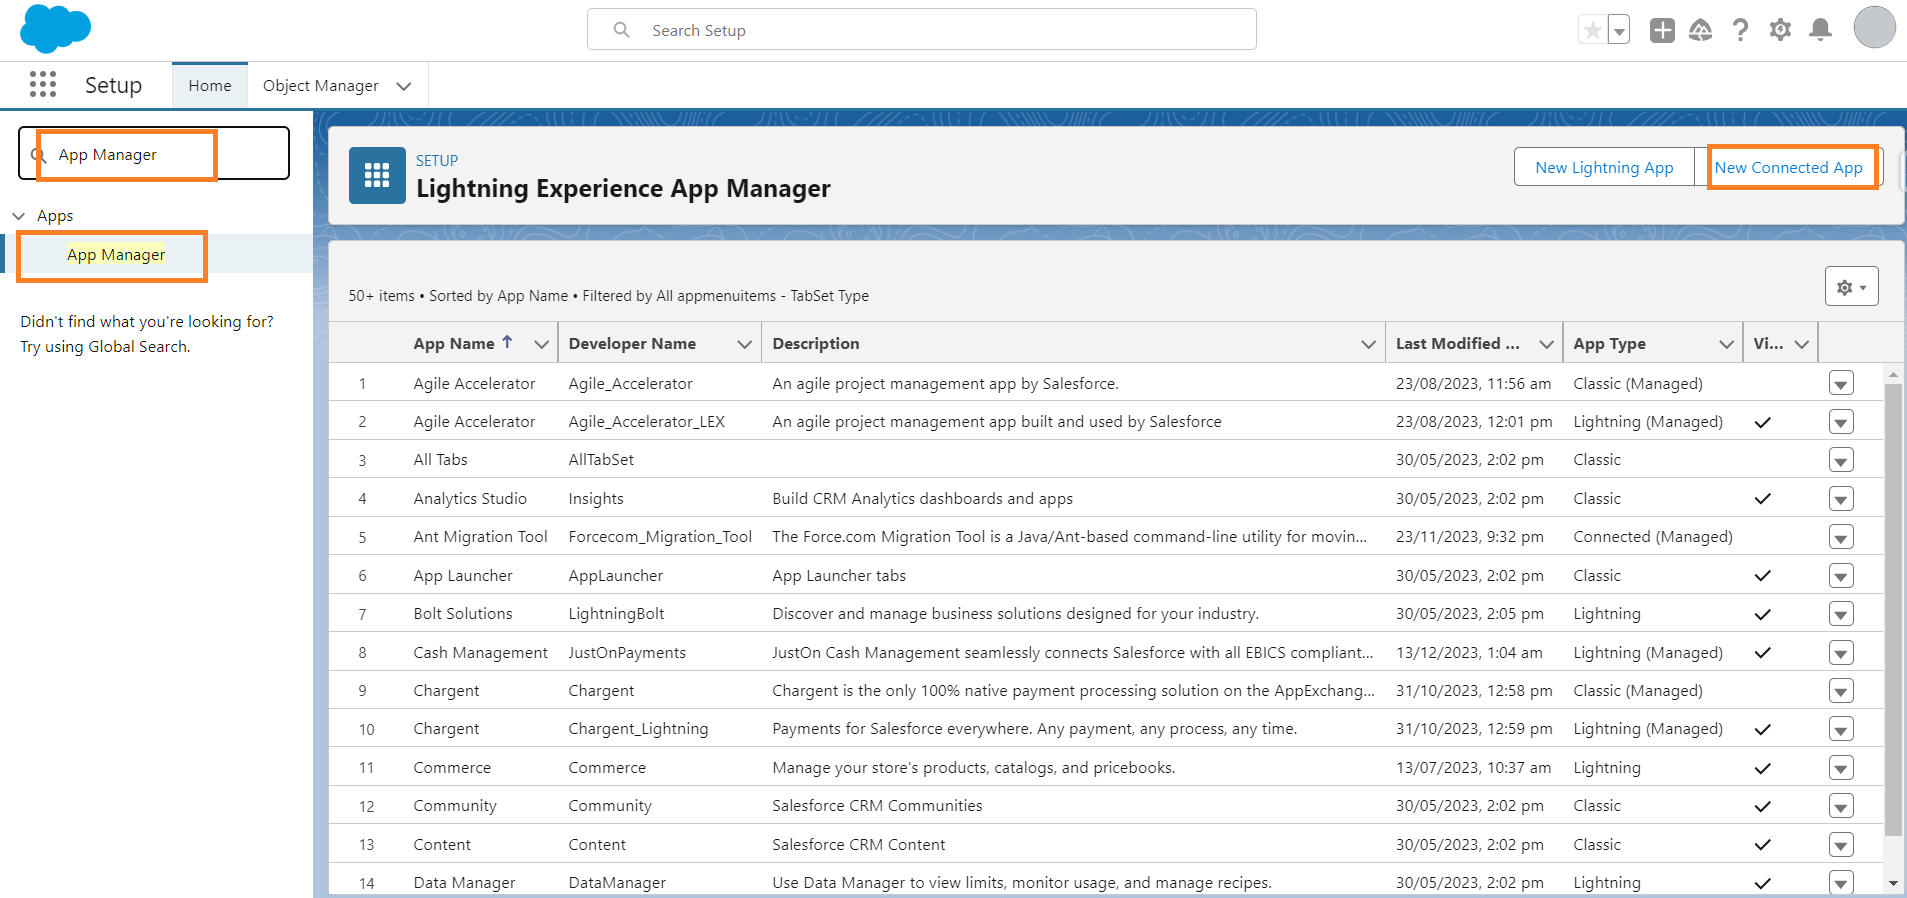
- From Setup, enter App Manager in the Quick Find box, then select App Manager.
- Click New Connected App.
3. Connected App Name: DevOps Center.
4. API Name: DevOps_Center
5. Contact Email: support@salesforce.com
6. Logo Image URL: ***https://tinyurl.com/***
7. Description: Manage your development and release processes
8. In Web App Settings, enter the Start URL: /sf_devops/DevOpsCenter.app
9. Click on Save.
10. In Setup Quick find box enter Manage Connected Apps.
11. Click on DevOps Center and scroll down.
12. In the Permissions Sets section, click Manage Permission Sets.
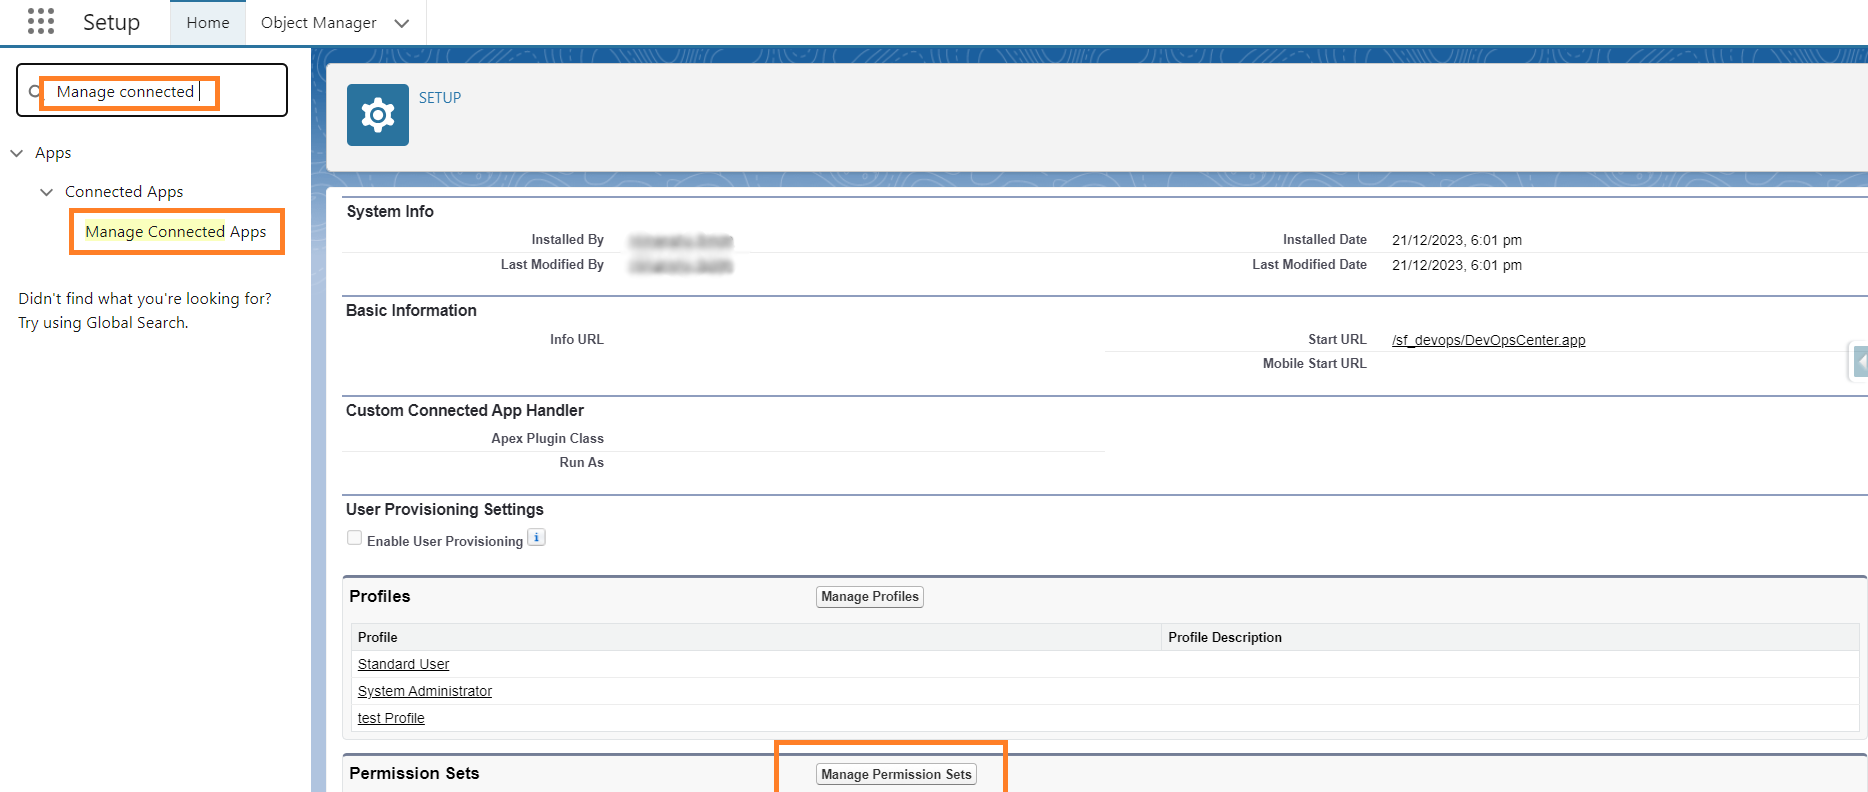
13. Select sf_devops_NamedCredentials, then click Save.

Assign the DevOps Center Permission Sets:
- From Setup search for user and click on it.
- Click on that user where you want to assign/give permissions for DevOps.
- Click on Permission set assignment on top left of the page.
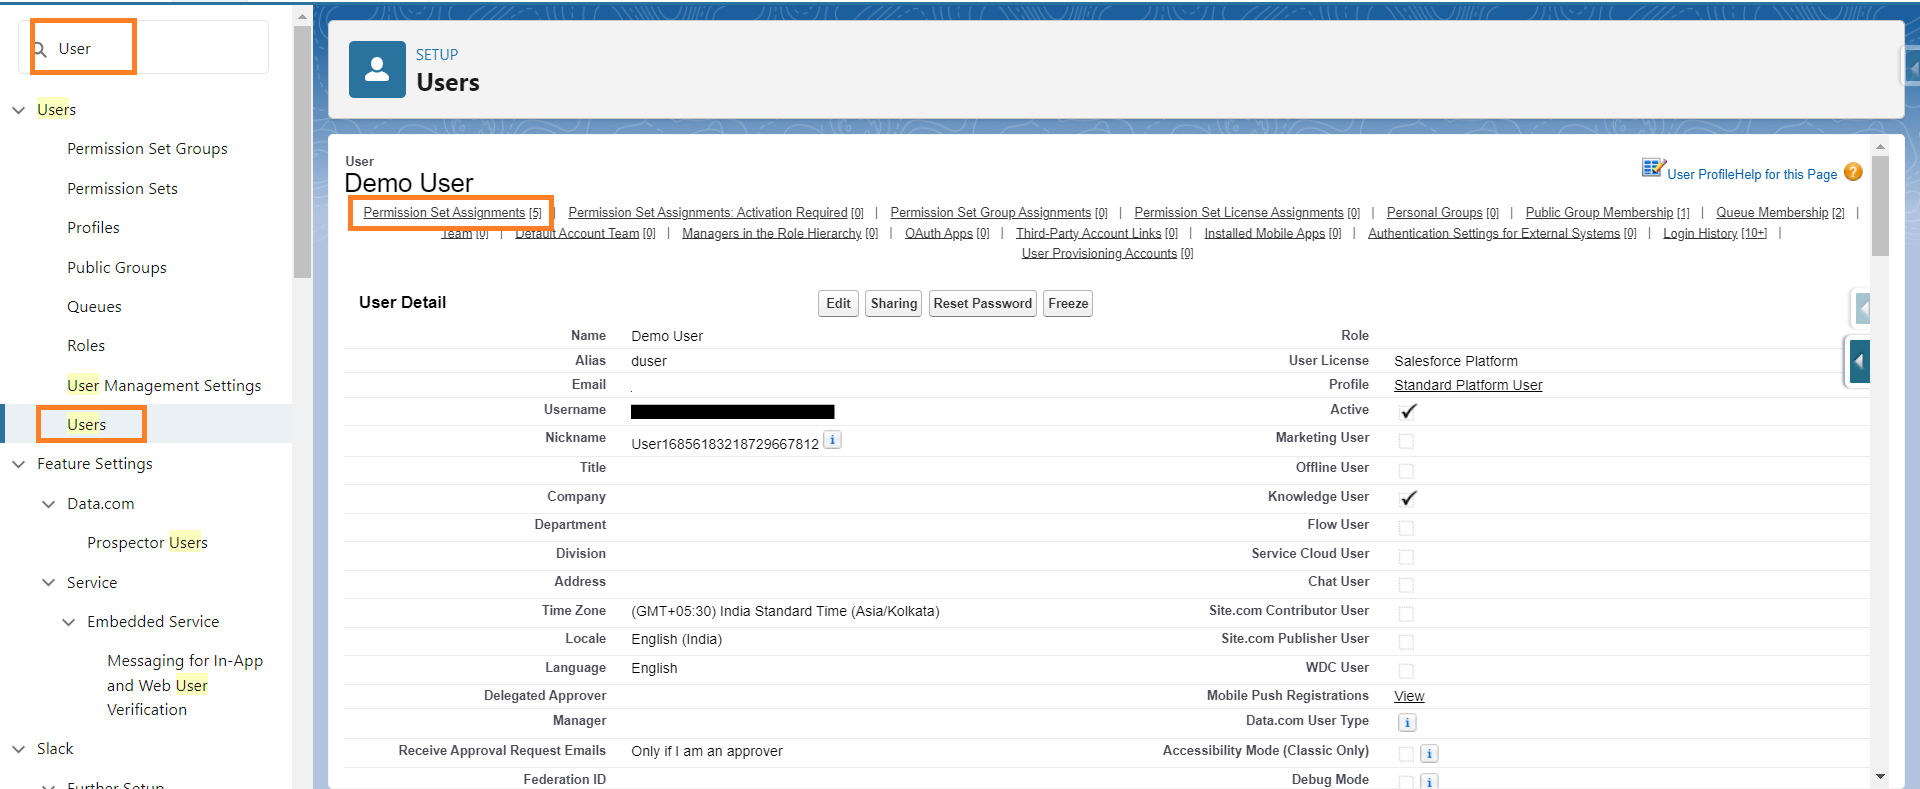
4. In the Permission Set Assignments Section click on Edit Assignment.
5. Add These 5 permissions from the Available permissions set section to the Enabled permission set section:
- DevOps Center
- DevOps Center Manager
- DevOps Center Release Manager
- sf_devops_InitializeEnvironments
- sf_devops_NamedCredentials
6. Click on save.
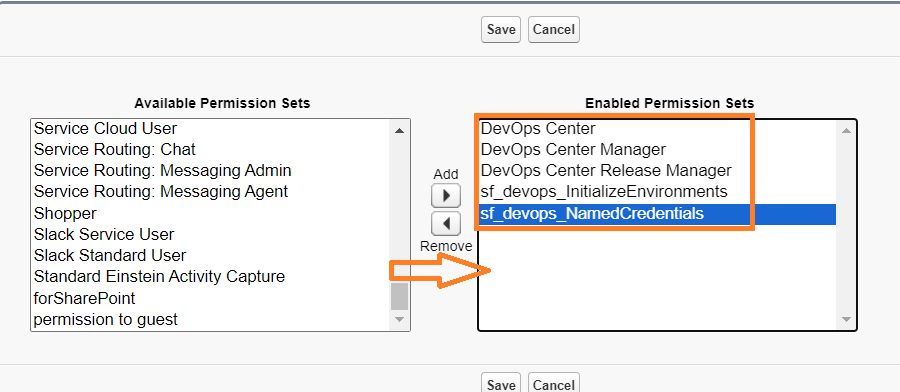
(Note :Repeat the same(2-6 steps) process for those users where you want to give permission for DevOps)
Manage DevOps Center Projects:
Create DevOps Project:
- From App Launcher, find and select DevOps Center.
- DevOps Center opens to the All Projects page. For the first time, the list will be empty.
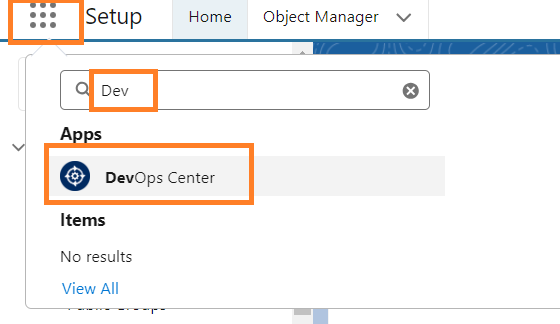
3. Click New Project.
4. For the first time creation of the project, We will get prompted to log in to GitHub. Log into an existing account if already have, otherwise create a new.
5. After Connecting GitHub again Click on New Project.
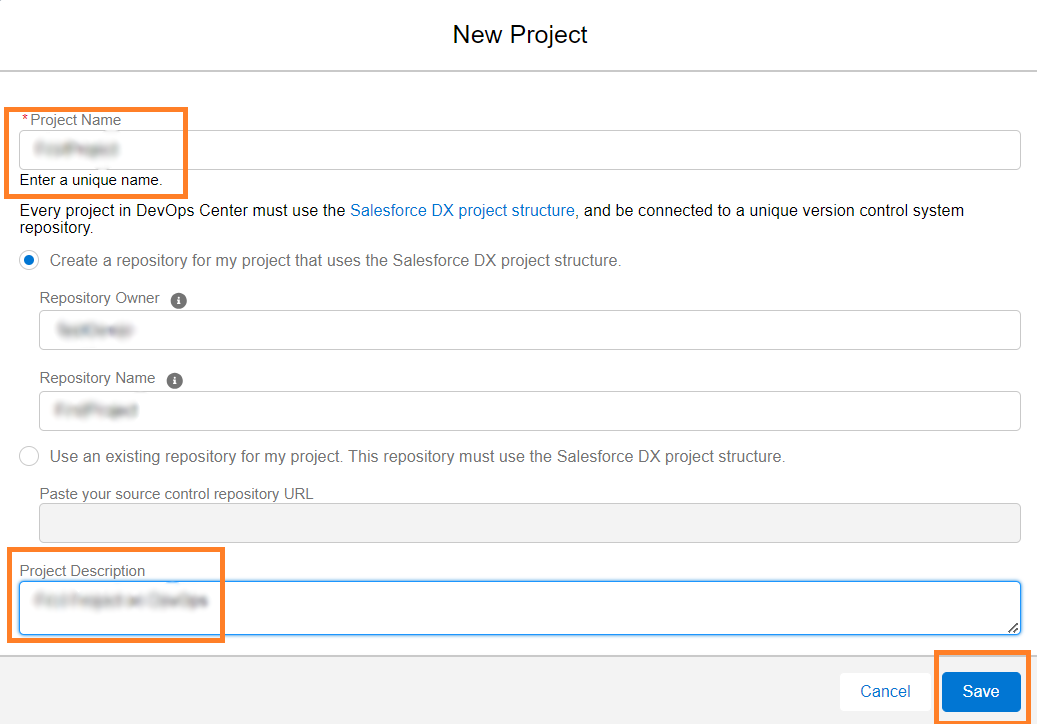
6. Enter a unique name for your project.
7. Create a repository or use an existing one.
8. If you choose to create a new repository, the repository Name will be filled automatically.
9. Enter a description to identify the purpose of the project. (Optional)
10. Click Save.
11. Now you can see your created project and you will be able to find a click to connect.
12. Click on click to connect to add Release Environment.

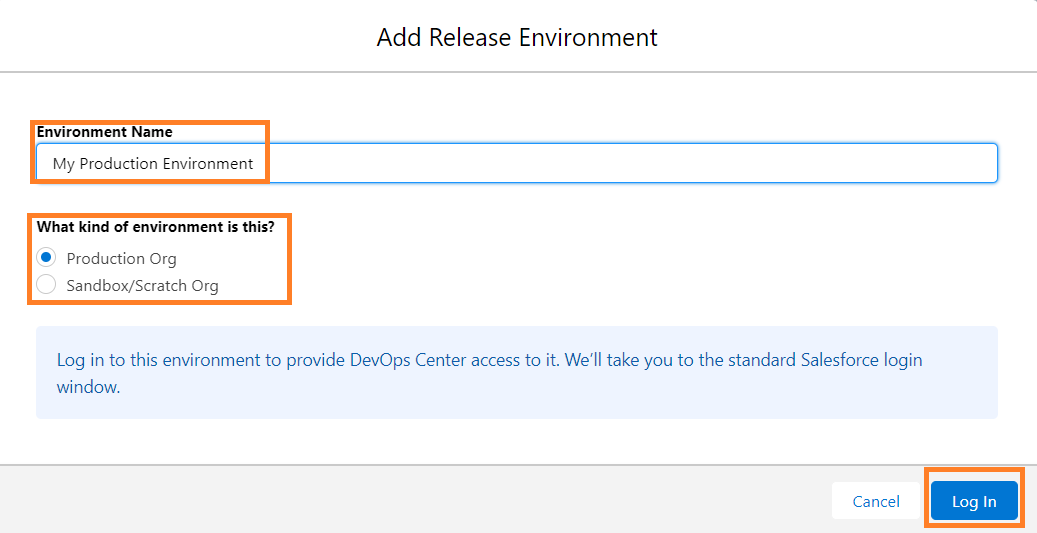
13. Give the Name to the Environment Name and select the kind(Type) of the environment.
14. Click on Log In and it will open the salesforce login window.
15. Enter your Credential and it will authorize your Creds.
Add Development Environment
- Click on project just created.
- After clicking the project you will get a new window.
- Now you will get the Add Development Environment Button.
- Click on the Development Environment Button and give the unique name to the Development Environment.
- Click on Login Button. And add the Credentials of the org where you are going to work.
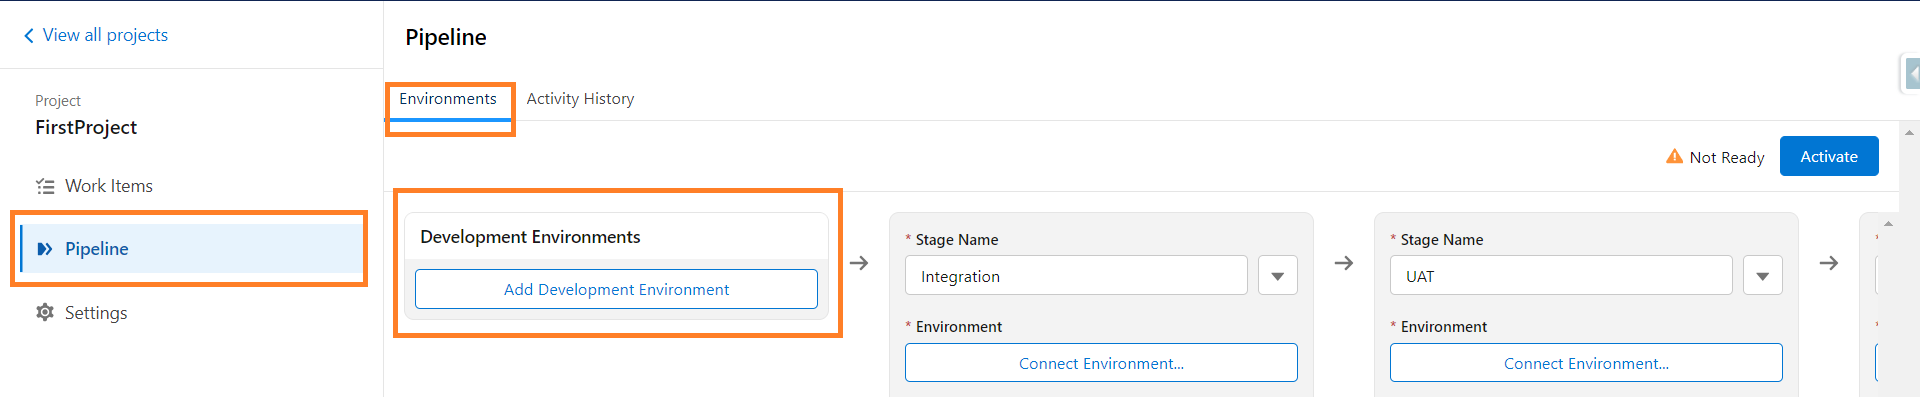
(Note: You can add only sandboxes or Scratch Orgs for Development Environment)
Add or Remove Stages:
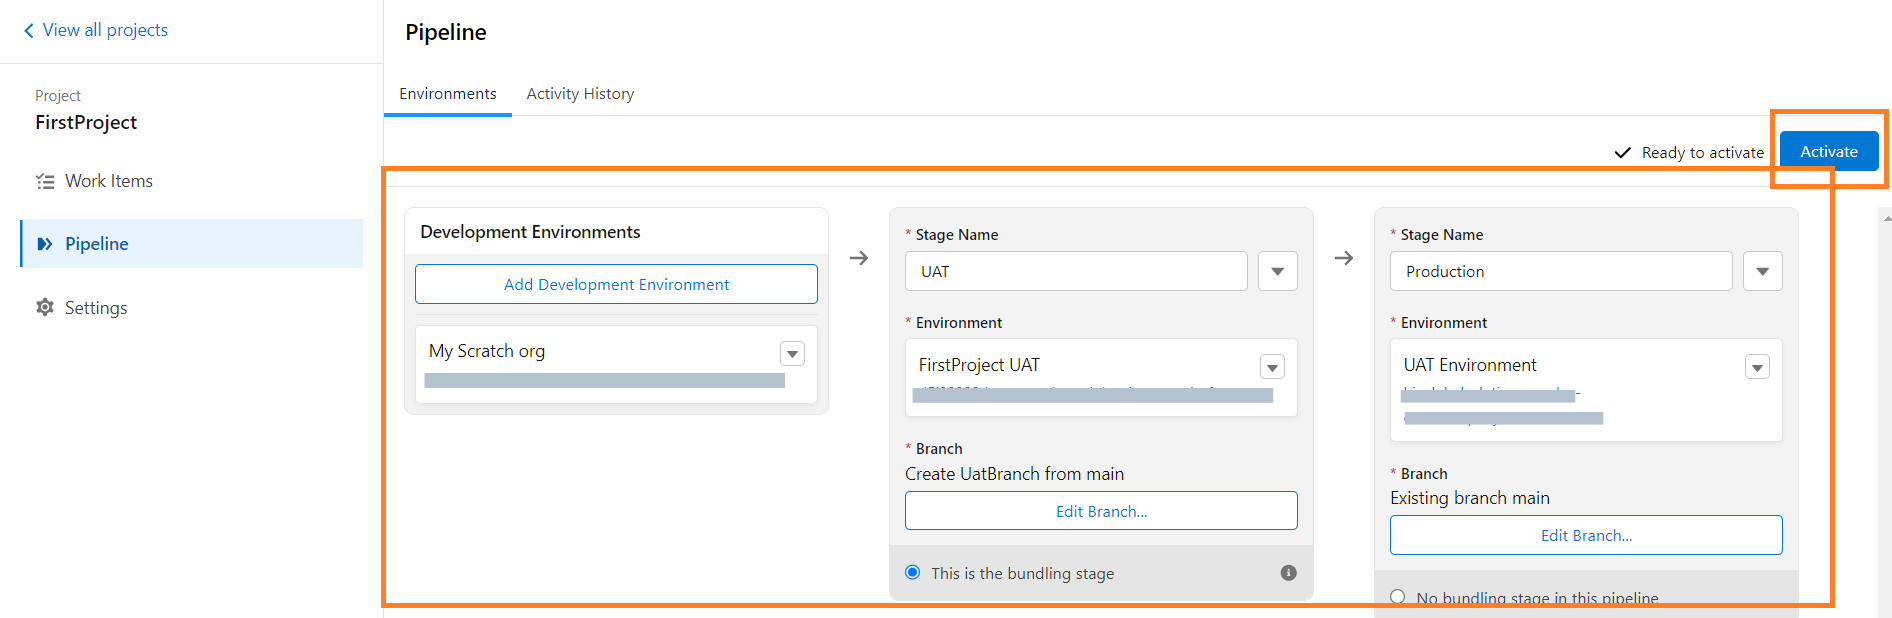
- You will find your added Development environment.
- You can add more stages between Production and Development as per your requirement.
- You can add/remove stages by clicking on the Dropdown button(right side of every stage name ).
- Now you will get many options, you can choose as per your requirement. You have to connect an Environment for every stage.
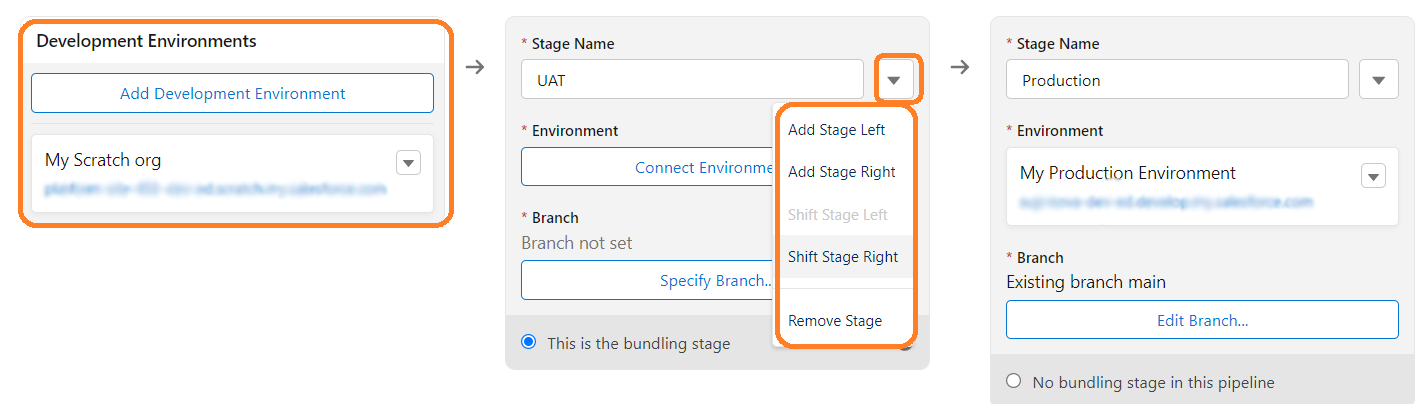
5. For Example: Here I have added one Development Environment, an UAT Environment ,and a Production Environment. Dev Environment>UAT Environment>Production Environment.
6. You can add more stages between Development Environment and Production Environment just clicking by Drop down button(right side of every stage name ).
7. Give an Unique Name to Branch and click on the Activate button.
Create Work Item:
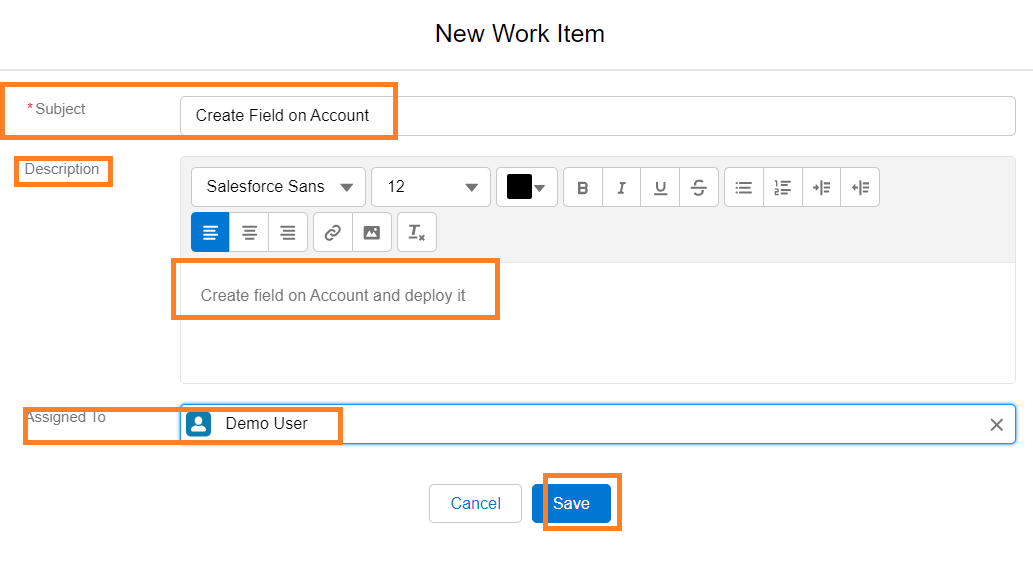
- Click on the work item at the left side of your screen.
- Now click on the New Work Item button top right corner.

3. Enter Subject, Description and assign it to the Developer.
4. Click on save.
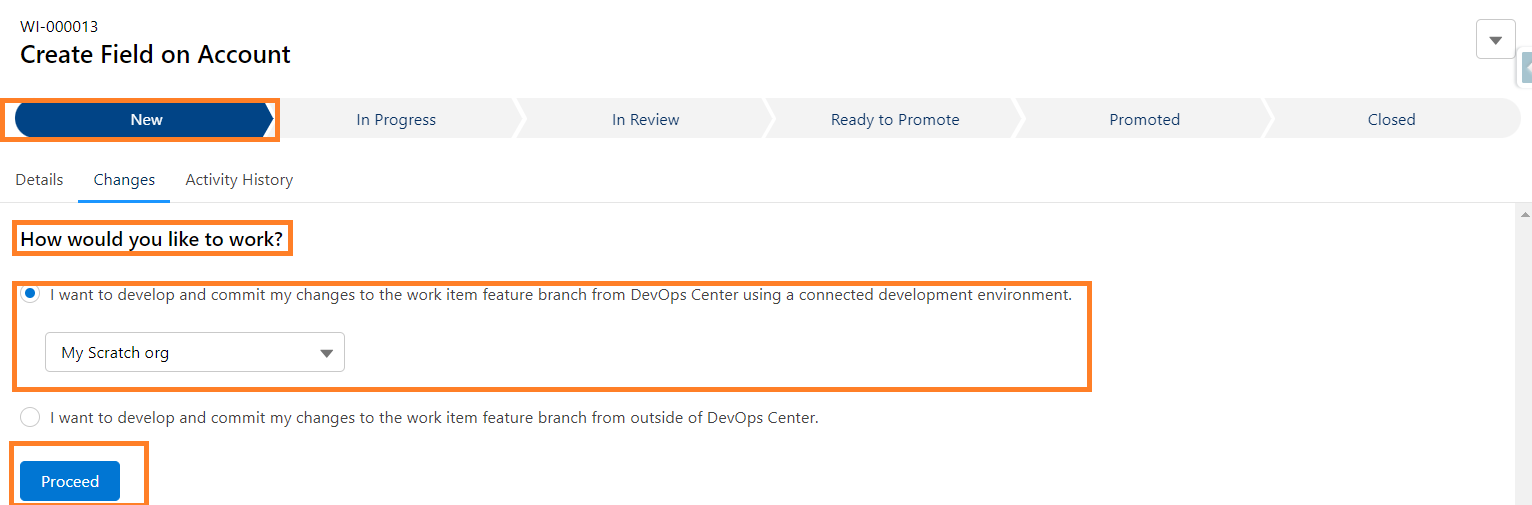
5. Click on your work item. On New stage, you need to specify where you are going to work.
6. Choose I want to develop and commit my changes to the work item feature branch from DevOps Center using a connected development environment.
7. From drop down select your development environment. And Click on Proceed.
8. When you click on Proceed if you get This environment is out of sync, then click on Go to Environment Tab Button.
9. After that you get Sync button under your development Environment. Click on Sync button. Then click on Start Sync.
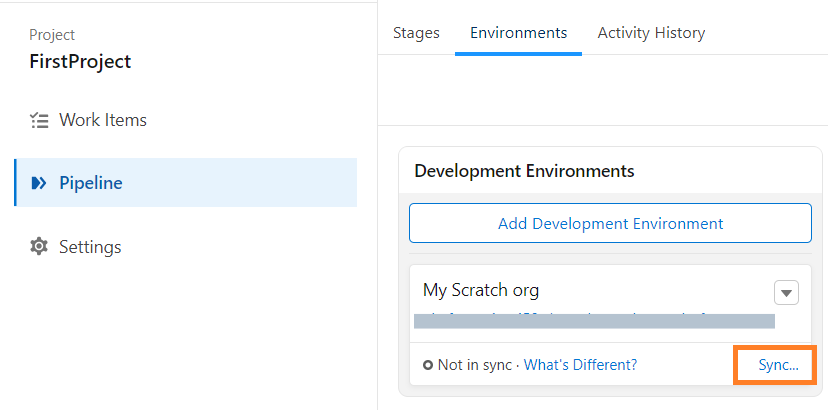
10. After successful syncing. Repeat 5 -7 steps.
Create a custom field on Account:
- Log into Development Environment org(where you are going to do development related work).
- Click on setup, then click on object manager.
- From Quick find box search for Account and click on it
- Click on Fields and Relationship then click on New.

5. For Data type choose Text. For field label fill Test Account.
6. For Length fill 255. Click on Next.
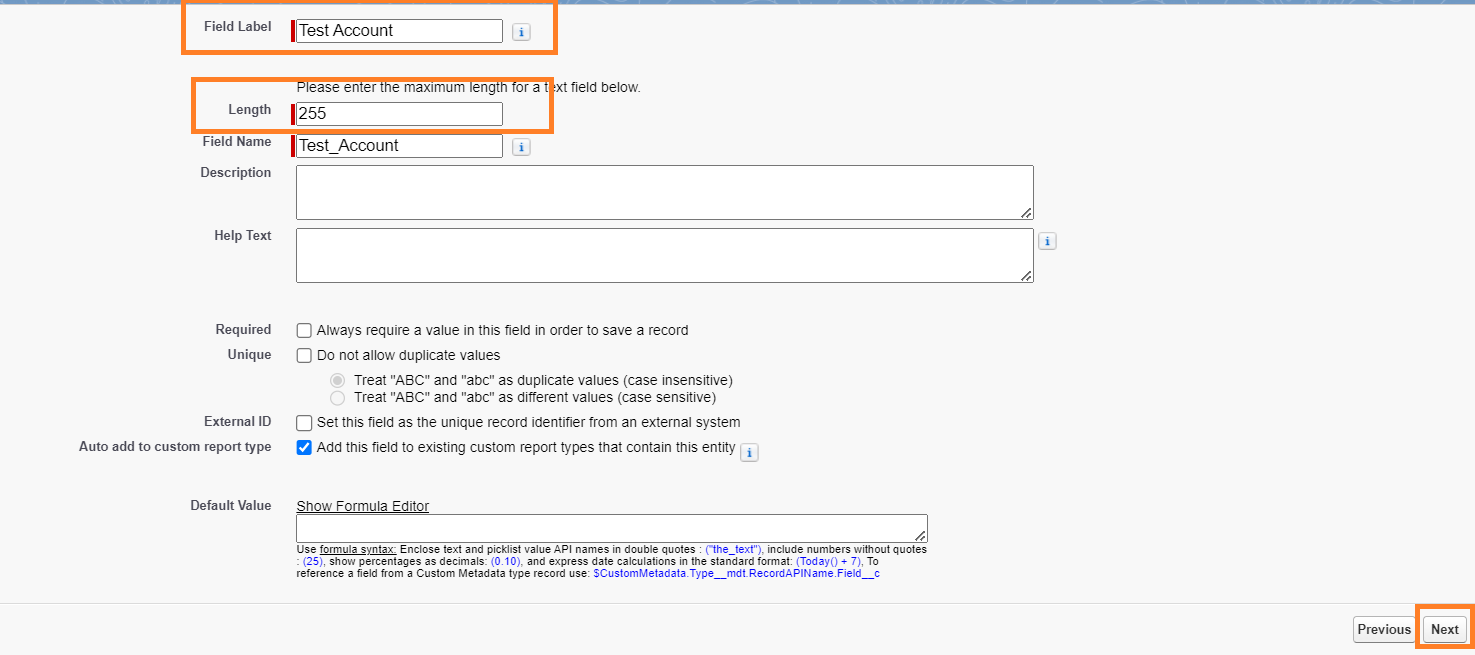
7. Set the visibility for all. Click on Next.
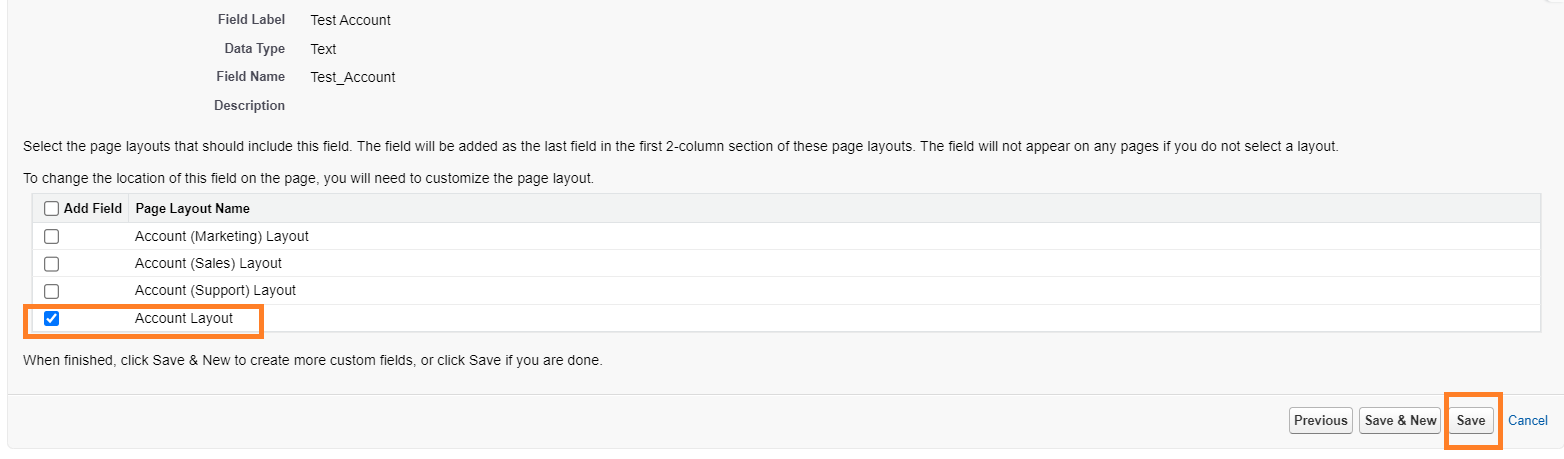
8. Check the Account Layout and click on Save.
Retrieve Custom field and meta data from Development Environment:
- To add metadata changes to Work Item, there are 2 options:
- Pull Changes button – it will pull all the modified changes from the development environment.
- Add Components Manually – you can select components manually to add to Work Item.
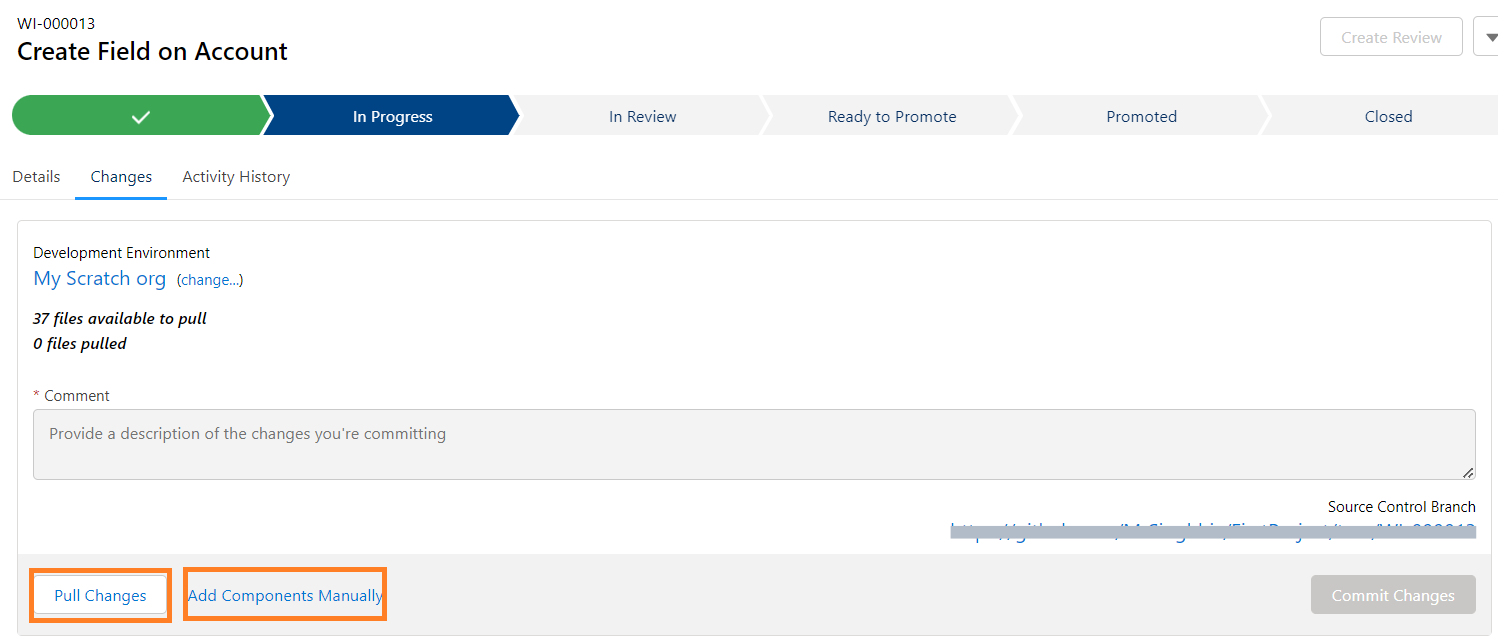
2. Click on Pull changes button.
3. Select the Test Account Field.
4. Write comment in comment field and click on Commit changes.

Create Review:
- After the metadata component is committed, Click on Create Review button in the top right corner.
- After clicking on Create Review, the Work Item moves into the In Review stage. In the back-end, a pull request is created.

Pipeline Promotion:
- After creating a pull request, it can be marked as Ready to Promote. This will make the Work Item available to promote to the next environment in the pipeline.
- Enable the Ready to promote.

Promote the Work Item:
- The last step is to Promote the Work Item. Multiple Work Items can be bundled in a single promotion and moved to the next environment.
- Click on the pipeline left side on screen.
- Check the checkbox under the Approved Work Items and click on Promote Selected.

4. For Changes to Promote select Changes not in the UAT stage.
5. For Test option select Default then click on Promote.
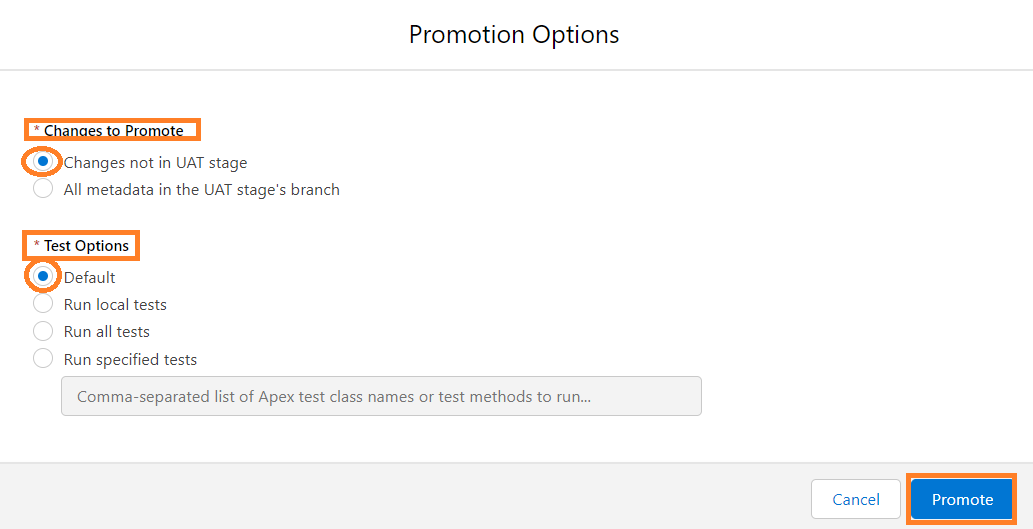
6. It will be deployed in the next environment.
7. Login into that environment where you deployed the changes.
8. That field will be reflected in Account object.
9. To deploy in next environment follow the same steps(3-6) if you have more stages between Production and Development Environment .
10. To Promote In Production Environment you will get Promote as Work item Bundle button click on it.

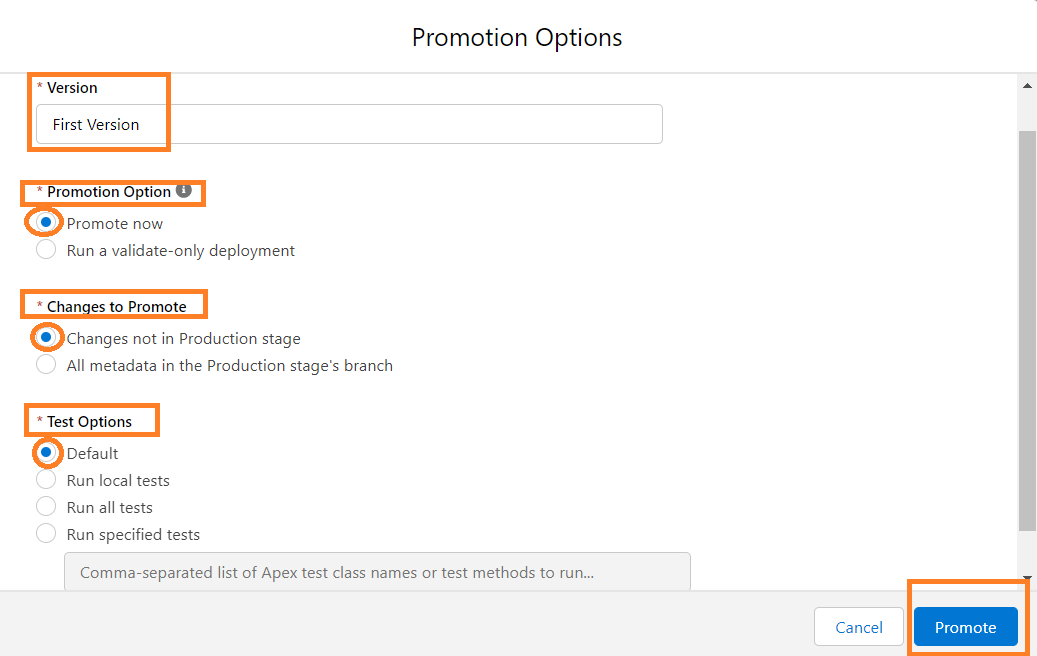
11. For Version enter any Unique name.
12. Choose to Promote Now for the Promotion Option.
13. For Changes to Promote choose Changes not in the Production stage.
14. For Test Options choose Default. Then Click on Promote.
15. Congratulations you have deployed the Custom field from Dev Environment>UAT Environment>Production Environment.
16. Login into your Production org and you will see the Test Account field on the Account object.

Conclusion:
With DevOps Center, teams can deliver solutions faster, improve quality, and increase customer satisfaction. DevOps Center is available as a managed package that can be installed in various Salesforce editions at no additional cost.





