Companies can finally connect Amazon Redshift to Salesforce Data Cloud without using the ordinary username & password authentication systems ever since its collaboration with AWS has happened.
Business owners no longer have to be concerned about managing static credentials or breaching data security. By leveraging Salesforce IDP, companies can easily access their data lakehouse in a much more secure & protected environment.
Let’s discuss Salesforce IDP’s advantages, describe how to implement it in Data Cloud, and outline how to integrate Amazon Redshift and grant access rights thereafter.
A Basic Understanding of Identity Provider (IDP)
An Identity Provider (or IDP), is in charge of authenticating an individual who is accessing a system, and authorizing him to many services affiliated with this individual’s applications.
Traditional Authentication: Joining Data Cloud with AWS via Static Credentials
In the past, combining Salesforce Data Cloud with external apps like Amazon Redshift involved setting connections manually through static credentials—passwords, private keys, and usernames. This was a standard practice, albeit with several pitfalls:
- Security Vulnerabilities – Static credentials have longevity, so their exposure to improper access is magnified.
- Operational Challenges – Getting a secure connection requires Data Cloud and AWS administrators to work closely together, which sometimes causes delays.
- Continuous Maintenance – Organizations implementing credential rotation every 60 or 90 days experienced constant updates, contributing to operational overhead.
Strengthening Security & Simplifying Integration with Salesforce IDP
Salesforce Identity Provider (IDP)–based authentication provides a more secure and streamlined method of integrating Salesforce Data Cloud with AWS services, avoiding static credential risks and complexity.
- Improved Security – Conventional username-password authentication is susceptible to attacks. IDP-based authentication eliminates the storage of static credentials through the use of short-lived, scoped tokens granting just-in-time access, minimizing the risk of phishing and unauthorized breaks.
- Easier Management – In the past, establishing secure connections involved manual coordination between AWS and Data Cloud administrators. Today, Data Cloud admins can create connections based on AWS IAM roles set up by the AWS admin, making workflows easier and administrative burdens lighter.
- Compliance in Industry – Industries such as finance and healthcare need to adhere to rigorous security and compliance measures. IDP-based authentication is compliant with identity and access management best practices, and it will provide constant compliance and protect sensitive information.
With the use of Salesforce IDP, organizations can improve security, streamline authentication, and ensure regulatory compliance while smoothly integrating Salesforce Data Cloud with AWS.
How to Setup IDP Authentication and AWS Connection in Salesforce Data Cloud
In this guide, we’ll walk through the step-by-step process of establishing a secure AWS connection in Salesforce Data Cloud using Salesforce Identity Provider (IDP).
Step 1: Configuring Salesforce as an Identity Provider in AWS
To enable Salesforce IDP authentication in AWS, follow these steps:
- Sign in to your AWS account.
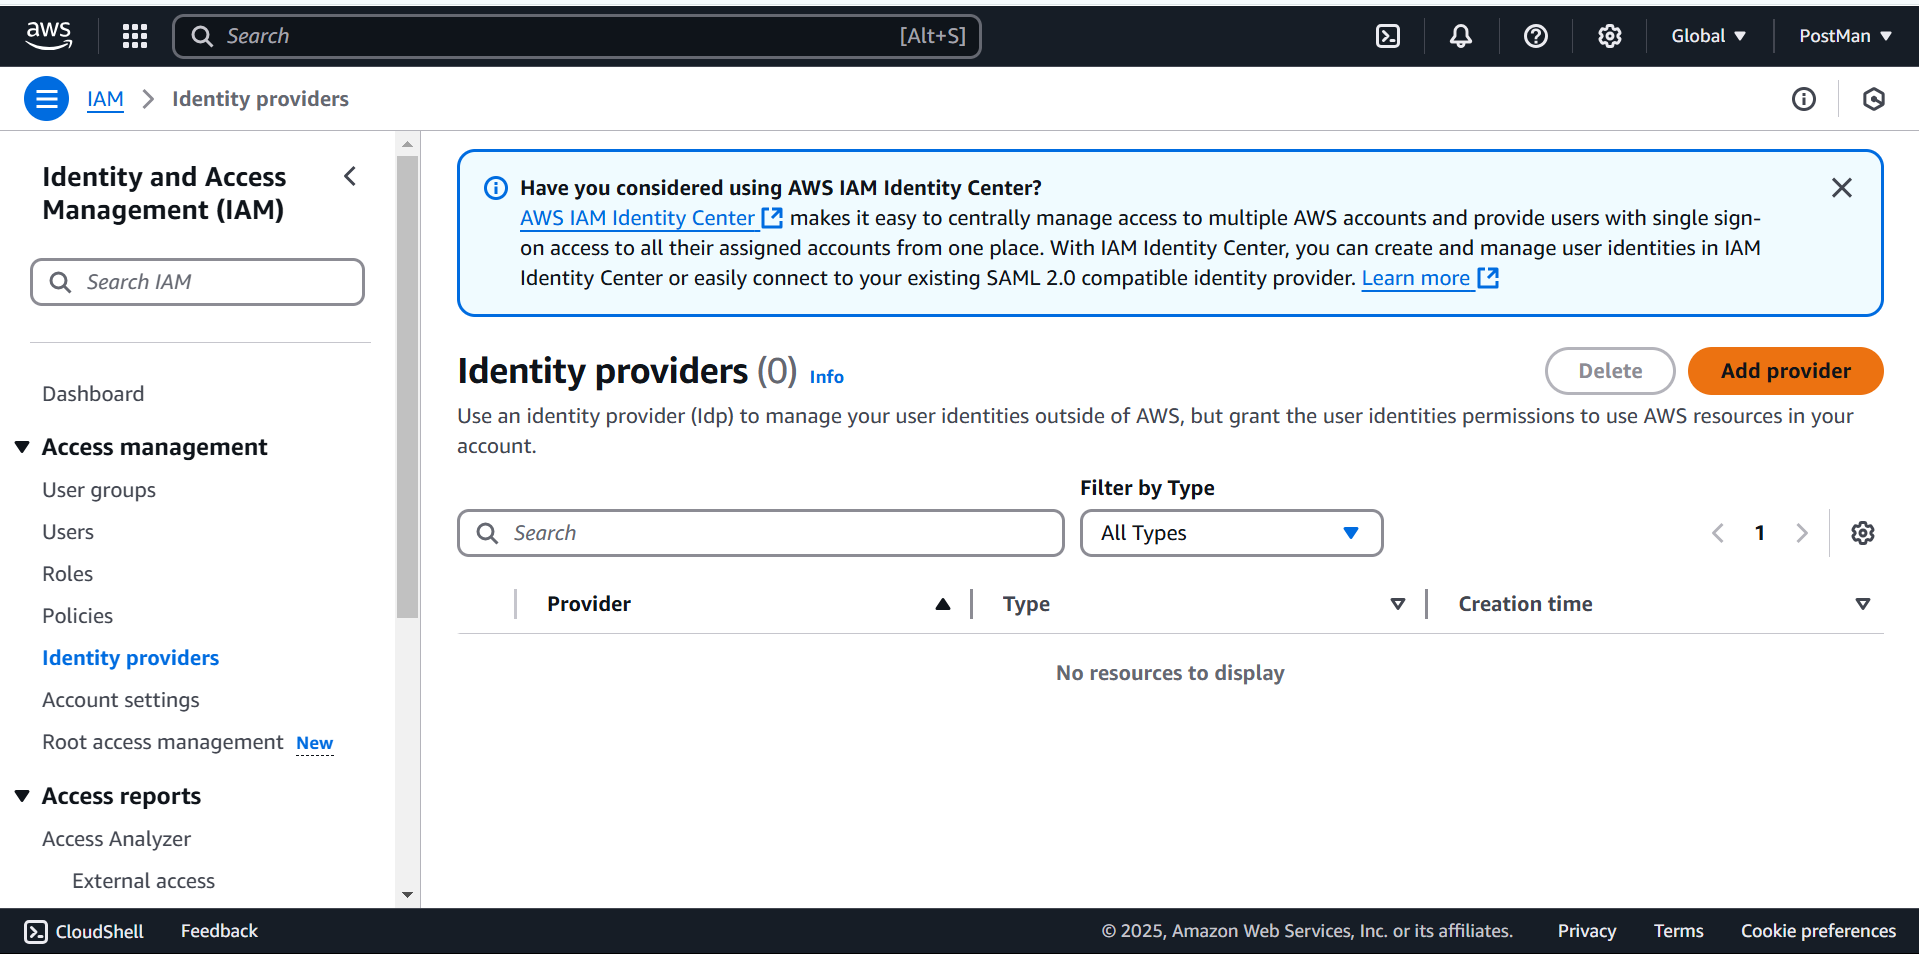
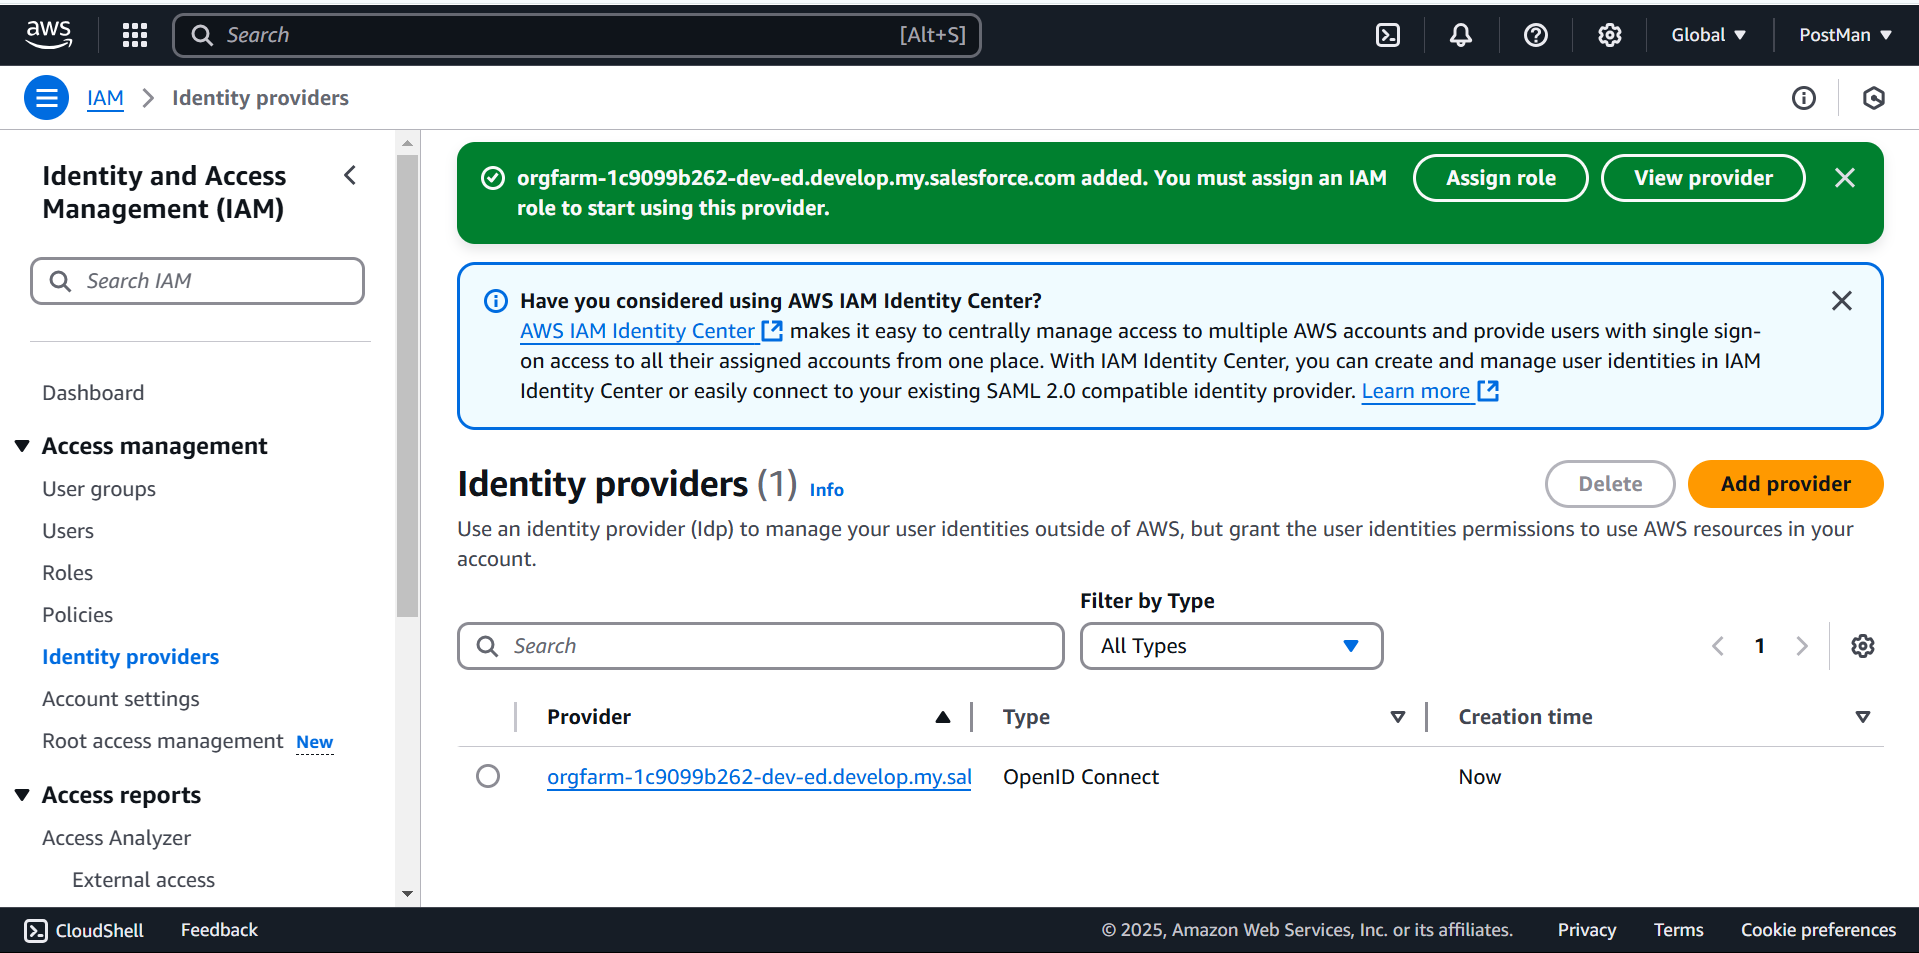
- Navigate to IAM (Identity and Access Management) and select Identity Providers from the menu.
- Click Add Provider to create a new identity provider.
- Under Configure Provider, choose OpenID Connect as the provider type.
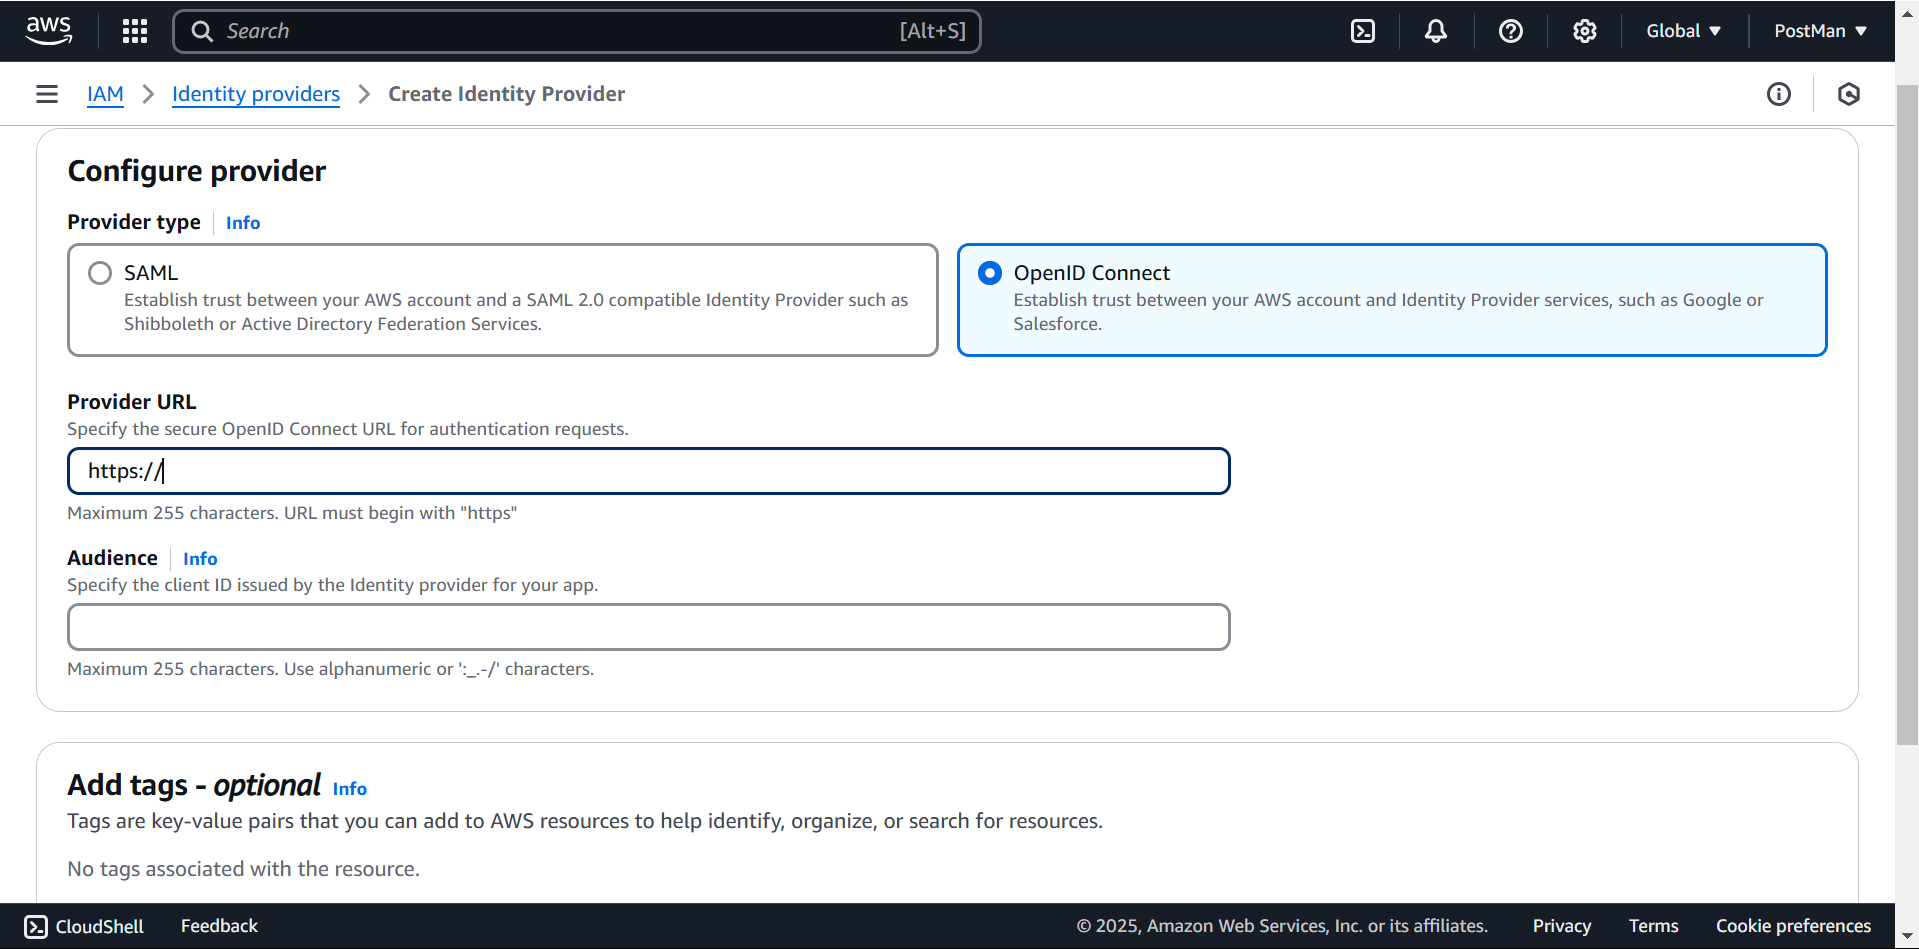
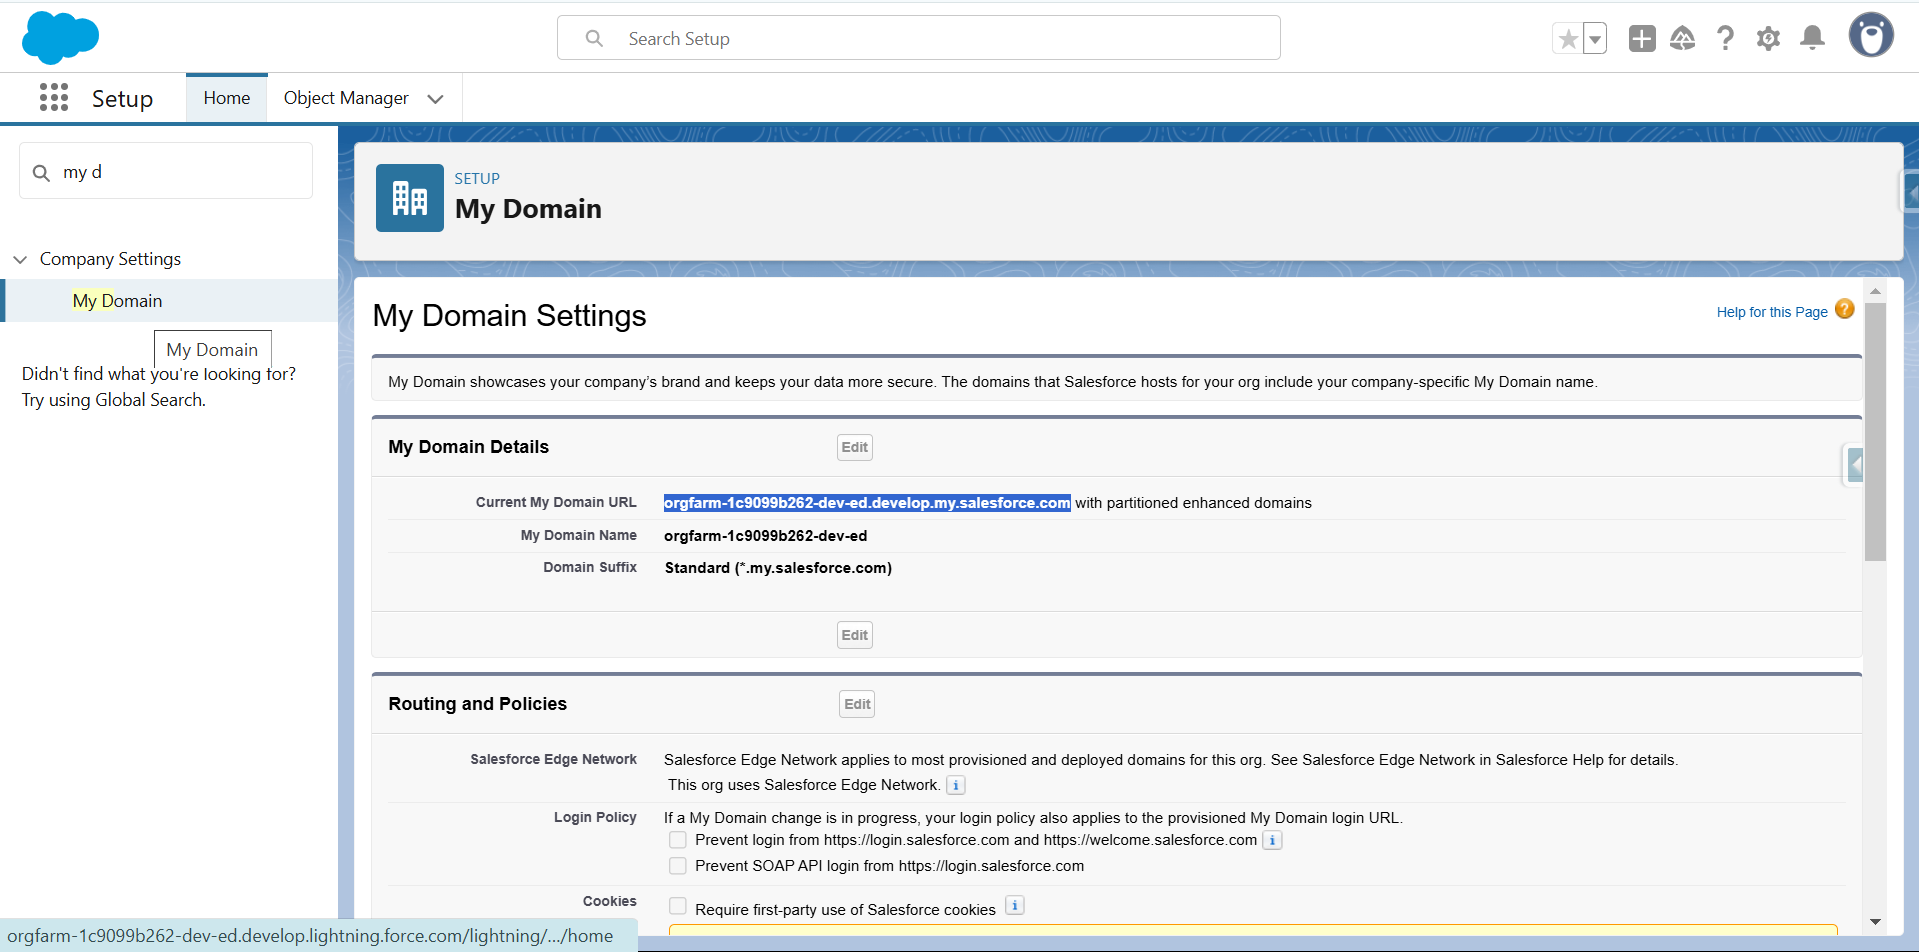
- Enter your My Domain URL in the Provider URL field and specify the audience.
- Review the details and click Add Provider to complete the setup. AWS will retrieve the certificate authority (CA) thumbprint of the OpenID Connect (OIDC) identity provider automatically.
Tip: To find your Domain URL, go to Setup in Salesforce Data Cloud, navigate to Settings > Company Settings, and select My Domain. You can refer to Salesforce’s official My Domain documentation for additional details.
Step 2: Establishing the AWS Connection in Salesforce Data Cloud
To connect Salesforce Data Cloud with AWS, follow these steps:
- Navigate to Data Cloud Setup in Salesforce.
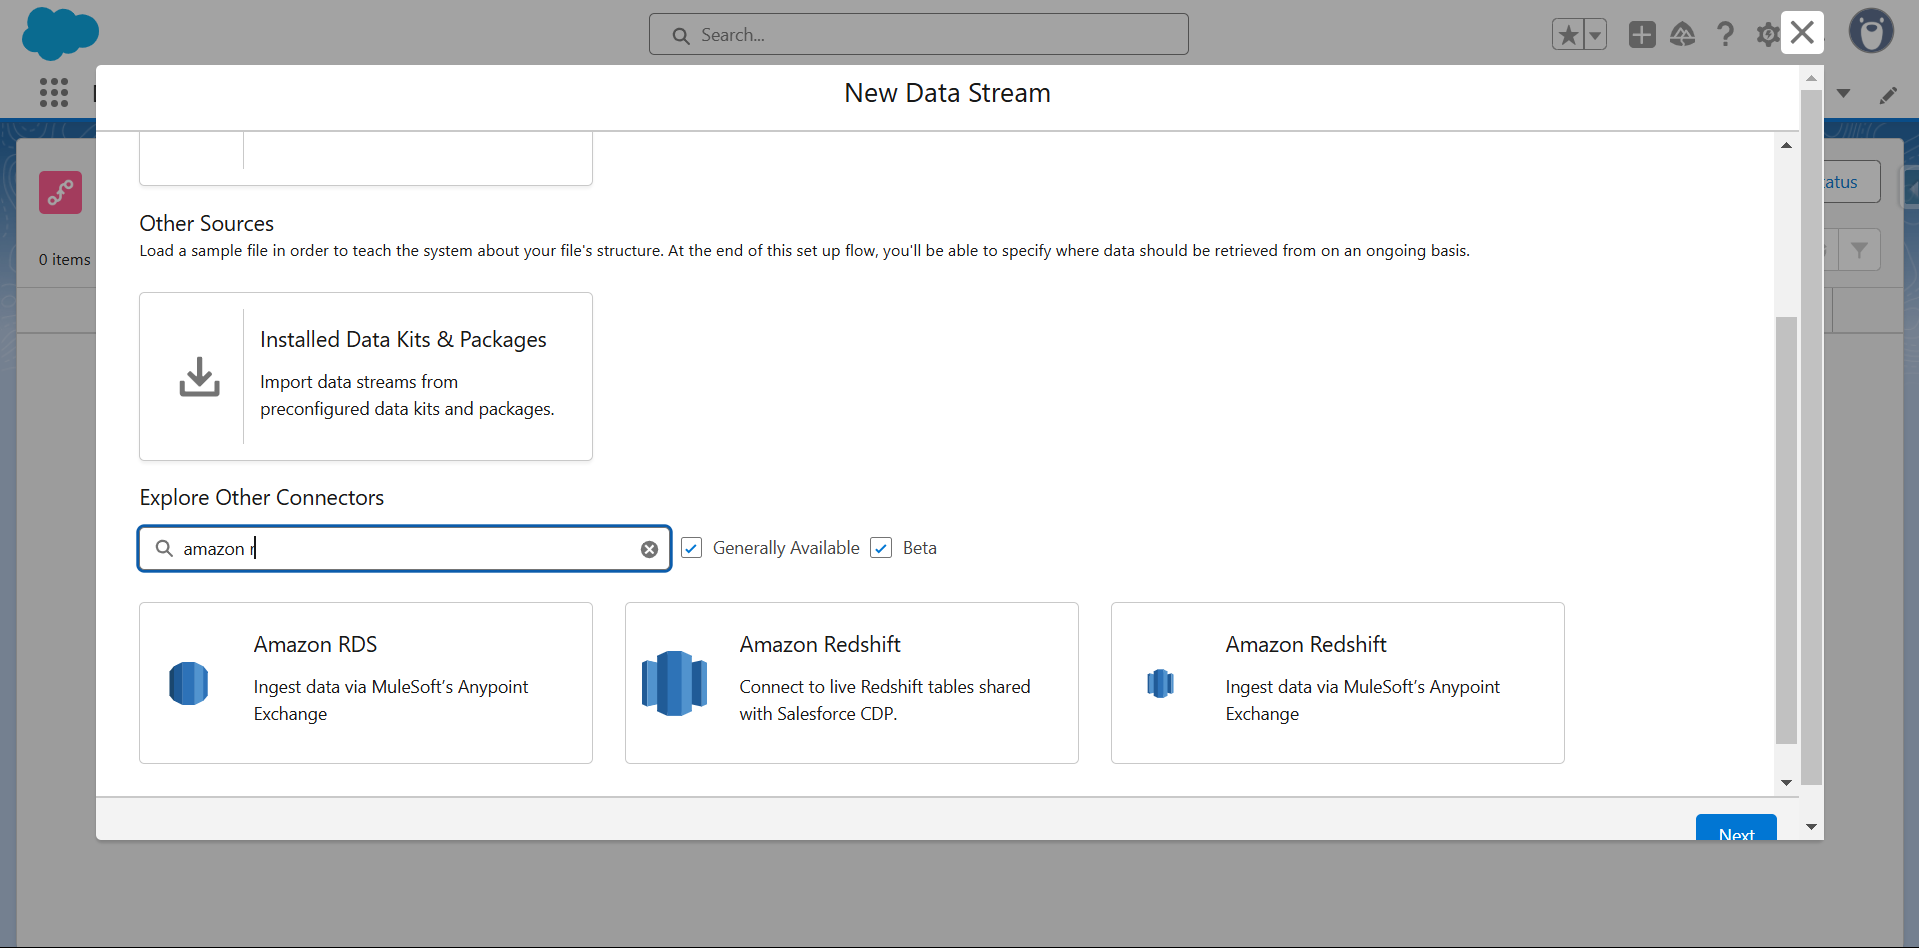
- Under External Integrations, select Other Connectors and click New.
- In the Source selection, choose Amazon Redshift, then click Next.
- You will be presented with two authentication options:
- Username/Password-based authentication
- Identity Provider (IDP)-based authentication
- Select Identity Provider-Based Authentication. This option will generate a unique External ID, which serves as a connection ID for establishing a trust relationship with AWS (explained in Step 3).
- Provide the IAM Role Name created in AWS, which is authorized by Salesforce IDP. This role enables Data Cloud to securely access AWS resources.
- Retrieve the Amazon Resource Name (ARN) from AWS IAM and enter it in the IAM Role Name field within the Salesforce Active Connection setup.
- Enter your JDBC URL from Amazon Redshift:
- Locate the JDBC URL under the General Information section of your Redshift cluster page.
- Add the database name from Redshift.
- Click Test Connection to verify the setup. If successful, click Save to establish the connection.
Note: If you’re using a Private Network Route, ensure that a private connection has been configured. Follow AWS’s official guidance on establishing an inbound connection with AWS. Once completed, select the private connection under Data Cloud Setup and enable the Private Network Route toggle while setting up the connection.
Step 3: Creating an IAM Role in AWS for Salesforce Data Cloud Access
After configuring Salesforce IDP in AWS, the second step is to establish an IAM role that grants Salesforce Data Cloud users secure access to AWS resources. The role protects AWS services such as Amazon Redshift from access by unauthorized users.
To set up the IAM role, proceed as follows:
Go to IAM Roles in AWS:
- Log in to AWS and launch the IAM (Identity and Access Management) console.
- In the left-hand navigation pane, choose Roles and click on Create Role.
Define IAM Role Permissions:
- Both IAM roles have two parts: Permissions Policy and Trust Relationship.
- In the Permissions section, choose which AWS resources this role should be able to access (e.g., S3 buckets, Redshift clusters) and identify the actions permitted (e.g., read, write, delete).
- Apply the required policies to provide Data Cloud with the necessary level of access.
Set up a Trust Relationship with Salesforce IDP
- The Trust Relationship specifies which external identity provider (IDP) is permitted to take on this IAM role.
- As we set up Salesforce IDP in Step 1, we will now designate it as the trusted identity provider.
- When creating the trust policy, enter the External ID (created in Step 2) to limit access to approved requests from Salesforce Data Cloud.
Save and Complete the Role:
- After setting the Permissions Policy and Trust Relationship, click Save to finalize the creation of the role.
- This IAM role is ready to use now with the AWS connection made in Step 2.
Concluding Words
By leveraging Salesforce IDP for authentication, businesses can securely integrate Salesforce Data Cloud with Amazon Redshift without the complexities of static credentials. This approach enhances security, simplifies administration, and ensures compliance with industry standards—making data access seamless and protected. Stay tuned for more updates!