




Salesforce REST API lets you integrate Salesforce into the External system. With REST API
we can expose our salesforce org data to an external system or we can fetch data from an external system into the Salesforce org.
Now if we have created any API in our system then we have to test it if it is working fine for users. Several methods exist for testing APIs, but Swagger is a popular one.
Swagger is one of the tools for documenting API. You can test your API right in the documentation using Swagger. JSON or YAML can be used to define Swagger definitions.
So here in this blog, we tried to let you know how to configure your org so that you can test your APIs using swagger. Let’s begin
Complete guide to test APIs using Swagger
Here we are using a “httpget” request to make you familiar with how we can use the swagger API tool for exposing salesforce org data to an external system.
In this scenario, we hit a get request in the swagger editor and it will give us the order list in the form of JSON.
Here are the steps:
Step 1. First, make your apex class available for the Rest web services by using a global specifier for both class and method.
Code of APEX class
Step 2. Now in Setup go to the quick find box and type sites

Step 3. If you are not having any sites please create one and if you are having sites please select any site. Here we will permit the external user to access our class.

Step 4. After selecting the sites click on “Public Access Settings”.

Step 5. Here click on “Enabled Apex Class Access”

Step 6. Here we are going to add the apex class so click on edit.

Step 7. Select the apex class which you have created as an API and add it

Step 8. Now after adding the class to the site user we still have to add the swagger site to CORS so that the swagger website is able to access our org. So go to the quick find box and type CORS

Step 9. Click on the New button

Step 10. Add this Url to CORS
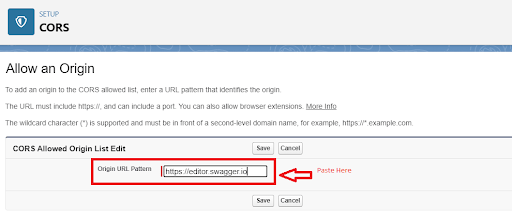
Step 11.Create a Swagger file
Here we are done with our setting now we have to create a Swagger file for this go to this link and create a new file.
(i) Here first we have swagger as a starting element and its version must be not more than 2.0.
(ii) now in info define any version and title of your choice.
(iii) In the host tag define your org URL while in the path tag defines your base path and add /service/apexrest as it is necessary to hit APEX APIs.
(iv) after that in path define the URL/path that you have mentioned in your class. And start coding
As per the need of your class.
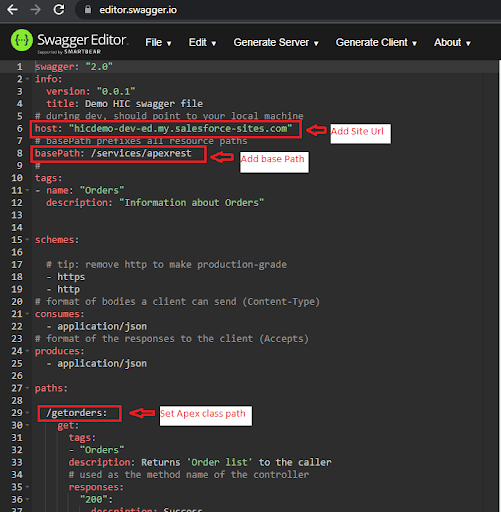
Swagger Code:
Step 12. Once your swagger code is complete, on the right side you will get the UI to work on.
Here just for testing purposes paste our code and you will get a list of orders from our org. Click on GET Button and you will get the result.
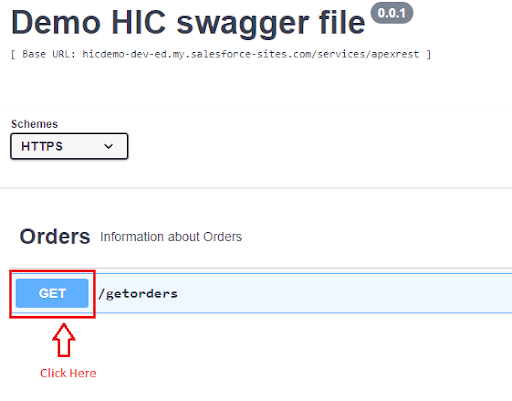
Step 13. Click on Execute Button and it will hit the API whose URL is provided in the swagger method.

Step 14. Here you will get the response depending on the response body you have sent by your apex class.

Conclusion
So, here it is, a complete guide on using Swagger to test APIs in salesforce.
We’d love to hear about your experience with the solution. Keep an eye out for more interesting Salesforce development solutions on our blogs and Stay tuned for the next one. Happy Learning!





