




In this blog today, we have brought a solution that comes in handy when the original approver User goes out of the office or is unavailable. Usually, in such scenarios, the original approver designates a delegated approver user to approve requests on behalf of the User.
As the delegated approver is a substitute one, they have limited access to approval requests. Though they can approve or reject approval requests, they cannot reassign any approval requests.
But If populated, this user gets the exact approval requests rights as the original approver.
There are multiple solutions possible to auto-populate this field when a new user is created. In the example today, we will explain how we can achieve this using lightning flows.
Auto-populate delegated approver field for new users using Lightning Flows
To achieve this automation we have divided this into three parts which are
- Define flow properties for record-triggered flow.
- Add a Decision element to check if the manager is populated or not.
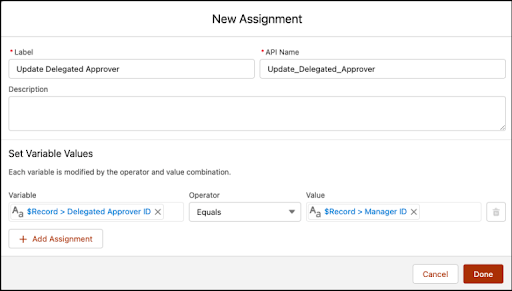
- Add an assignment element to populate delegated approver.
1. Define Flow Properties
1. Click Setup.
2. In the Quick Find box, type Flows.
3. Select Flows then click on the New Flow.
4. Select the Record-Triggered Flow option, click on Create and configure the flow as follows:
- Object: User
- Trigger the Flow When: A record is created or updated
- Set Entry Criteria
- Condition Requirements: None
- Optimize the Flow For Fast Fields Update
5. Click Done.

2. Using Decision Element to Check if the Manager is Populated or Not
1. On Flow Designer, click on the + icon and select the Decision element.
2. Enter a name in the Label field; the API Name will auto-populate.
3. Under Outcome Details, enter the Label the API Name will auto-populate.
4. Condition Requirements to Execute Outcome: All Conditions Are Met (AND)
1. Row 1:
- Resource: {!$Record.Id}
- Operator: Is Null
- Value: {!$GlobalConstant.True}
2. Click Add Condition
3. Row 2:
- Resource: {!$Record.ManagerId}
- Operator: Is Null
- Value: {!$GlobalConstant.False}
5. When to Execute Outcome: If the condition requirements are met.
6. Click Done.

3. Using Assignment Element to Update Delegated Approver
- On Flow Designer, below the Yes node, click on the +icon and select the Assignment element.
- Enter a name in the Label field; the API Name will auto-populate.
- Set Variable Value
1. Row 1:
- Field: {!$Record.DelegatedApproverId}
- Operator: Equals
- Value: {!$Record.ManagerId}
4. Click Done
Save the Flow
After these 3 steps flow will look like this :

Once everything looks good, perform the steps below:
- Click Save.
- Enter Flow Label the API Name will auto-populate.
- Click Save.
Proof of Concept
Now onwards if a user is created, the Delegated Approver will be automatically populated.
- Navigate to Setup | Administration | Users | Users
- Create a New User and mark it as Active, make sure to populate Manager.

- Now click on Save.
- Navigate to Delegated Approver and you will find the user automatically added.
Conclusion
So, here is your detailed guide to adding delegated approved fields on a new user using the Lightning Flow.
Hope this article helps! If you have any queries or concerns or would like to add value to this piece, please reach out to us anytime!





