
Salesforce to Google Drive Integration is crucial for many businesses. It improves team collaboration by facilitating real-time synchronization of Google Sheets, Docs, Slides, and forms to an opportunity, account, or customer contact in Salesforce. As Salesforce analyzes data and generates reports, this integration proves beneficial with real-time updates, business process optimization, multi-level data security, increased storage, and reduced cost.
So, if you are looking to integrate Salesforce with Google Drive, Here are the steps and code to get a seamless integration experience.
Steps to Integrate Salesforce to Google Drive :
Step 1: Create an Authentication Provider for Google Drive
To use Google Drive as an external data source, create an authentication provider for it in Salesforce. The process begins with creating a related project in the Google Developers console.
Create a Project in the Google Developers Console :
- Log in to https://console.cloud.google.com.
2. Select Project and click Create Project.
3. Enter a project name and location, and click Create.
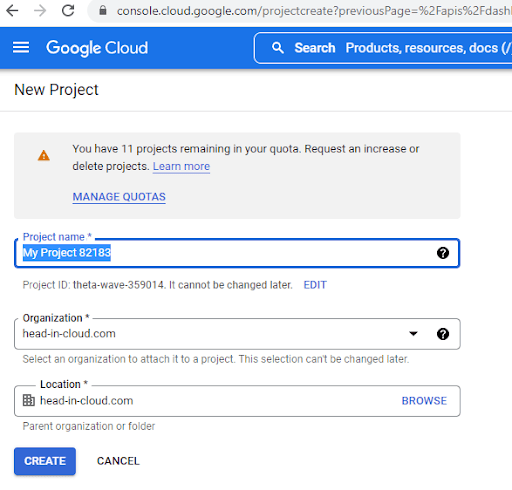
4. In the project dashboard, click the menu icon in the upper left, and then click APIs & Services.

5. In the API manager, go to the Library tab and search for Google Drive API.
6. In the search results, click Google Drive API and Enable API.

7. In the menu on the left, click Credentials.
8. In the OAuth Consent Screen tab, enter a valid email address and application name, and click Save.
9. In the Credentials tab, click Add credentials and select OAuth client ID.

10. Select Web application, and click Create.
11. Copy the client ID and client secret values to a text file. Use these values when creating an authentication provider in Salesforce.
Step: 2 Create an Authentication Provider in Salesforce
In Setup, enter Auth. Providers in the Quick Find box, then select Auth. Providers. Click New.
- For Provider Type, select OpenID Connect, and then set the following options:
- Name — Enter the name you want to appear in Salesforce.
- URL Suffix — Enter the suffix at the end of the URL path. For example, in the path, https://login.salesforce.com/services/authcallback/00Dx00000000001/MyGoogleProvider, the suffix is “MyGoogleProvider”
- Consumer Key — Enter the client ID you copied when creating the Google project.
- Consumer Secret — Enter the client secret you copied when creating the Google project.
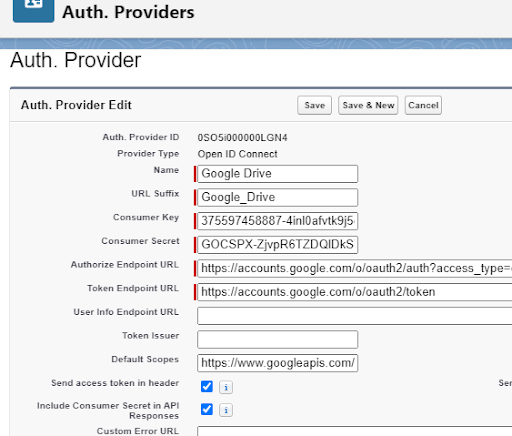
2. Authorize Endpoint URL —Enter
https://accounts.google.com/o/oauth2/auth?access_type=offline&approval_prompt=force
- Token Endpoint URL — Enter https://accounts.google.com/o/oauth2/token
- Default Scopes — Enter openid email profile https://www.googleapis.com/auth/drive
- Click Save. Then, at the bottom of the Auth. Provider detail page, copy the Callback URL entry to a text file. (Use this URL when editing the Google project.)
- Edit the Project in the Google Developer Console
- In the API Manager, in the menu on the left, click Credentials.
- Click the previously created web app.
- In the Authorized Redirect URIs section, add the Callback URL you copied when creating the authentication provider in Salesforce, and click Save.
3. Now we will create Named Credential in Salesforce :
- Go to Setup and search for Named Credentials.
- Click on New Named Credential.
- For Label give GoogleDrive.
- For URL use https://www.googleapis.com/drive/v2.
- For Identity, Type choose Named Principal.
- Choose OAuth 2.0 for Authentication Protocol.
- For Authentication Provider choose GoogleAuth (we created auth provider in step 2).
4. Check Start Authentication Flow on the Save checkbox and click on Save.
5. After saving it will redirect to the google login page, login with your account.
6. Next, we will get a screen asking for permission to allow access to Google Drive
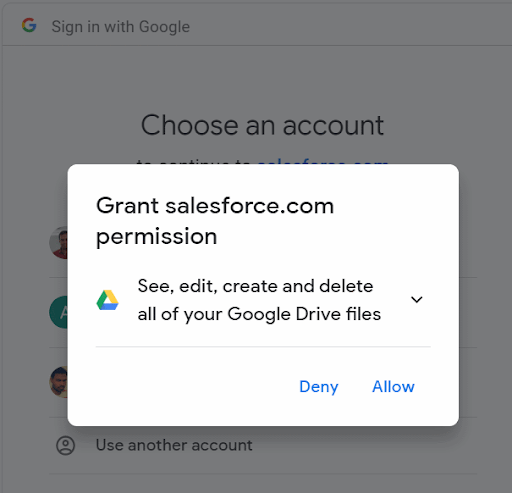
7. Click on Allow, next we will see a confirmation dialog, click Allow again.
8. After this we will be redirected to the Named Credential detail page. Here we will see Authentication Status as Authenticated.
Step 3: Now we will make a callout and get the Attachment in our Google Drive Account.
Open Developer Console and paste the Below codes
Code
Trigger:
Batch to Handle File
Utility Class:
Note : Create fields in the classes if needed , which are available in code.
Conclusion
So, here it is, our strategic guide to integrating Salesforce with Google Drive. Try out the solution and share your experience with us. Also, stay tuned to our blogs for more interesting Salesforce development services. Catch you on the next one. Happy Learning!
Frequently Asked Questions
Why should I integrate Salesforce with Google Drive?
Integrating Salesforce with Google Drive allows users to store, share, and access documents directly from Salesforce. It helps centralize file management, improve collaboration, and reduce Salesforce storage costs.
What are the different ways to integrate Salesforce with Google Drive?
Salesforce can be integrated with Google Drive using multiple methods: native features like Files Connect, third-party apps from AppExchange, or custom API integrations with Salesforce REST API and Google Drive API.
Is Salesforce Files Connect free for Google Drive integration?
Salesforce Files Connect supports Google Drive integration, but availability depends on your Salesforce edition and license. Some editions include it, while others may require additional configuration or licensing.
Can I automatically sync files between Salesforce and Google Drive?
Yes. With proper integration setup (via APIs or third-party tools), you can enable automatic syncing so that files added in Salesforce are updated in Google Drive and vice versa, ensuring consistency and real-time collaboration.
Is the Salesforce–Google Drive integration secure?
Yes. Both Salesforce and Google Drive provide enterprise-grade security. Using OAuth 2.0 authentication, role-based access, and proper permission settings ensures data security, compliance, and controlled file access.