




Today, Most companies prefer digital document signing over the old-age paper-based signing method.
And we all know that DocuSign is a powerful tool that allows instant electronic signature generation for any document.
So, the global CRM leader Salesforce built a plugin to enable its users to capture digital signatures using DocuSign right from their Salesforce org.
So, for this week’s issue, we have brought a strategic guide on how to install and configure DocuSign in Salesforce org without any code.
So, let’s jump straight to the installation and Setup process.
Step by Step Guide to Install and Set up DocuSign
How to install DocuSign in Salesforce org
To get started with codeless DocuSign configuration in your Salesforce org, first, we need to install Salesforce’s app “DocuSign eSignature for Salesforce: The trusted eSignature solution” from Salesforce AppExchange.
Step 1
Visit Salesforce AppExchange and search for DocuSign eSignature for Salesforce in the search bar. Once the app page is displayed, click on ‘Get It Now.

Step 2
Next, you will be prompted to log in to your Salesforce Account. After successful login, you will be asked whether you want to install the package in Production or sandbox.
Click on “Click here” to continue installing in Production.

Step 3
Review all the information details and click on the checkbox for terms and conditions. Then click on Confirm and Install.
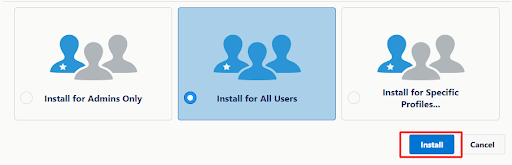
After confirmation, you will be asked whether you want to install for users, admins, or specific groups. Select the options you want and click on Install.
After the installation is complete, you should be able to see DocuSign in the installed packages list of your Salesforce org.
How to set up DocuSign in Salesforce org
Step 1
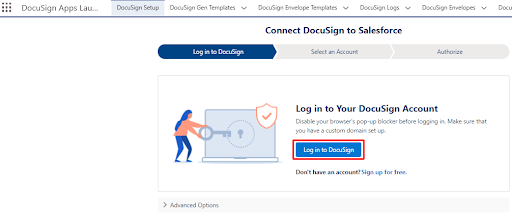
To configure DocuSign, Go to the AppLauncher and search for DocuSign. Now, Click on the app and go to DocuSign Setup.
You will be asked to log in to DocuSign. In case you don’t have a DocuSign account, you can sign up from here as well.
Step 2
Select the login options as you please. Choose Advanced Options if you are not using any production account or you may select Log into Demo Account if you are looking for a DocuSign Demo or using a Sandbox account.

Step 3
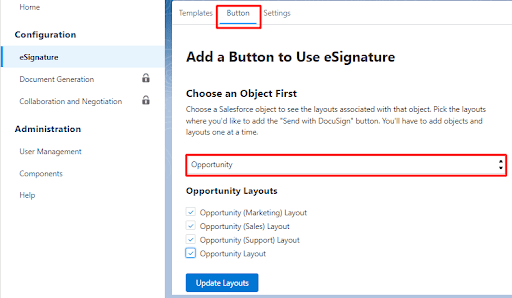
In this step, you will configure the e-signature functionality by adding a Button. Click on eSignature→Button.
Now, choose your desired Object to see the layouts. Then Select the layouts where you would like to add the ‘Send with DocuSign’ button. Click on Update Layouts.
Step 4
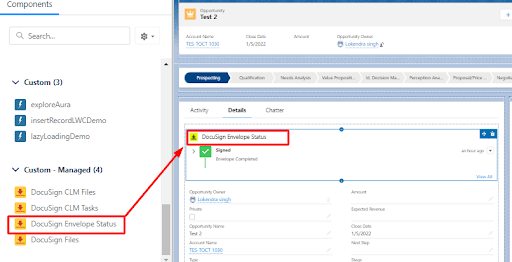
To see the DocuSign Files, go to Component and scroll down to the Custom-Managed section and click on DocuSign Files.

Step 5
You can now see the status as Signed in the Details section by clicking on DocuSign Envelope Status.
Conclusion
We hope you find this guide helpful. Try out this solution for an effortless e-signature generation with DocuSign right from your Salesforce stance.
Also, get in touch with our Salesforce developers at HIC Global Solutions in case you need any assistance with any Salesforce development project. Stay in touch and keep learning!





