
Salesforce CPQ (Configure, Price, Quote) is a powerful tool that enables businesses to streamline their quoting process by providing advanced configuration options.
Among its many features, Multi-Dimensional Quoting (MDQ) stands out as a powerful capability that allows sales teams to create more detailed and flexible quotes for complex products.
In this blog, we’ll dive into the technical aspects of MDQ products in Salesforce CPQ, exploring how they work, their benefits, and how to set them up effectively.
What is Multi-Dimensional Quoting (MDQ)?
Multi-Dimensional Quoting (MDQ) is a feature in Salesforce CPQ that allows sales reps to split a single product into multiple segments or dimensions. Each of them can be independently priced and quoted.
This is particularly useful for products that are sold regularly, such as subscriptions or services that are delivered over time. With MDQ, you can create quotes that reflect different pricing for different time periods, usage levels, or any other dimension that fits your business model.
The Key Features of MDQ Products
- It lets you break a product into different time segments within a single quote using the Quote Line Editor (QLE).
- Each segment can have its quantity and discounts.
- Separate quote lines are created for each time segment.
- You can also apply year-over-year price increases.
Things to Consider for MDQ Products
- The quote needs a start date, or the calculations won’t be accurate.
- MDQ products only work with month-based subscription terms.
- MDQ products can’t be the main item in a bundle.
- A regular bundle can include an MDQ product as a child option.
a. The main bundle will show up in the standard table, while the MDQ product will be listed separately in the segment table.
b. The quantity of the MDQ product is independent of the main bundle. - MDQ products can’t be configured and don’t have configuration attributes.
How to Set Up an MDQ Product
Here are the key steps for you to set up an MDQ product that you must know:
1. Create a Product
You can start by creating a new product in Salesforce CPQ. Before moving ahead, you need to make sure that the product has a subscription product.
2. Define Price Dimensions
Now, add the necessary price dimensions to your product, including setting up time-based segments (e.g., yearly, quarterly, one-time, custom).
3. Customize Quote Templates
At last, modify your quote templates to properly display MDQ products. You need to ensure that each segment is listed with its corresponding price and terms.
💡 Tips for MDQ Products
1. Before you start using MDQ with customers, test it thoroughly to make sure everything works as expected..
2. Make sure your sales team understands how MDQ works and when to use it. This will help them create accurate and effective quotes..
3. Ensure that your quote templates clearly show the different segments of the MDQ product so that customers understand the pricing.
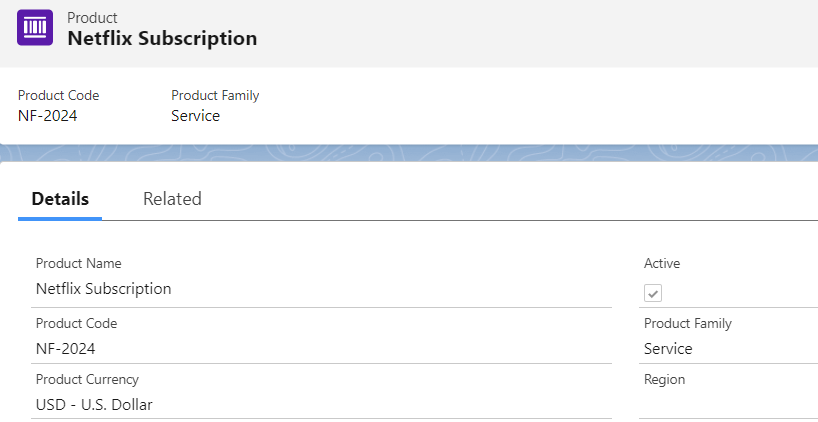
Step 1: Configure a subscription product in your CPQ org. 👇
Go to Product tab —> New —> Fill details
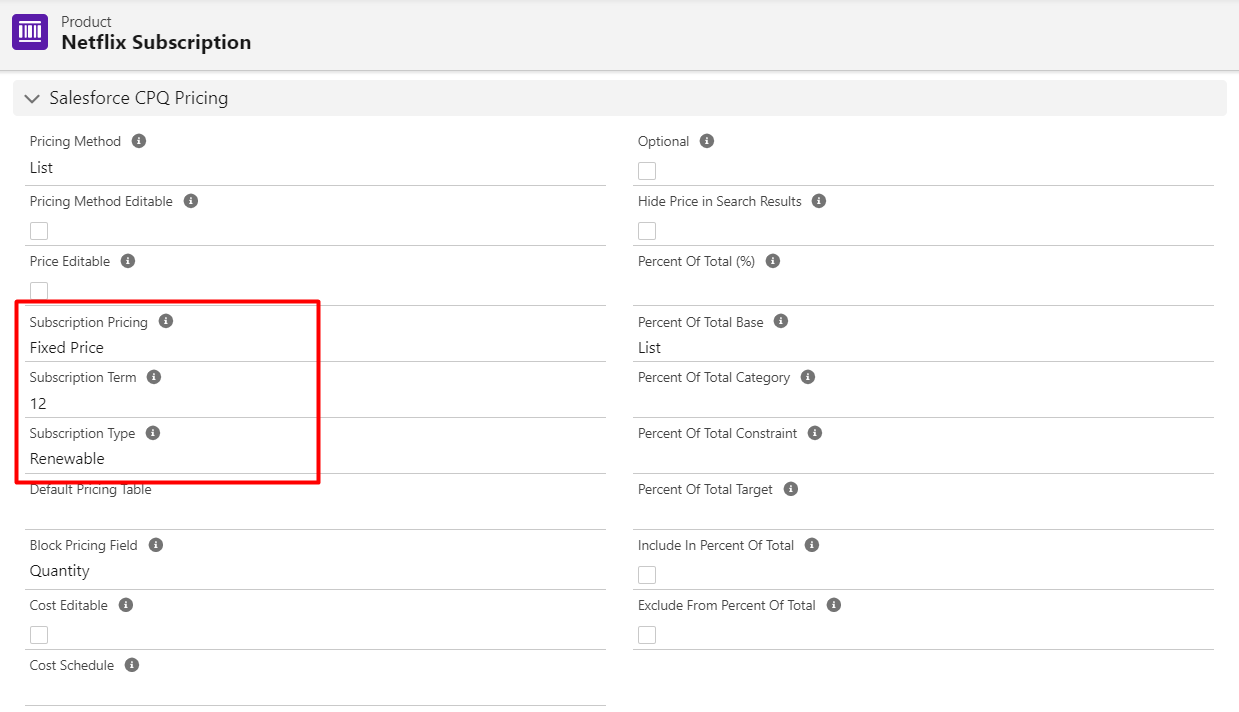
To make product a subscription product need to fill fields- ‘Subscription Pricing’, ‘Subscription Term’ and ‘Subscription Type’
In the below example I have set up a subscription product with price dimensions quarterly and one time.
Lorem ipsum dolor sit amet, consectetur adipiscing elit. Ut elit tellus, luctus nec ullamcorper mattis, pulvinar dapibus leo.
Step 2: Add the product to the price book. 👇

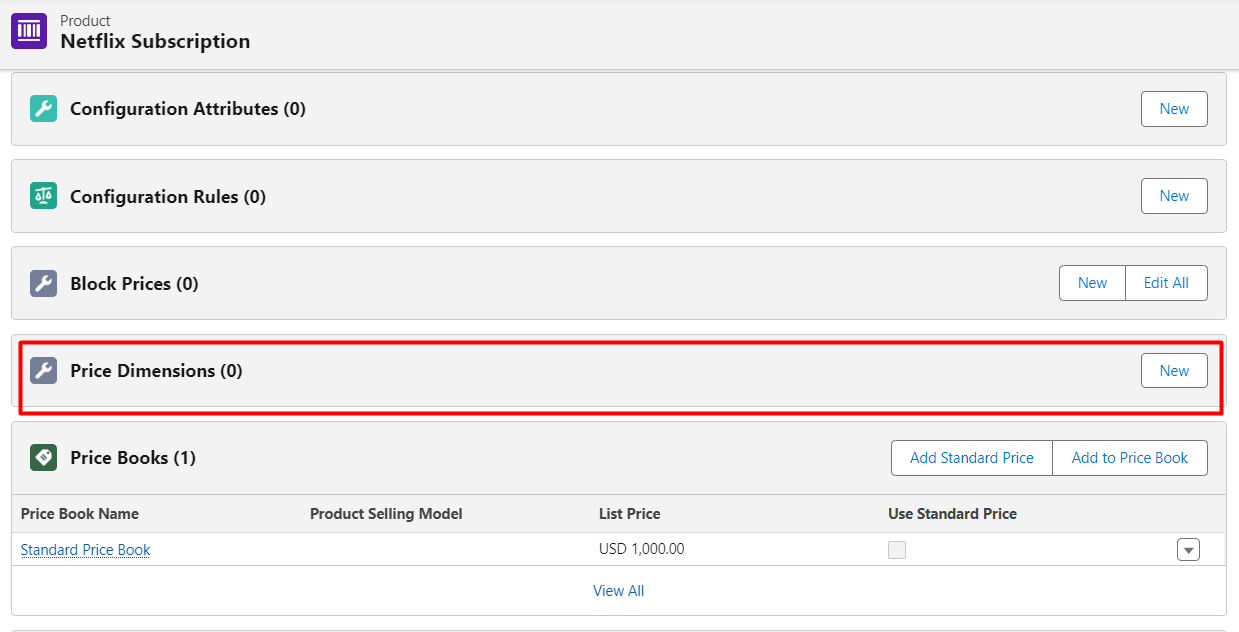
Step 3: In the next step, you need to create a price dimension for the product. 👇
Product Record —> Related Tab —> Price Dimension —> New
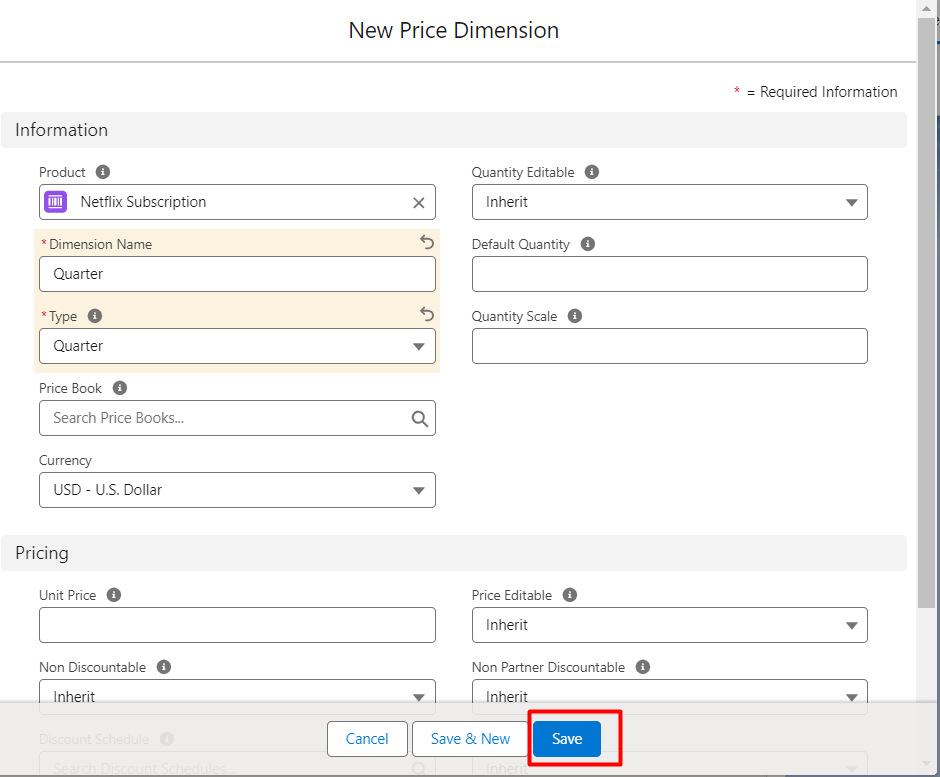
Step 4: Fill in the details as per your requirement. For instance, I have created a dimension for quarterly. 👇
Step 5: Now it’s time to test how this dimension is working on QLE. 👇
Quote —> Edit Lines —> Add Product —> Select new created product —> Select
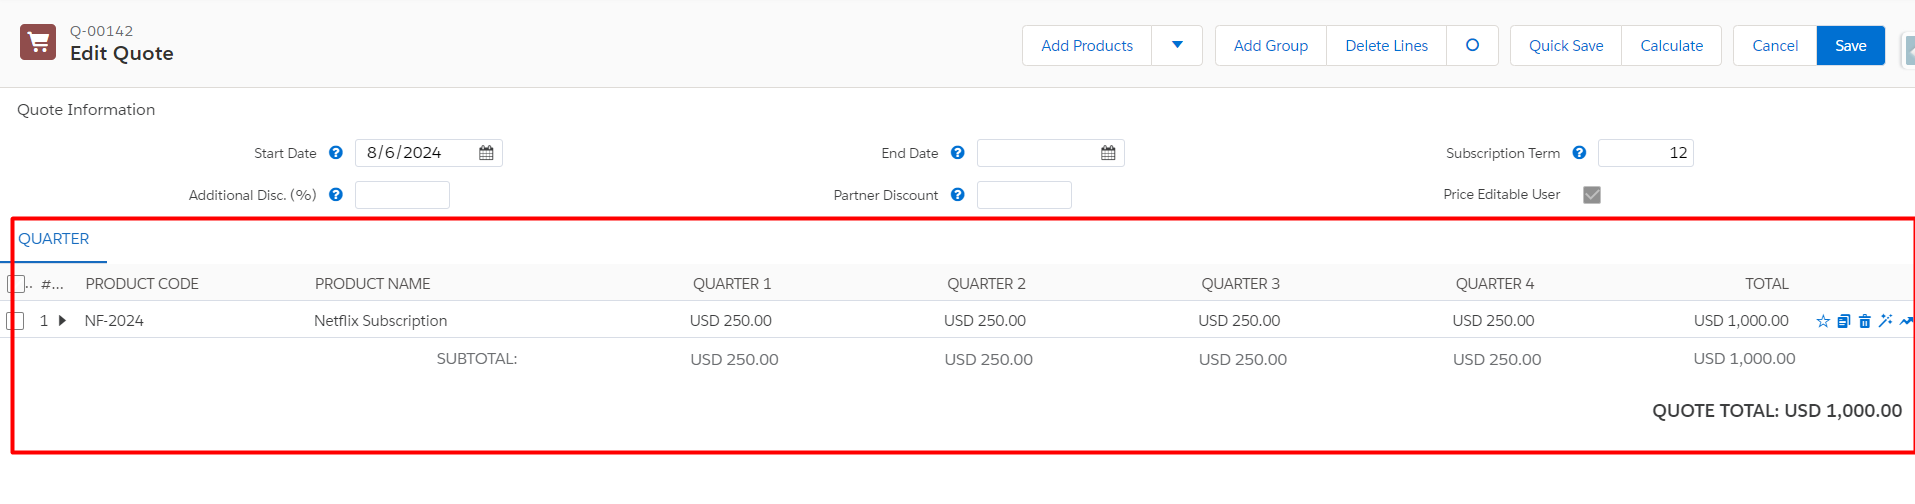
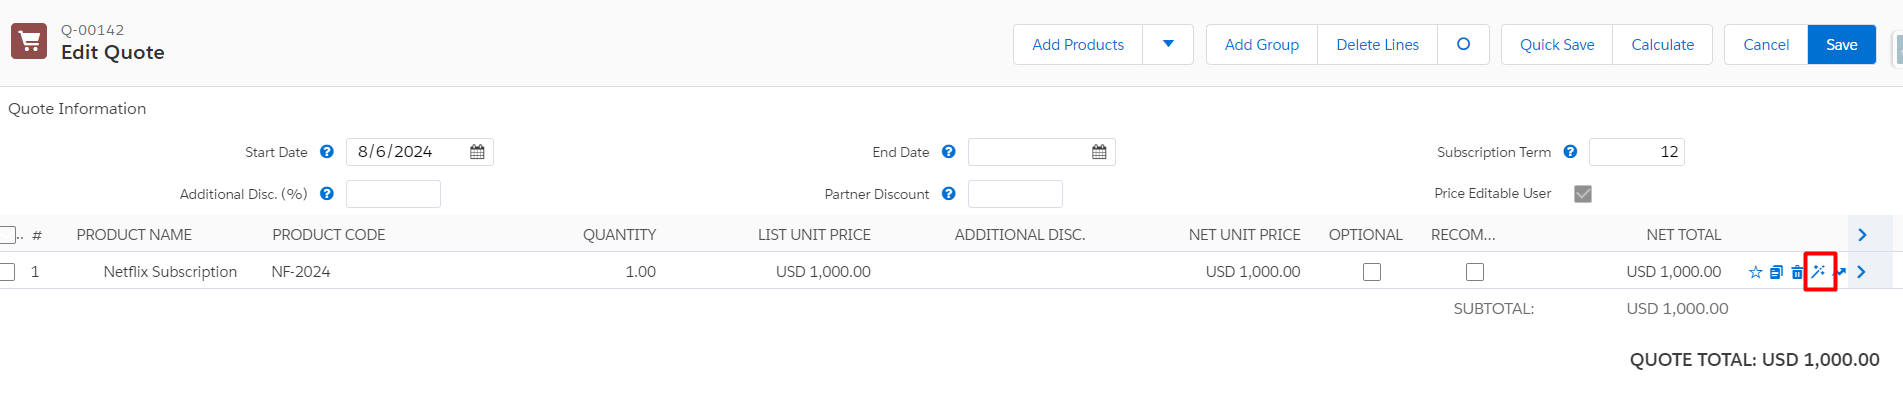
To disaggregate the lines, you need to click on the icon available on the right side of the quote line in order to make further changes.
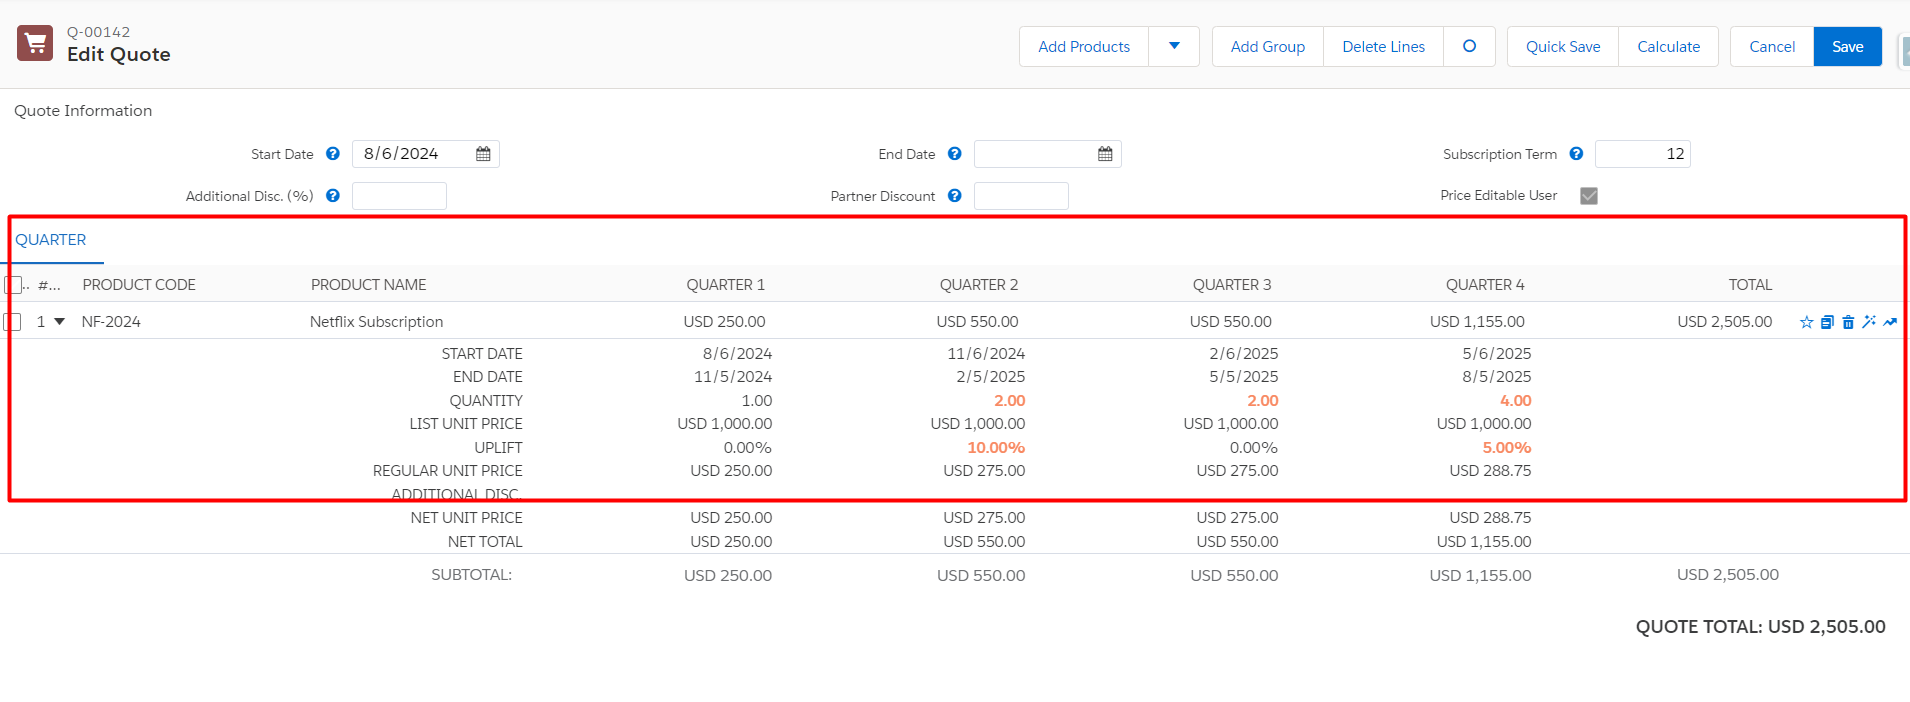
In the screenshot provided above, you can see that the product price is divided into 4 quarters, and each quarter has its own start & end date, quantity, uplift, and additional discount.
From here, you can simply change the values for any particular quarter, and by clicking on the “calculate” button, you will get the pricing accordingly.
If we increase/decrease the Subscription term value the quarter segment will update accordingly.
Now let’s add a standard product in this and see how it appears.
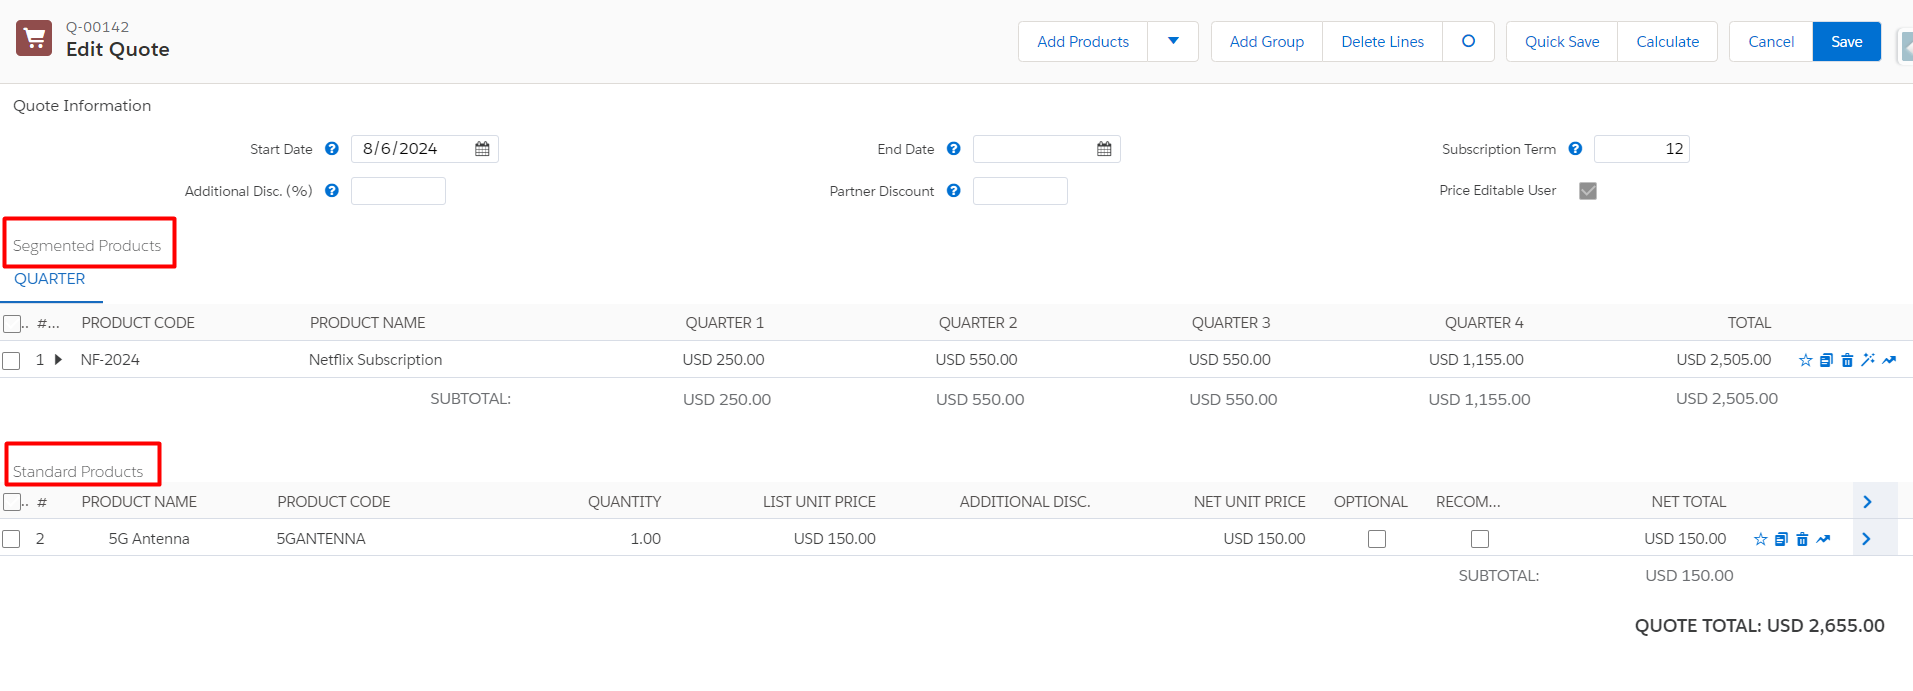
As you can see in the above image, both products are divided into Segmented products and Standard products section.
💡 Segmented vs. Standard Products
MDQ Products are displayed in a segmented, matrix format by default within the Segment Products table on the Quote Line Editor. In contrast, other subscription products appear in the Standard Products section.
You can switch between these sections to view different product types. Each segment of an MDQ product is represented as an individual quote line. For example, if you have an MDQ product with four yearly segments and one standard subscription product, your quote will contain five separate quote lines. MDQ products can also be represented in the same multi-dimensional matrix format on Quote Line Templates in Salesforce.
Now, let’s suppose we have segmented our product quarterly; however, we have a one-time Installment fee for the product. So, we can create another dimension record in the same product with Type one-time.
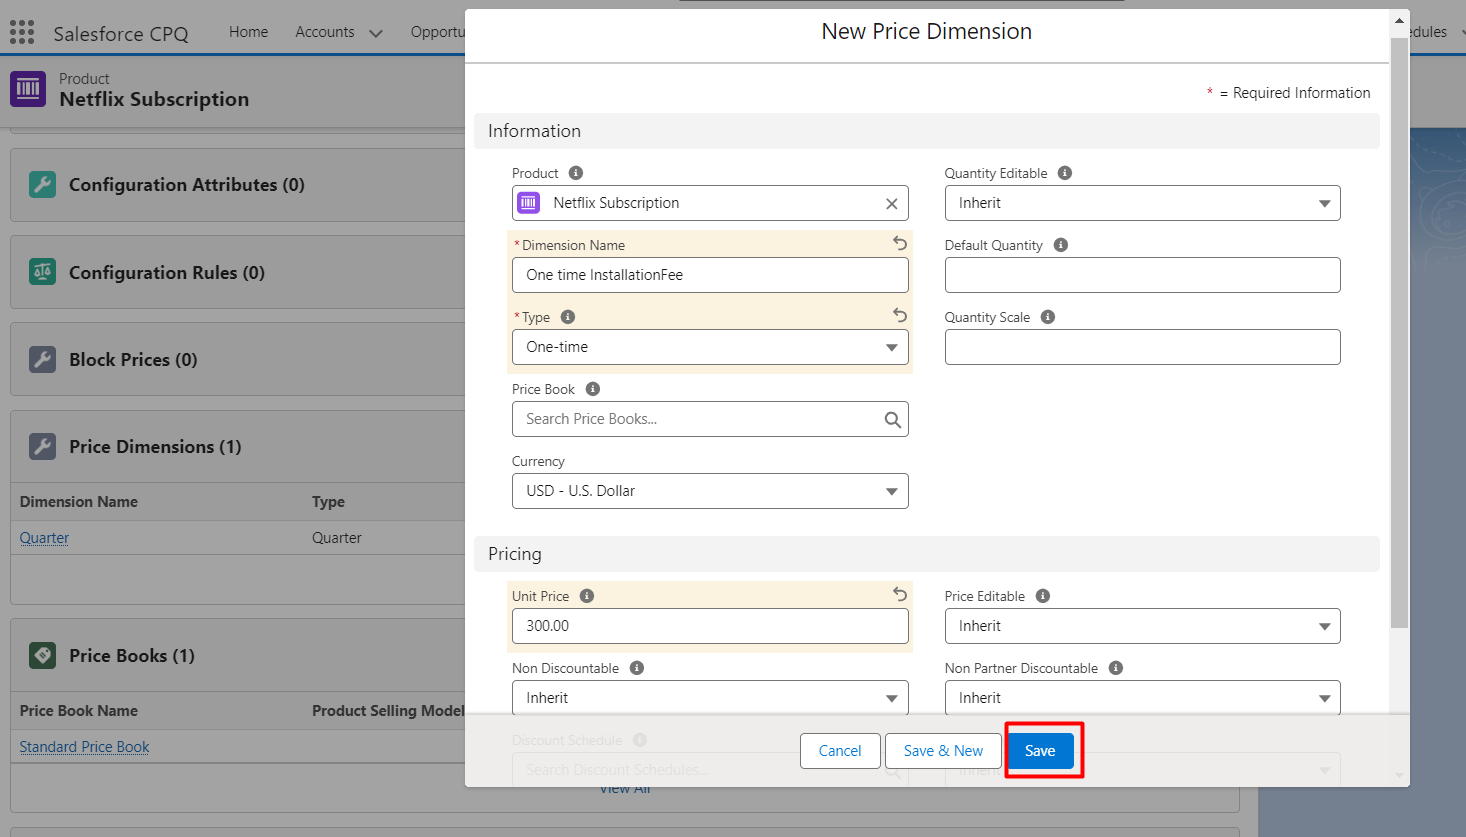
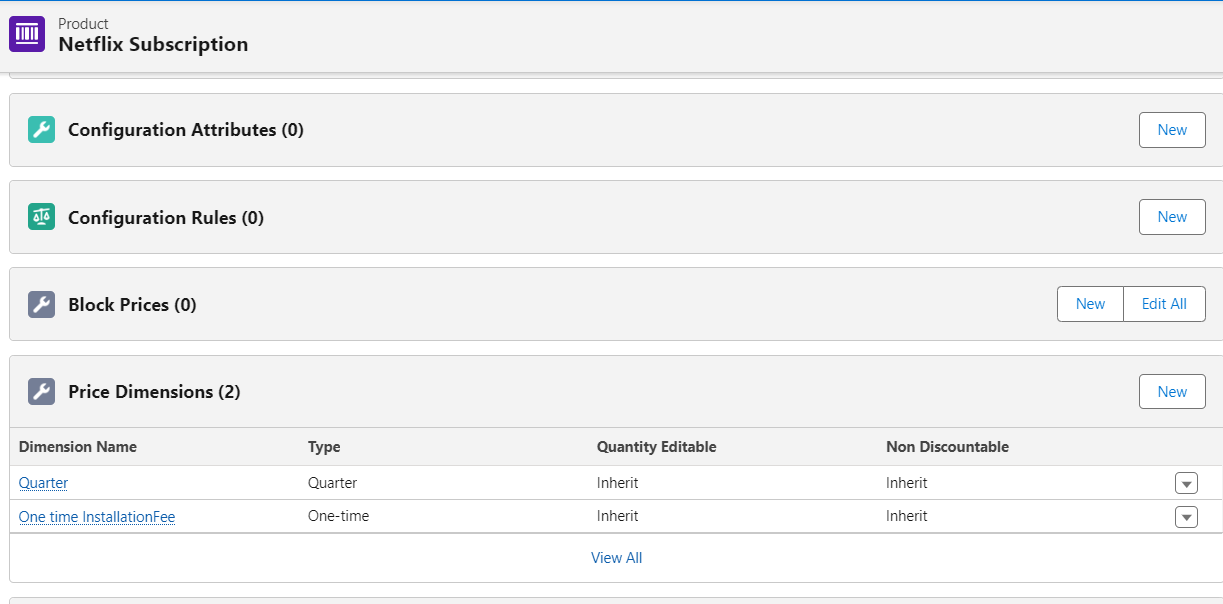
In the below image, we can see how it will appear in QLE. 👇
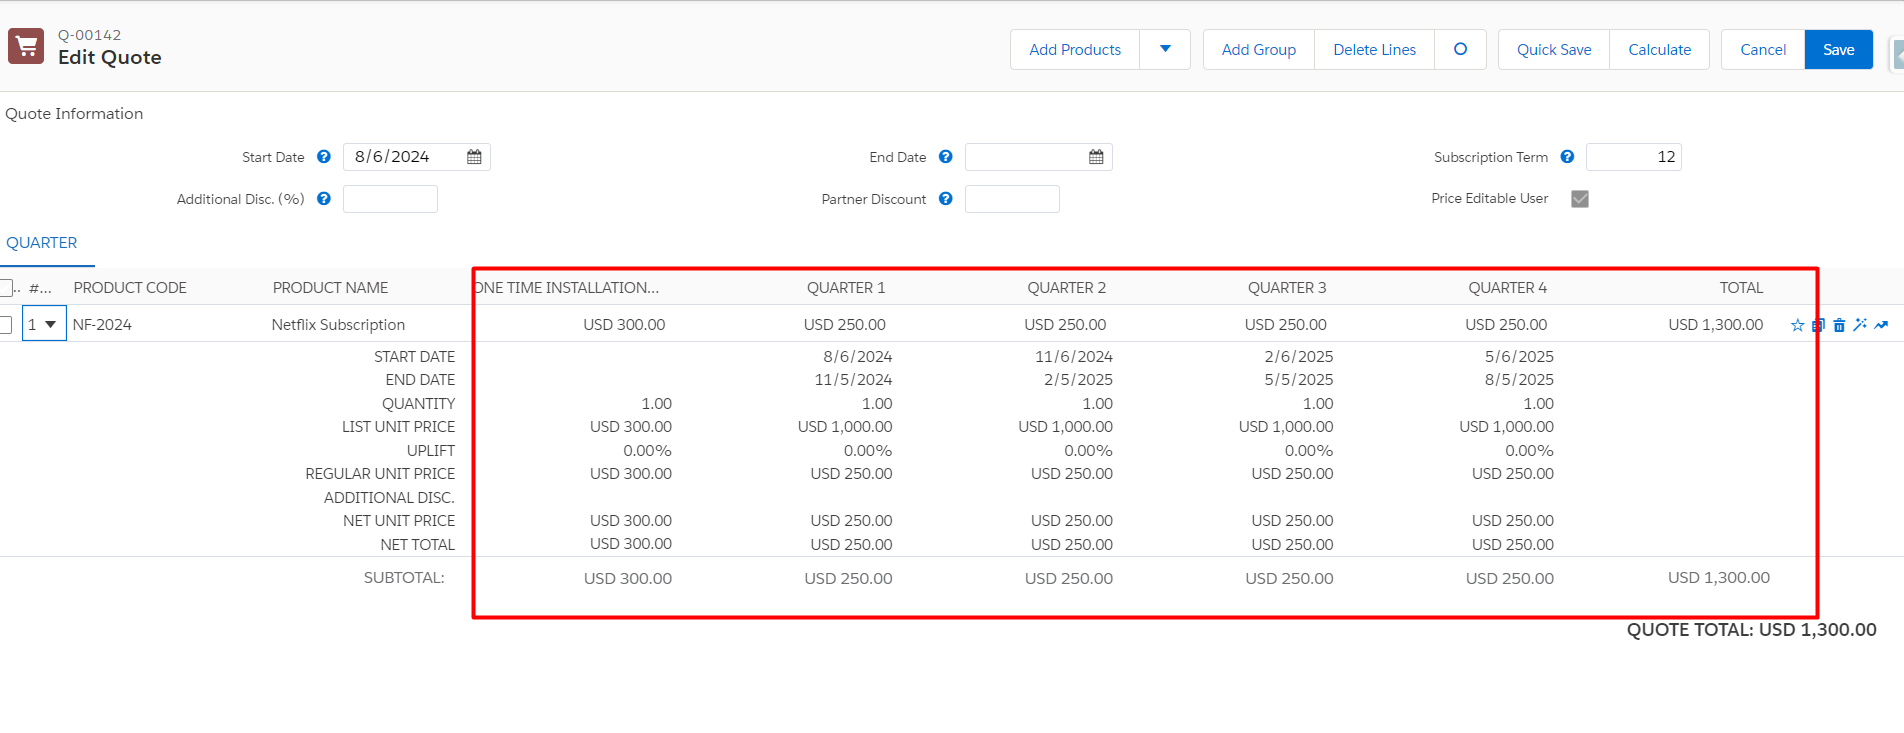
You cannot have multiple time-based Dimensions for the same Product.

Let’s try an example with a Custom dimension type:
Step 1: Configure a subscription product
Step 2: Create a record of Price dimension with Custom type
In the below example, I have created a new subscription product.
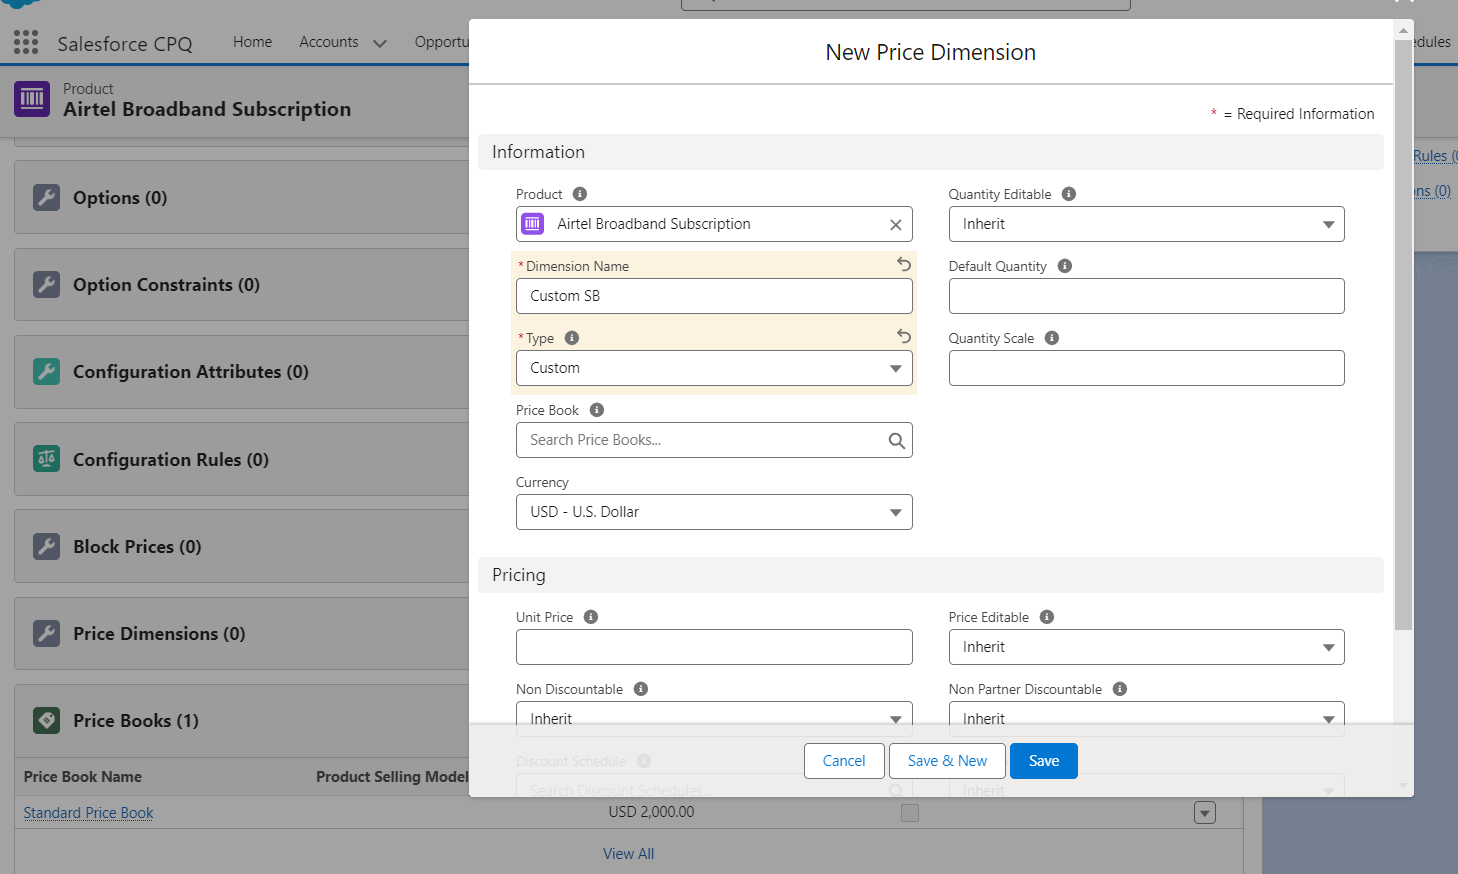
Now, add this product with custom price dimensions in the quote. In the below image when this product new tab of Custom is created next to the Quarter tab. 👇
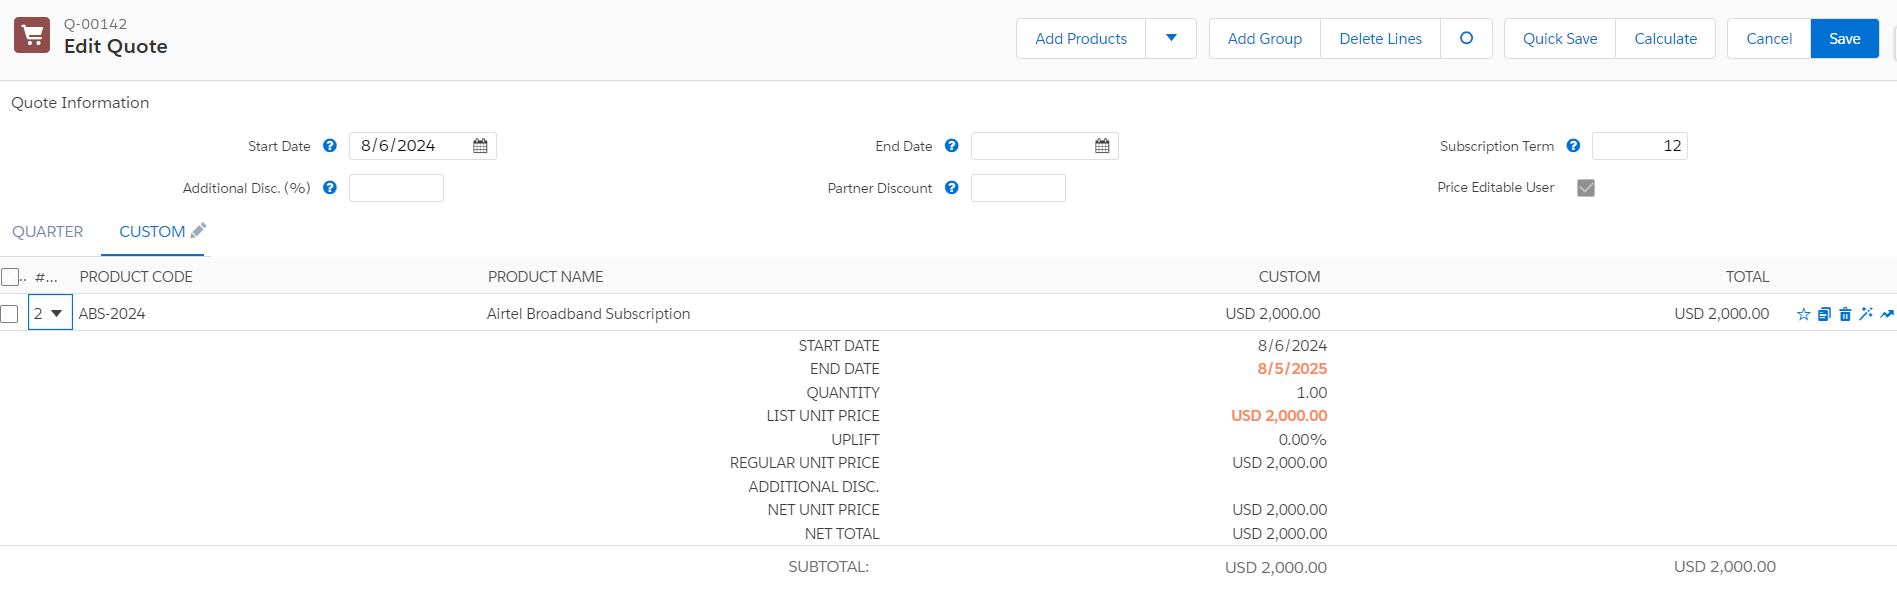
Now, check how we customized this tab.
Click on the pencil icon next to the custom tab —> Custom Segments will open —> Divide it into as many segments based on your requirement.
Keep end date of first segment sync with start date of second segment
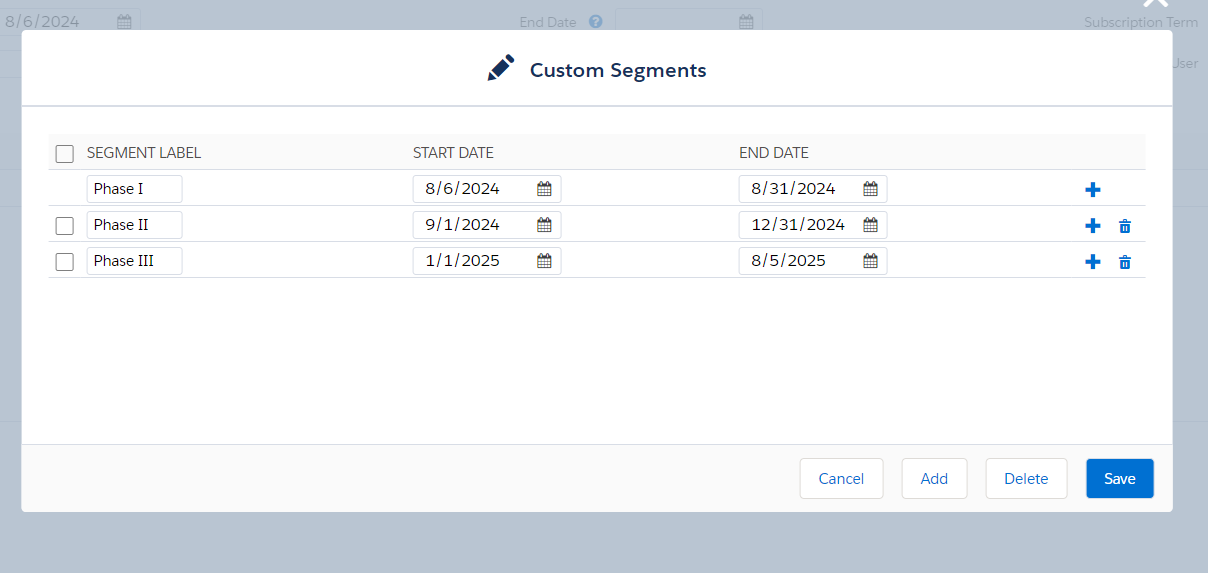
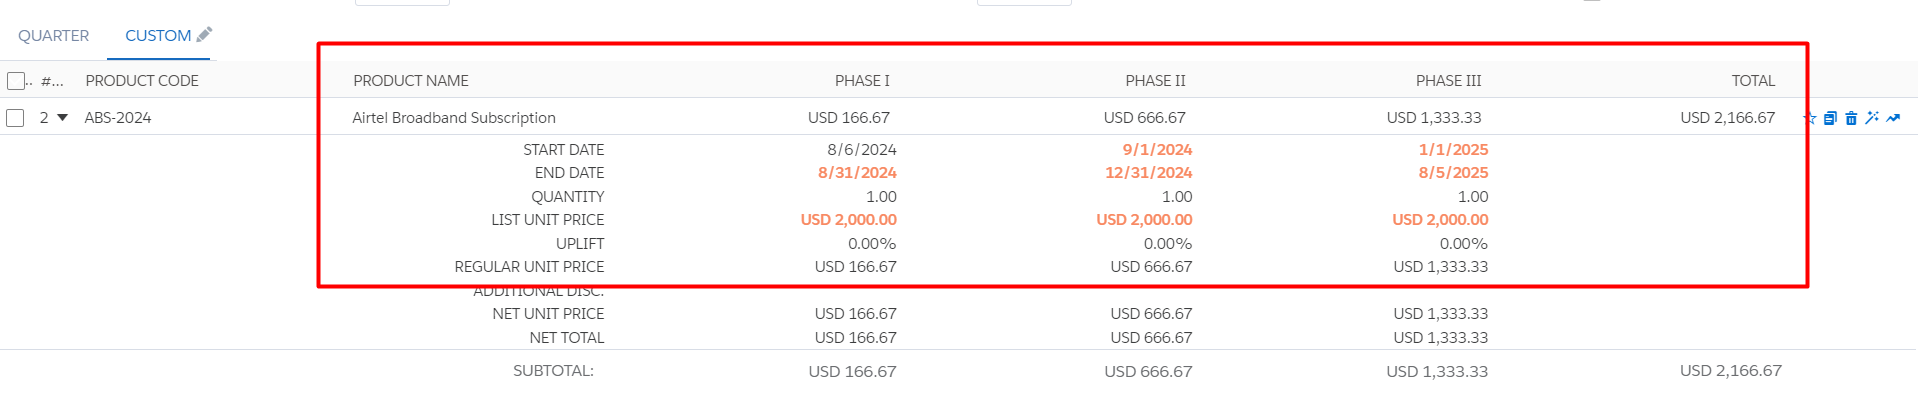
Now finally these custom segments will appear in the quote line editor like the below image. 👇
Conclusion
MDQ products in Salesforce CPQ offer a powerful way to create detailed and flexible quotes for complex products.
By breaking down products into multiple dimensions, sales teams can tailor their pricing strategies to meet the specific needs of each customer. With the right setup and training, MDQ can help your business close more deals and improve customer satisfaction.
Implementing MDQ in Salesforce CPQ might require some initial effort, but the benefits it brings to your quoting process are well worth it. By following the steps outlined in this guide, you’ll be well on your way to mastering MDQ products and delivering more precise, effective quotes to your customers.
Now, it’s time to try it yourself in your org. Happy Learning!
Stay tuned for more recent updates!